Create a knowledge base collection
About adding knowledge base collections
To see the collections in the global knowledge base, browse the collections available in the WorldCat knowledge base (updated monthly). Alternatively, perform a search in Collection Manager to return all available collections. Select All Collections from the Scope drop-down and click Search.
For some collections, OCLC and your provider can automatically add and maintain your library-specific collection data. See Providers and contacts for Automatic Holdings Feeds for more information.
Caution: Once you have requested to have your collections selected automatically, do not add, delete, or update any of the titles within the collection. If there is an issue with the titles selected or missing from your collection, please contact OCLC Support with examples.
For other methods to add knowledge base collections, see Choose a method to add or create a knowledge base collection.
Watch a video
Select and edit WorldCat knowledge base collections
Run time: 9:38
This video demonstrates how to use the WorldShare Collection Manager interface to select and edit WorldCat knowledge base collections, as well as edit these collections using KBART files.
Create a knowledge base collection
You have two options for adding titles to your collection. Follow the instructions to Create a collection and and to Navigate to the collection you created. Then follow the steps to Add titles using a KBART file upload or to Add title one-by-one in the interface.
Create a collection
- Sign in to the WorldShare interface at your library's WorldShare URL. Replace yourlibrary with your library's identifier: https://yourlibrary.share.worldcat.org/wms
- Navigate to Metadata (or Licenses)> Collection Manager.
- Click Create a Collection and select Knowledge Base Collection from the Collection Type drop-down.
- Click Create.
- Open the Properties accordion for a new collection:
- Enter a Collection Name.
- A Collection ID will be generated automatically.
- You have the option to customize this ID but the value must remain unique among collections.
- Optional. Enter a Provider.
- When you create a knowledge base collection, you have the option to complete the field for Provider. If your provider is not already in the WorldCat knowledge base, you can create a custom provider so that the provider will be available in your local knowledge base. Your custom provider (for example, "My University") will be searchable content in Collection Manager. You will be able to sort this provider among the other WorldCat knowledge base providers when you elevate links from a specific provider for WorldCat Discovery.
Note: Create local collections per provider for linking consistency. Including titles from multiple providers in a single locally created collection is not recommended.
- When you create a knowledge base collection, you have the option to complete the field for Provider. If your provider is not already in the WorldCat knowledge base, you can create a custom provider so that the provider will be available in your local knowledge base. Your custom provider (for example, "My University") will be searchable content in Collection Manager. You will be able to sort this provider among the other WorldCat knowledge base providers when you elevate links from a specific provider for WorldCat Discovery.
- Optional. Enter a Description, select Attributes, or enter Public or Staff Notes.
- Click Create.
Navigate to the collection you created
- Navigate to the Collection Manager search box.
- Select My Selected Collections as the Scope and click Search.
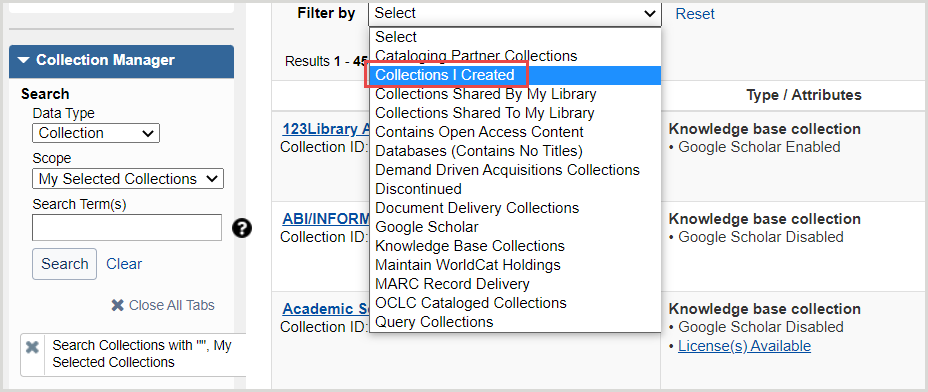
- Use the Filter drop-down list at the top of the screen to narrow your search results. Choose:
- Collections I created

- Collections I created
Option 1: Add titles using a KBART file upload
Learn more in a training course: Use KBART files to edit WorldCat knowledge base collections
Download a KBART-formatted template
- Navigate to the collection you created, click on the name of your collection in the search results to open your collection.
- Use the Collection Actions drop-down list to select Download Titles in This Collection. Alternatively, use the KBART template.
- If you select My Selected Collections, the file will not be immediately available. A Download here link appears on the collection when the file is ready.
Open your .txt file as a KBART spreadsheet
Enter KBART title data
You are not required to fill in every column in the KBART spreadsheet. The values needed depend on the format of the collection you are creating. You have two options to enter title data.
Option A: Use "Autofill"
You can add OCLC numbers to a KBART formatted spreadsheet to have the system populate some of the title data fields. Afterward, you will need to enter your coverage information and Title URLs. For instructions, see KBART values and formatting, "Autofill" values.
Option B: Enter title data
You can fill in the recommended title data and include your coverage information and Title URLs. For instructions and details about the data values that are required, see KBART values and formatting, Recommended values by format.
Make sure to:
- Use the correct format for dates. See how to Represent coverage information and Use the correct date format
- Include the Collection ID in the oclc_collection_id column of your KBART file. The Collection ID in your file must match that in the collection you created in order for the titles to upload to your collection properly
- Include a unique numerical value for each title in the oclc_entry_id column
- Add a value to each title row of the ACTION column: Use the value "raw"
See the KBART ACTION column values for more information.
Save your file
Upload your file
- Search for the collection you created. Click on the name of your collection in the search results to open your collection.
- See Navigate to the collection you created, above, if you need help
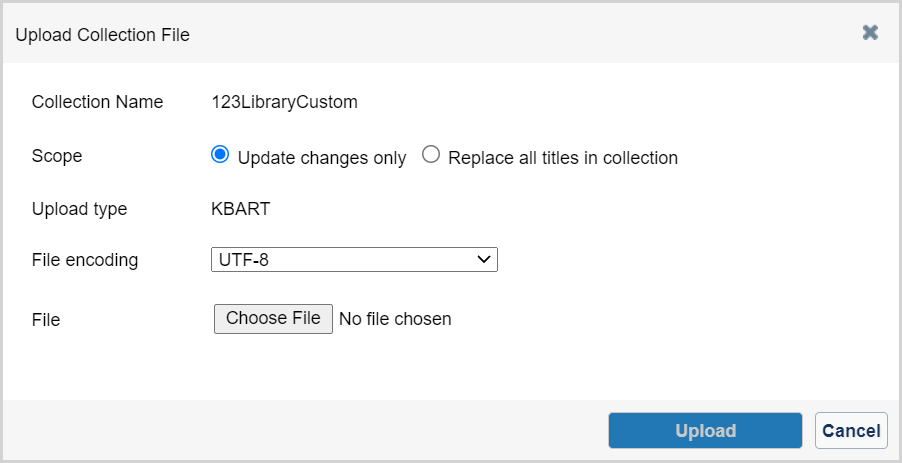
- Use the Collection Actions drop-down list to select Upload Titles to This Collection.
- In the Upload Collection File box, choose the Scope of your file:
- Update changes only (default)
Choosing "Update changes only" causes the system to look only for changes in the file and to use the specified ACTION value to determine how to process the changes. Choose this option if:- You are creating a collection for the first time
- You have made changes to title data and are using the "overlay" or "covoverlay" ACTION value
- Replace all titles in collection
Choosing "Replace all titles in collection" will cause the system to delete or deselect any existing title selections in the collection and replace them with the information in the new file you are uploading. Choose this option if:- You are using a file to delete or deselect titles from a collection

- You are using a file to delete or deselect titles from a collection
- Update changes only (default)
- Choose an upload File encoding
- Leave the default File encoding UTF-8 unless you need to change it. If your collection data includes Non-Latin/Non-Roman characters, use the File encoding drop-down list to change the default selection to UTF-16LE (Unicode Text/Excel).
The following options are available:- UTF-8
- ISO-88591 (LATIN-1)
- UTF-16LE (Unicode Text/Excel)
- Leave the default File encoding UTF-8 unless you need to change it. If your collection data includes Non-Latin/Non-Roman characters, use the File encoding drop-down list to change the default selection to UTF-16LE (Unicode Text/Excel).
- Browse for and select your .txt file and click Upload.
- When the upload has finished processing, preview the report and decide whether to approve the KBART upload or discard it and start again.
- The upload preview will be available for 72 hours from the generation date.
- The collection will then be locked for re-indexing until your changes have had time to process.
Excel files (.xls) and (.xlsx) will NOT upload correctly. Your file should be saved as a (.txt) tab delimited text file, Unicode Text .txt.
View the status of your file upload
Note: When reporting problems, include your Registry ID and attach the file you attempted to upload. If possible, include proxy credentials that will allow us to access full-text links. Your information is needed to diagnose and resolve certain issues.
After you upload a knowledge base collection in Collection Manager, you can check the status of your file upload by opening the Collection History accordion within the collection. Alternatively, you can view your institution's history in your institution Activity History. See Activity History for instructions and details about Activity History detailed reports.
Option 2: Add titles one-by-one in the interface
Learn more in a training course: Edit WorldCat knowledge base collections with user interface
Add a title
- After you Navigate to the collection you created, click on the name of your collection in the search results to open your collection.
- Expand the Titles accordion.
For more information, see Title-level settings in knowledge base collections.
Request OCLC create a link scheme for your collection (optional)
Link schemes are needed in order for articles to resolve to full text. Regardless of how the collection is created (one title at a time or via file upload) you need a link scheme for e-journal collections to resolve to full-text for articles. Without a link scheme, article citations will link to the journal’s homepage instead of the article.
OCLC can create a link scheme for you, but only if:
- All titles are on the same platform
- The provider uses consistent structure for their linking syntax, and
- The platform supports article level linking
See Link scheme values and overrides for details.
Make your collection available to other libraries
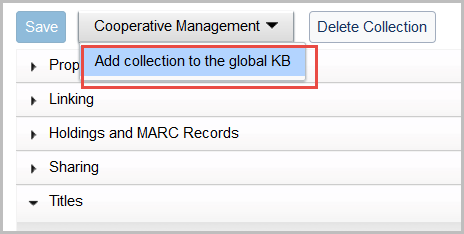
Learn how to add your custom collection to the global WorldCat knowledge base so all other Collection Manager libraries can select and use the collection's title data. See Cooperative management.

Watch a video
Create WorldCat knowledge base collections
Run time: 12:02
This video demonstrates using WorldShare Collection Manager, as well as KBART files, to create knowledge base collections to add your e-journal, e-book collections or print serial collections not found in the global WorldCat knowledge base.


