Collection-level settings in cataloging partner collections
Properties
Collection Name (required)
Enter the collection name of your choice.
Provider (required)
Select a provider from the drop-down list.
Account Number (required; defined by your material provider)
Enter an account number as defined by your material provider. Do not include spaces or white-space characters.
Collection ID (required; coordinate with your material provider)
Enter a collection ID. Do not include spaces or white-space characters.
If your library has more than one collection under a single account number, you will need to create a collection for each collection under that account number. You can use the same account number in multiple collections that you create in Collection Manager, but you must use a unique collection ID for every collection under the account.
The collection ID distinguishes one of your cataloging partner collections from another by fund code, shelf location, branch, or some other unique value. In the case of a single or a general collection, the collection ID is often the same as the account number.
OCLC processes cataloging partner collections by matching what you enter in Collection Manager with the electronic order information, or manifest, that your provider sends at your request. Specifically, Collection Manager uses the account number values and collection ID values to match the collection you create in Collection Manager with the electronic order information your material provider sends.
Collection Manager processes files from all providers in the same way. However, there may be differences per provider for how you choose collection ID values. To avoid potential errors, coordinate with your material provider to ensure that the collection ID value(s) in the manifest they send to OCLC and in the collection(s) you create in Collection Manager are the same.
Description (optional)
Enter a description that will be useful for you or your staff in the future.
WorldCat Holdings
Maintain WorldCat Holdings
Use this setting to disable holdings for a specific collection after you have enabled the institution-level setting in Institution Settings > WorldCat Holdings.
To disable setting holdings:
- Choose Disable for this collection from the options:
- Use institution setting (once the institution-level setting is enabled, this is the default selection)
- Disable for this collection
Select the default audience level for knowledge base collections. From the Holding Audience Level drop-down, select one of the following options:
- Use institution setting (default): Refer to WorldCat Holdings for information about the institution setting.
- Override: Select from one of the following for the collection.
- All Users: Display to everyone using WorldCat.
- My Library Users: Display to everyone within my instance of WorldCat Discovery
- My Authenticated Users: Display to library staff and users who have logged in with their WorldCat Discovery credentials or are recognized by IP address
- My Library staff: Display to library staff in the WorldShare user interface and when authenticated as staff in WorldCat Discovery
Delay Holdings
Use this setting to delay setting holdings in WorldCat. A delay is often set by libraries using shelf-ready options from their provider.
To delay settings holdings:
- Select Delay holdings by [up to 180] days.
- Choose the number of days for which you would like to delay setting holdings in WorldCat.
MARC Records
Options you defined in Collection Manager > Institution Settings apply across your collections. Some of the record customizations you made in your institution-level settings can be overridden per collection. If you need to review your settings, navigate to Metadata > Collection Manager > Institution Settings > MARC Records.
Note: Cataloging partner collections must be enabled for MARC record delivery to ensure files of records and labels are delivered.
Enable MARC Record Delivery
The collection-level MARC record delivery options will not be available until you enable MARC record delivery in the institution settings.
- Use institution setting: [Your institution settings will be displayed here]
- Disable for this collection (default)
After you enable record delivery in the collection, you will see the following tabs of settings:
- Customize Records
- Record Delivery
Note: To enable MARC record delivery for multiple cataloging collections at one time, see Enable MARC record delivery for multiple collections.
Customize Records
Holding Library Code (049 $a)
- Use institution setting (default)
- Override
- Enter the holding library code that you want to override the institution holding library code
Copy Call Number
If you configured your record settings in the Customize Records tab to include call numbers (by adding the "Copy Call Numbers" value), you can override the call number to meet the needs of a specific collection. Values will be overridden only if the specified tag is currently mapped in your institution settings. In other words, use the same tag as you used in Customize Records.
- Use institution setting (default)
- Override (in case you have a collection that's different)
- Tag: Enter a tag. Override values will be used instead of your institution settings for the tag specified
- From: Choose from where you would like the copy call number to come: 050 (LC), 055 (Canada classification number), and so forth
- Format: Choose the format you would like in your records
- Spacing: Choose the spacing you would like in your records
See Guidelines for call number selection when there are multiples of the same call number in the record for the order of call number selection for cataloging partner collection labels.
MARC Custom Text
If you mapped custom text to your records in the Customize Records tab, add collection-level text in the corresponding field(s).

If desired, use the Define Custom Text Labels button to change the text label from "Custom Text 1" to something more meaningful. See Collection Custom Text for more information.
Record Delivery
Delivery File Output
Configure the settings that determine if records for this collection are output in a separate file.
Deliver records in the default provider files (default)
- Example: metacoll.XXX.wcp.provider.D20150825.T240542.1.mrc
Customize delivery
- Deliver my firm and approval records in separate files by provider
-
Example: metacoll.XXX.wcp.FIRM.provider.D20160214.T210512.1.mrc
-
Example: metacoll.XXX.wcp.APPR.provider.D20160214.T210512.1.mrc
- Deliver records for this collection in a separate file - If you choose this option, a field will open for you to type a unique file name for that collection.
-
Example: metacoll.XXX.wcp.provider.D20160214.T210512.YourFileName.1.mrc
For more information on file names, see Files of records and file names.
Limit Output By
Limiting your output by Encoding Level(s) and/or by Cataloging Source(s) will allow you to choose acceptable sources for record delivery.
If the Collection Manager match for the title is not an acceptable cataloging source per the criteria you selected, it will result in one of the following:
- No item delivered, or
- Delivery of a partnering data record (PDR), if you enabled PDR delivery in Institution Settings > MARC Records > Cataloging Partner Options.
Labels will be delivered whether the item is delivered or not, if you enable label functionality within a collection's label settings.
Encoding Level(s)
Choose which encoding level(s) are acceptable to deliver as a match. This option can be used in conjunction with the Cataloging Source(s) option or used alone.
- Use all encoding levels (default)
- Select encoding level(s)
- Once enabled, the drop-down list displays the following selections. Select one or more of the following options:
- CIP (8)
- Full (Blank, 1, 4, I)
- Not Full (7, 5, 2, K, M)
- Other (3)
- Once enabled, the drop-down list displays the following selections. Select one or more of the following options:
To find more details on encoding levels with full explanations, see Bibliographic Formats & Standards > ELvl: Encoding Level.
Cataloging Source(s)
Choose which cataloging source(s) are acceptable to deliver as a match.
- Use all cataloging sources (default)
- Select cataloging source(s)
Once enabled, the drop-down list displays the following selections:
LC (Library of Congress)
-
040 $a contains DLC either alone or in combination with another symbol (e.g., DGPO/DLC, DLC/followed by another symbol, DLC followed by anything else, or /DLC at the end of subfield $a)
-
040 $c contains DLC
-
Cataloging Source (Srce) is c
-
042 $a contains lcderive, lccopycat, lccopycat-nm, lcode, lcnccp, premarc,lcac, lc, lcd, msc, nsdp or nst
NLM (National Library of Medicine)
-
040 $a contains NLM
UKM (British Library)
Other (member and national libraries)
-
All valid codes in Srce 040 or 042 that do not fall under the above definitions of DLC, NLM or UKM
To find more details on cataloging sources with full explanations, see Bibliographic Formats & Standards > Srce: Cataloging Source.
Labels
Use these label settings to enable and customize spine labels or pocket labels to deliver spine labels to you or to your provider at the time records are delivered to your library. If you do not need labels, please proceed to the next set of settings.
Because label options are available in each cataloging partner collection you create, you can select a specific type of call number for each collection. For example, you can select the NAL call number for your agricultural campus's collection and provide specific location text for the collection. You can have different requirements for labels for items from other collections.
Enable Labels
Collection Manager can create labels for cataloging partner collections. To enable label output, choose Yes from the options:
- Yes
- No (Default)
Deliver To
Label processing varies by provider. You can choose to have the file of labels delivered to your library along with your records. OCLC can supply labels directly to your library as a service included with your cataloging subscription. Alternatively, you can choose to have the file delivered to your provider.
Libraries who use shelf-ready options with a provider typically choose to have labels delivered to their provider. Choose from the options:
- Library
- Provider (Default)
Format
Choose a format for printing labels:
- slb (Spine Label B): 1 spine label and 1, 4-line pocket label
- sl6 (Spine Label 6): 1 spine label and 2, 6-line pocket labels
- sl4 (Spine Label 4): 1 spine label and 2, 4-line pocket labels
Class Scheme
Choose one:
- Dewey
- LC
- NAL
- NLC
- NLM
- SUDOCS
Once you select the class, configure the following options that are relevant to you:
Additional information
About title truncation for pocket labels
For pocket labels, the printed line limit for the title is 2 lines of 28-characters each. The system uses the following process to determine where to split the title into 2 lines:
- Fills up to 28 spaces available for the first line with the title, including characters and spaces between words.
- Moves back to the first space it finds and breaks the title.
- If no space is found, it moves back to within 4 characters of the beginning of the title and breaks the title.
Placeholder labels
If Collection Manager cannot create a label, a placeholder label with the text "No Label" is created. You can receive a placeholder label when:
- The bibliographic record has no call number
- The bibliographic record also has an alternative call number, for example, multiple subfields ($a) in field 050, 060, 090, 096
- The provider data or user-identified data exceed the call number printing line limit:
- 9 for Spine Label B (slb)
- 15 for Spine Label 6 (sl6)
- 9 for Spine Label 4 (sl4)
Record and label retrieval
If you chose to have labels output for titles in a cataloging partner collection, you will receive a file of labels if you also chose to have the files come to you rather than to your provider. Follow the process to download your records from the WorldShare interface, Metadata tab, My Files area. See Download files in My Files for more information.
- Example label file: metacoll.wcp.[XXX].lbl.[provider].D20160214.T210512
Follow the process to download your records from the WorldShare interface, Metadata tab, My Files area. See Download files in My Files for more information.
Dewey Call Numbers
Configure the options within each collection for adding Dewey numbers, if desired. Configuring Dewey Call Number options is not required. The need to include Dewey numbers depends on how you order with your provider. To enable the functionality, simply configure the settings.
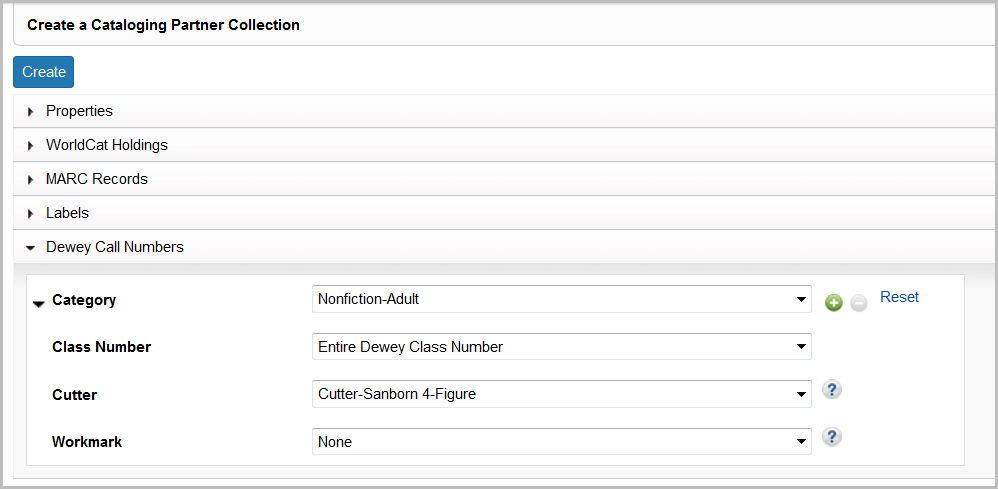
Category
Choose one of the following. You can add another row by using the add button (+) in the interface.
You can add a single category or six categories for a single collection. If you enable all six Dewey number types when you create a collection, you will get only a single Dewey number type in each record because a single WorldCat record would not include multiple types of Dewey numbers.
- Biography-Adult
- Biography-Juvenile
- Fiction-Adult
- Fiction-Juvenile
- Nonfiction-Adult
- Nonfiction-Juvenile
Class number
Depending on the category you chose, you will have some of the options below. Choose from the relevant options:
- Biography type codes: B, Bio, BIO, Biog, BIOG, Other
- Fiction-Adult type codes: F, Fic, FIC, Other
- Fiction-Juvenile type codes: j, J, juv, JUV, JUV FIC, YA, Other
Choose the portion of a Dewey classification number used in a local call number:
- Entire Dewey class number
- First three numbers (up to the decimal point)
- Truncated Dewey class number
- Up to first slash
Cutter
Choose the Dewey Cutter type you use for your local call number.
- Cutter 4-figure
- Cutter-Sanborn 4-figure
- No Cutter
- Text Cutter
Text Cutter
The text Cutter is the first 1-15 characters of the first significant word of the main entry (or for biographies, the first word of the first 600 field). The OCLC label formats support up to 8 characters per line. Customize the text Cutter using the options listed:
Number of characters:
- Choose 1, 2, 3, 4, 5, 6, 7, or 8 (default)
Include punctuation: You can profile to include punctuation or not include punctuation in your text cutter.
- Choose Yes or No (default)
Capitalization: You can also choose the case of the text cutter:
- Uppercase
- Lowercase
- First letter uppercase (default)
Numerals: Choose to use numerals or spell out the numerals into an English word (e.g., "2" or "Two").
- Use numerals (default)
- Change numerals to a word
Workmark
Choose to add a title workmark to your Dewey call number. The first letter of the title in the 245 field is added to the call number at the end of the cutter. Choose the case:
- Existing case (Keep as in record)
- Lowercase
- Uppercase
Use 920 for Collective Biographies
Select from the options:
- Yes
- No
Juvenile prefixes
- Biography-Juvenile prefix: None, j, J, juv, JUV, JUV, YA, Other
- Nonfiction-Juvenile prefix: None, j, J, juv, JUV, JUV, YA, Other
Juvenile materials
Collection Manager defines Juvenile materials as follows:
- If fixed field Audn contains values a, b, c, d, or j
- If another code appears in field Audn, but field 082 contains E
- If any 6xx field has a second indicator 1 or a subfield $v containing Juvenile literature
Use E in place of Juvenile fiction text
Select from the options:
- Yes
- No
If the 082 field in the matched MARC record contains E, place an E in the 092 field instead of the Juvenile Fiction text for titles that are coded as Juvenile Fiction.
- Example: 092 E $b Adams
Call number text
Edit the call number text.
Collection History
See Collection History in Cataloging partner collections for more information.