Learner guide: Lending workflows
Course overview
This course provides the basic skills needed to respond to lending requests in Tipasa. After completing this course, you will be able to decide how your library will use lending priorities and advanced lending workflows (verifying, retrieving, scanning, and packaging), and process lending requests for loans and copies in Can You Supply and Lending Priorities queues. This includes printing pull slips/packing slips with your call number, printing shipping labels for loan requests, and transmitting scanned copies via Article Exchange.
Course evaluation
Your feedback is important to us . After completing this course, please answer a brief survey to contribute your feedback on this session.
Real-time availability and automatic holdings lookup
Real-time availability for loan requests is available for most ILS. This feature connects to your library's local catalog and enables the system to automatically respond No to lending requests that have an OPAC status of unavailable. If the item is available, automatic OPAC lookup, available for most ILS, will populate the Local ID field with branch, location, and call number from your local catalog.
If your library is not already configured for real-time availability and OPAC lookup, complete the form at oc.lc/realtimeill or contact support@oclc.org (or contact Tipasa Implementation via Basecamp if your library is still in the Tipasa implementation phase).
Lending automation
You can use Automated Request Manager (ARM) to apply designated constant data records to new lending requests based on the identity of the borrowing library, the type of request, or the material format being requested. This ensures that lending charges, notes, policies, and addresses are accurately applied to lending requests, saving staff time and ensuring compliance with local policies and preferences. OCLC recommends turning off constant data persistence and instead using ARM to apply constant data. Additionally, you can automatically apply request tags to incoming lending requests.
Suggested uses for Lending Priorities
Consider Lending Priorities if:
- Your library is a member of a consortium
- You need to give priority to in-state requests
- Your library has reciprocal agreements with other libraries
- You want to give special handling to requests from libraries that are on your courier service
Suggested uses for Advanced Lending Workflows
| If your ILL lending or document delivery operation has: | Consider these advanced lending workflows |
|---|---|
| Several full-time staff; several student or part-time workers | Verifying, Retrieving, Scanning, Packaging |
| One full-time staff; several student or part-time workers | Retrieving, Scanning, Packaging |
| One full-time staff; one student or part-time worker | Retrieving |
| One staff member who does all ILL lending activities or document delivery; no student or part-time worker | None |
Things to know about Lending Priorities and Advanced Lending Workflows
- You can configure up to 5 priority lending queues
- Verifying, Retrieving, Scanning, and Packaging queues:
- Requests move between these queues only as the result of staff action
- Moving a request into one of these queues does not stop request aging or change Days to Respond
- These queues are also available in Lending Priorities and Document Delivery, if enabled
Use Advanced Lending Workflows
- Process new lending requests using your regular workflow, incorporating use of the Verifying, Retrieving, Scanning, and Packaging queues as needed.
- You can use one, two, three, or all four of the Verifying, Retrieving, Scanning, and Packaging queues; and you can move requests among these queues in any order needed.
- You can move requests to these minor queues one at a time, or (in queues that support it) using batch response.
- To move an individual request to one of these minor queues, open the Actions menu by clicking the arrow, then click the appropriate Mark as response.
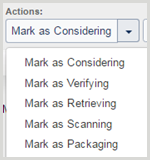
- In queues that support batch response (indicated by
 ). click the appropriate response. For example:

- Add requests to the list to be included in the batch using one of three methods:
- Click the + next to the request
- Scan the request ID barcode
- Type the request ID
- Add requests to the list to be included in the batch using one of three methods:
- To complete the batch response, click the button (for example, Retrieving).

Example lending workflow
At your library you will want to decide on optimal lending workflows based on many factors such as your library’s policies, number of staff and their responsibilities, volume of requests, and even what computer, printer, scanner, and barcode reader hardware is available.
- If your library uses WorldShare Circulation, you can set up integration between Tipasa and Circulation to automatically update loan requests in WorldShare Circulation when you respond Yes or Checked-in/Complete in Tipasa by following this lending workflow.
- If your library uses III Sierra or III Millennium circulation (with an NCIP server provided by Sierra or Millennium), or Ex Libris Alma circulation, you can set up third-party Circulation integration with Tipasa to automatically update loan requests in your circulation system when you respond Yes or Checked-in/Complete in Tipasa by following this
Third-party Circulation integration Lending workflow.
Here is one example workflow that you can modify to fit your needs:
- For each request in a Lending Priorities or Can You Supply queue:
- If your library is configured for OPAC integration (automatic holdings and availability lookup:)
- If you have one holding, the Local ID field should be pre-populated with location and call number. Verify Availability (under Local Holdings).
- If you have more than one holding, click View Local Holdings. Select which holding to use and click the Apply button. This will populate the Local ID field with location and call number.
- If your library is not configured for OPAC integration (automatic holdings and availability lookup):
- Click Search my library's online catalog.
- In your catalog, verify availability (and copy the call number).
- On the request, paste the call number into the Local ID field.
- Add to Bookstrap/Sticker Print Queue.
- Click Mark As Retrieving.
- Click Next Request.
- If appropriate, respond No or Conditional.
- If your library is configured for OPAC integration (automatic holdings and availability lookup:)
- Print the book straps or stickers
- Open Print Queue > Lending > Book Straps/Stickers.
- Select book straps to print.
- Select format 2 per page.
- Click Print.
- On the Print Preview screen, use the printer icon or link to print the book straps (appearance of Print Preview screen varies depending on your web browser).
- Once you have confirmed your printing was successful, you can delete book straps from the print queue. Book straps stay in the print queue until they are removed.
- Go back to the print queue, select the check boxes for the book straps you printed, and click Remove.
- Use the printed book straps to retrieve the requested items.
- For loan requests, Mark as Packaging. You can mark individual requests or use batch processing. To use batch processing:
- Open a Retrieving queue.
- Click Batch respond to "Can You Supply" items > Packaging.
- To add requests to the list, scan barcodes from the printed book straps OR click + next to a request OR type the request ID.
- Click Packaging.
- For copy requests, Mark as Scanning. You can mark individual requests, or use batch processing. To use batch processing:
- Open a Retrieving queue.
- Click Batch respond to "Can You Supply" items > Scanning.
- To add requests to the list, scan barcodes from the printed book straps OR click + next to a request OR type the request ID.
- Click Scanning.
- For requests in a Packaging queue:
- Click Batch respond to “Can You Supply” items > Yes.
- To add requests to the list, scan barcodes from the printed book straps OR click + next to a request OR type the request ID.
- (Optional) Apply Constant Data, if not already applied with an automation.
- Select Print Shipping Labels option.
- Click Yes.
- Print shipping labels
- Open Print Queue > Lending > Shipping Labels.
- Select requests for which you need shipping labels.
- Select format (6 or 30 per page)
- (Optional) When 6 per age is selected: Select check boxes to include the following on the labels:
- Request ID barcode
- LIBRARY MAIL DMM: 173.5.0
- RETURN SERVICE REQUESTED
- Select starting label position.
- Print the labels.
- Open Print Queue > Lending > Shipping Labels.
- Complete physical packaging of each item.
- Once you have confirmed your printing was successful, you can delete shipping labels from the print queue. Shipping labels stay in the print queue until they are removed. Go back to the print queue, select the check boxes for the shipping labels you printed, and click Remove.
- For requests in a Scanning queue:
- Scan each article to a file on your computer. You may want to name the file using the request ID.
- If you are using a Scannx or BSCAN scanner, you can automatically update the lending request after scanning the document. If you have configured the option to automatically move requests fulfilled using an Article-Exchange connected scanner to Shipped status, this eliminates the steps below. For more information, see the Scannx and BSCAN integration help and configuration help for Article Exchange connected scanners.
- On the Tipasa home screen, Search for requests defaults to Request ID, with the cursor in the search box. Scan the Request ID barcode on the printed bookstrap.
- Click OCLC Article Exchange.
- Navigate to the scanned article on your computer, and click Open.
- Click Drop File.
- (Optional) Click Preview to confirm that you uploaded the correct article. When confirmed, click Done.
- (Optional) Apply Constant Data, if not already applied with an automation.
- Click Yes.
Simulations and quiz
Supplemental information
The OCLC Support site connects you to our highly skilled support staff and valuable self-serve resources. These include extensive documentation for OCLC’s products and services, helpful troubleshooting instructions, and other materials to answer your questions.
- Tipasa documentation
- Tipasa training - Find this class and additional training content here.
- What’s new with Tipasa? Check the Tipasa release notes.
- Tipasa FAQ & Troubleshooting articles
- Tipasa Community Center
- Connect with OCLC staff and peers using Tipasa.
- Share workflows and feedback, and submit enhancement requests.
- Attend webinar events and keep up with product news
Additional questions? Contact OCLC Support.
We look forward to seeing you in the next class!