Supplier registration
Add a supplier record
Supplier records can be created based on an existing library record or independently.
To add a supplier record from a library record:
- Retrieve the library record. See Retrieve or view a library record for more information.
- Click Supplier.
- The following message displays: "Supplier does not exist, would you like to add one?" Select Yes.
- The Supplier Registration screen displays with information prefilled from the library record. Add to or modify the supplier record as required. See below for details.
- Click Add.
Note: While the library symbol is case sensitive, the supplier code is not. For example, when creating a supplier record from a library record with symbol = oorii, the supplier code will be OORII. If you then create a supplier record from a library record with symbol = OORII, the following message displays: "Supplier Code OORII already exists. Please enter a unique Supplier Code." An example of a unique supplier code would be OORII1.
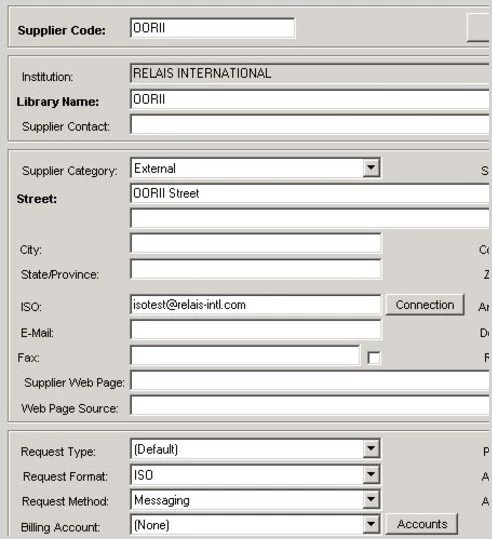
Adding an ISO supplier
Once the supplier record is added:
- Set Supplier Category to External.
- In ISO, enter the email address or TCP/IP address and port provided by the supplier.
- Set Request Format to ISO.
- Set Request Method to Messaging.
- Click Update.
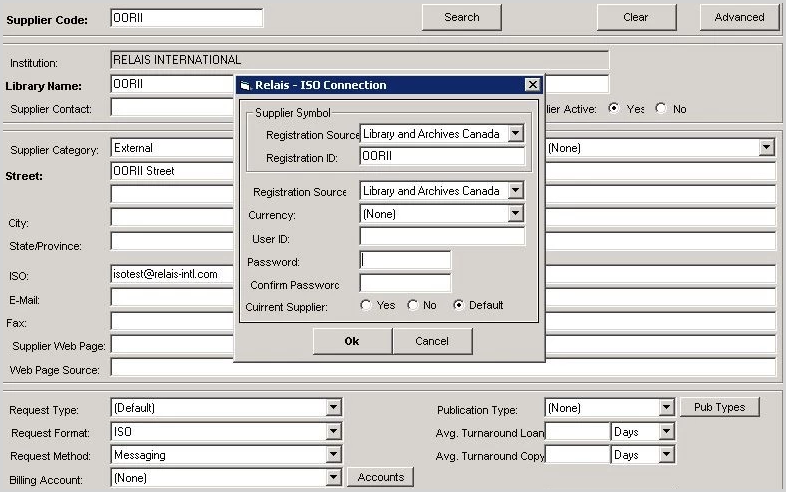
- Click Connection (to the right of the ISO box).
- Set Supplier Connection > Registration Source to the appropriate value:
- For a Canadian supplier: Library and Archives Canada
- For an Australian supplier: National Library of Australia
- In Supplier Symbol > Registration ID enter the symbol for the supplier.
- Set Registration Source to the appropriate value for your library:
- For a Canadian supplier: Library and Archives Canada
- For an Australian supplier: National Library of Australia
- Click Ok.
Note: If the ISO Connection information is not provided, then ISO requests will not be sent to the supplier. This information must be provided.
Tiers
Tiers can be used to create groups of suppliers, for example, geographical groups or consortia. Once a tier is created it can be sequenced along with individual suppliers. A supplier can belong to multiple tiers. In a shared Relais ILL system, tiers are shared.
- There is no limit to the number of tiers that can be created.
- There is no limit to the number of suppliers in a tier.
- When suppliers that belong to tiers are used in creating a routing list Load Balancing is used to determine the order.
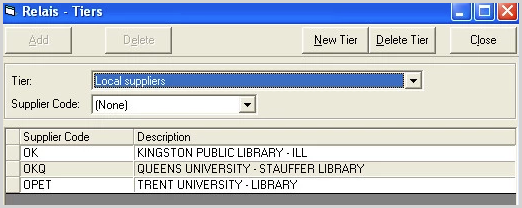
Create a tier
To create a new tier of suppliers to be used in created routing lists.
- Login to Supplier Registration or Library Registration > Supplier.
- Click Routing.
- Click Tiers.
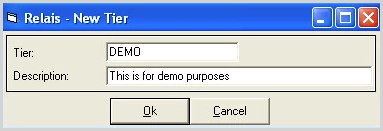
- Click New Tier.
- Enter a code for the Tier (30 characters max) and a Description (100 characters max) and click Ok.
- Select the newly created tier from the Tier drop down box.
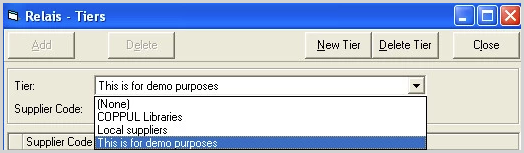
- Select a code from the Supplier Code drop down box.
Note: To navigate through the list of supplier codes, enter the first couple of characters of the code. This will take you directly to the entry in the list.
- Click Add.
- Repeat the last two steps until all suppliers are added to the tier. Click Close.
Modify a tier
To change the entries in an existing tier:
- Login to Supplier Registration or Library Registration > Supplier.
- Click Routing.
- Click Tiers.
- From the Tier drop down box, select the tier to be modified. The existing suppliers in this tier are displayed.
- To add another supplier to the tier, select it from the Supplier Code drop down box and click Add.
Note: If the supplier already exists in this tier it does not display in the Supplier Code drop down box. A supplier can belong to multiple tiers.
-
To delete a supplier from the tier, highlight it and click Delete.
-
Repeat the last steps as often as necessary. Click Close.
Delete a tier
To delete an existing tier:
- Login to Supplier Registration or Library Registration > Supplier.
- Click Routing.
- Click Tiers.
- From the Tier drop down box, select the tier to be deleted.
- Click Delete Tier, then click Yes.
- If the tier you are deleting is part of an existing Supplier Sequence, it cannot be deleted. The following message is displayed:
- "This Tier belongs to a currently sequenced list. It cannot be deleted until it is removed from all sequencing lists."
- Delete the tier from all routing sequences and then delete the tier.
- If the tier you are deleting is part of an existing Supplier Sequence, it cannot be deleted. The following message is displayed:
- Click Close.
Set a supplier inactive
If a supplier or an internal library/branch is to be closed temporarily and you do not want requests to be sent to the supplier or library during that time, then set the supplier record to Inactive.
- Log into Supplier Registration.
- Open the supplier record.
- Set the Supplier Inactive flag to No.
- Click Update.
- Click Close.
When a Supplier is set to Inactive:
- It no longer appears in the Available Suppliers list.
- If it is retrieved in Search Manual. it is marked with an x and treated as an Unregistered supplier.
When you select the specific supplier record from the drop down list, it will immediately bring up that record.
- Once you have retrieved the correct supplier record, change the Supplier Active field from no to yes (or visa versa).
- Click Update.
The supplier should now be active and there will be no x next to it in the search manual tabs.
Sequencing suppliers and tiers
Relais uses your preferred sequencing of tiers and suppliers when building a routing list for a request. See Routing Lists for more details.
- Different sequencing can be defined for each request type. Within a request type different sequences can be defined for each of Copies and Loans.
- When there are multiple locations that are part of one tier then load balancing may be used to determine the order in which to use these location.
- If a tier or a supplier is not included in the sequencing, then the supplier(s) may or not be added to the end of the routing list. A setting is available to indicate the preference.
- See Tiers for instructions on creating, modifying and deleting tiers (or groups of suppliers)
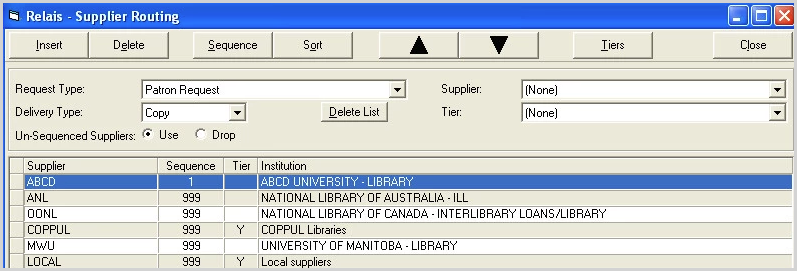
Create a sequence
Find the steps to create a new preferred sequence of suppliers to be used in creating routing lists.
- Add suppliers or tiers.
- Login to Supplier Registration or Library Registration > Supplier.
- Click Routing.
- Select the Request Type from the drop down box.
- Select the Delivery Type from the drop down box.
- Select a Supplier or Tier from the appropriate drop down boxes.
Note: To navigate through the list of supplier codes enter the first couple of characters of the code. This will take you directly to the entry in the list.
- Click Insert.
- Repeat this process until all suppliers or tiers are added to the sequence.
- A pop-up box displays. Specify whether you want the selected supplier/tier to be added to the top or the bottom of the current list. The order can be changed later. Click Cancel to do nothing.
- Keep adding suppliers and tiers until all preferred suppliers display, for example:
-
Order the list of suppliers or tiers
- There are two methods for ordering a list. A combination of both methods can be used to put suppliers / tiers in the preferred order.
-
Method 1:
- Select a supplier or tier and use the Up and Down arrows to move it in the list.
- To assign sequence numbers to the suppliers or tiers in the order in which they are currently displayed, click Sequence.
-
Method 2:
- Select a supplier or tier and enter the desired sequence number in the sequence column.
- Click Sort to order the list based on the sequence numbers assigned.
- Repeat the above as required until you have your preferred sequence for this request type.
-
- There are two methods for ordering a list. A combination of both methods can be used to put suppliers / tiers in the preferred order.
-
Specify how to handle un-sequenced suppliers:
- If set to Use any un-sequenced suppliers found during the search process, un-sequenced suppliers are assigned a sequence number of 999 and added to the bottom of the routing list for a request.
- If set to Drop any un-sequenced suppliers found during the search process, un-sequenced suppliers are ignored and not added to routing lists.
-
Click Close to save the preferred sequence.
Create a sequence using Cloning
To create a preferred sequence of suppliers to be used in created routing lists by using an existing sequence as the starting point.
- Login to Supplier Registration or Library Registration > Supplier.
- Click Routing.
- Select the Request Type from the drop down box.
- Select the Delivery Type from the drop down box.
- Click Clone List.
- Select the Request Type and Delivery Type to use as the starting point, from the appropriate drop down boxes.
- Click Clone List.
- Make any modifications to the preferred sequence as appropriate.
Example 1
For request type set to PAC (Core Patron), create a sequence for Delivery Type set to Copy based on the Delivery Type set to Loan.
- Login to Supplier Registration or Library Registration > Supplier.
- Click Routing.
- Select Core Patron under Request Type.
- Select Copy under Delivery Type.
- Click Clone List.
- Select the Request Type and Delivery Type to be cloned.
- Click Clone List from the upper left corner.
- A confirmation message displays. Click OK.
- The new sequence is created and can be modified as necessary.
Example 2.
Create a sequence for request type set to PAE (Express Patron),with Delivery Type set to Copy based on the Request Type set to PAC (Core Patron).
- Login to Supplier Registration or Library Registration > Supplier.
- Click Routing.
- Select Express Type under Request Type.
- Select Copy under Delivery Type.
- Click Clone List.
- Select the Request Type and Delivery Type to be cloned.
- Click Clone List from the upper left corner.
- A confirmation message displays. Click OK.
- The new sequence is created and can be modified as necessary.
Modify a sequence
At any time you can modify an existing sequence of suppliers or tiers.
Delete a supplier or tier:
- Login to Supplier Registration or Library Registration > Supplier.
- Click Routing.
- Select the Request Type from the drop down box.
- Select the Delivery Type from the drop down box.
- Select the supplier or tier to be deleted.
- Click Delete.
To add a supplier or tier, change the order of the sequence, or change how un-sequenced suppliers are handled. See Sequencing suppliers and tiers,
After all changes are made, click Close
Delete a sequence
To delete a preferred sequence:
- Login to Supplier Registration or Library Registration >Supplier.
- Click Routing.
- Select the Request Type from the drop down box.
- Select the Delivery Type from the drop down box.
- Click Delete List. A warning message is displayed, click Yes.
- Click Close.
Note: In Relais D2D and in shared Relais ILL systems, the weighting factor must be agreed upon by member libraries.