Sequencing tiers and suppliers
Relais uses your preferred sequencing for tiers and suppliers when building a routing list for a request.
- Different sequencing can be defined for each request type.
- When there are multiple locations that are part of one tier then load balancing is used to determine the order in which to use these locations
See Tiers for instructions on creating, modifying and deleting tiers (or groups of suppliers).
Create a sequence
There are 3 steps to create a preferred sequence of suppliers to be used when creating a routing list.
- Add Tiers
- Login to Supplier Registration or Library Registration > Supplier.
- Select Routing.
- Select the Request Type from the drop down box.
- Select the Delivery Type from the drop down box.
- Select a Tier from the appropriate drop down box.
- Click Insert.
- Repeat this process until all tiers are added to the sequence
- A Supplier Routing pop-up appears. Specify whether you want the selected tier to be added to the top or the bottom of the current list. The order can be changed at a later time. Select Cancel to do nothing.
- Keep adding tiers until all desired tiers are displayed.
- Order the list of Tiers
- There are two methods for ordering a list. A combination of both methods can be used to put tiers in the preferred order.
- Method 1
- Click Sequence to assign sequence numbers to the tiers in the order in which they are displayed.
- Select a tier and use the Up and Down arrows to move it in the list.
- Method 2
- Repeat the above as required until you have your preferred sequence for this request type.
- Click Sort to order the list based on the sequence numbers assigned.
- In the sequence column of a selected tier, enter the desired sequence number.
- Method 1
- There are two methods for ordering a list. A combination of both methods can be used to put tiers in the preferred order.
-
Click Close to save the preferred sequence.
Create a sequence using Cloning
Create a preferred sequence of suppliers to be used in created routing lists by using an existing sequence as the starting point.
- Login to Supplier Registration or Library Registration > Supplier.
- Select Routing.
- Select the Request Type from the drop down box.
- Select the Delivery Type from the drop down box.
- Click Clone List.
- Select the Request Type and Delivery Type from the appropriate drop down boxes to use as the starting point.
- Click Clone List.
- Make any modifications to the preferred sequence as appropriate.
Modify a sequence
Modify an existing sequence of suppliers or tiers.
Delete a supplier or tier
- Login to Supplier Registration or Library Registration > Supplier.
- Select Routing.
- Select the Request Type from the drop down box.
- Select the Delivery Type from the drop down box.
- Select the tier to be deleted.
- Click Delete.
See Add a supplier record for more information.
After all changes are made, click Close.
Delete a sequence
To delete a preferred sequence:
- Login to Supplier Registration or Library Registration > Supplier.
- Select Routing.
- Select the Request Type from the drop down box.
- Select the Delivery Type from the drop down box.
- Click Delete List.
- A warning message will display. Select Yes.
- Click Close.
Sequence your library's location
If you have multiple locations or branches in your library, you can sequence the order in which to use these locations or branches if there are multiple copies available when a request is routed to your library.
To view the current sequence for your own library's locations:
- Login to Library Registration.
- Retrieve your library record by entering your library symbol.
- Click Billing.
- Click Suppliers.
- All the local locations/branches registered are displayed.
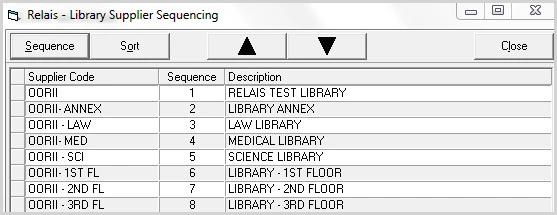
Change the order of the sequence
There are two methods for changing the order of the sequence. A combination of both methods can be used to put local locations/branches in the preferred order.
- Method 1
- Select a location and use the Up and Down arrows to move it in the list.
- Click Sequence to assign sequence numbers to the locations in the order in which they are displayed.
- Method 2
- Select a location and in the sequence column enter the desired sequence number.
- Click Sort to order the list based on the sequence numbers assigned.
- Repeat the above as required until you have your preferred sequence for this request type.
Click Close to save the sequence.