Purge and Archive
Overview
Periodically it may be necessary to purge files, e.g., log files, scanned images, or purge and archive data in the Relais database. A utility is provided to assist with this: Purge and Archive. This utility can be scheduled to run daily, weekly, monthly, or run manually as required by the customer.
When Purge and Archive is run data from the following tables is archived:
- ID_REQUEST
- ID_DELIVERY
- ID_AUDIT (optional)
Data from the following tables is purged:
- ID_AUDIT
- ID_BIB_INFO
- ID_COPYRIGHT_TRACKING
- ID_DELIVERY
- ID_HOLDINGS
- ID_ILL_MSG_IN
- ID_ILL_MSG_OUT
- ID_INBOX_SEARCH
- ID_ISO_MESSAGING
- ID_ISO_OCLC
- ID_KEYWORD_AUTHOR
- ID_KEYWORD_CALL_NO
- ID_KEYWORD_TITLE
- ID_LOAN_TRACKING
- ID_PARENT_CHILD
- ID_QUEUE
- ID_SERVICE_CHARGE
- ID_TURNAROUND_TIME
- ID_REQUEST
Files from configured directories are purged.
Configure Purge and Archive
Caution: Archive data is only a partial snapshot of the data from the Relais database and cannot be restored. Database backups must be maintained in case data needs to be restored.
Prior to using the Purge and Archive utility, an archive database must be created. This can be done using the scripts required to create a new database except for the “3_Add Foreign Keys.sql” script. The archive database only contains data from a limited number of tables so Foreign keys are not allowed. If the Archive Database is configured on the same database server, then change the database name and password to that of the Archive Database. The Archive Database creation process requires a separate schema with an appropriate name, e.g., RelaisArchive.
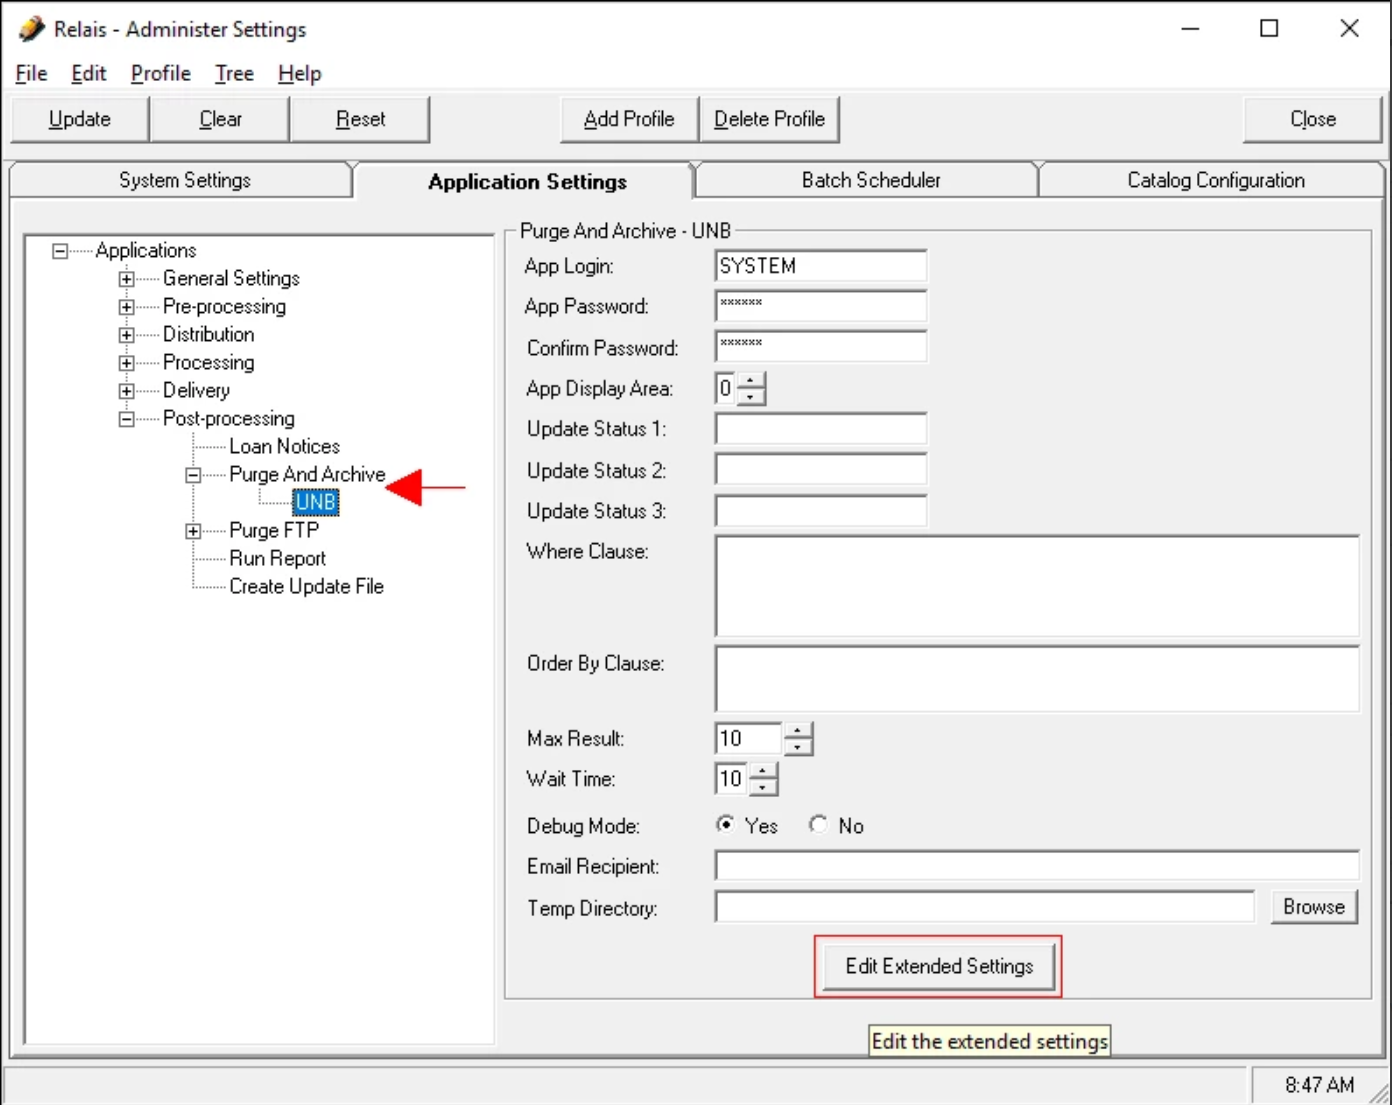
To configure the settings for Purge and Archive as well as the connection information for the archive database:
- Login to Administer Settings.
- Select the Application Settings tab.
- Open the Post-Processing section.
- Open the Purge & Archive section.
- Click Edit Extended Settings, to display Extended Purge and Archive Settings.
- Enter the information as described below.
- Click Ok.
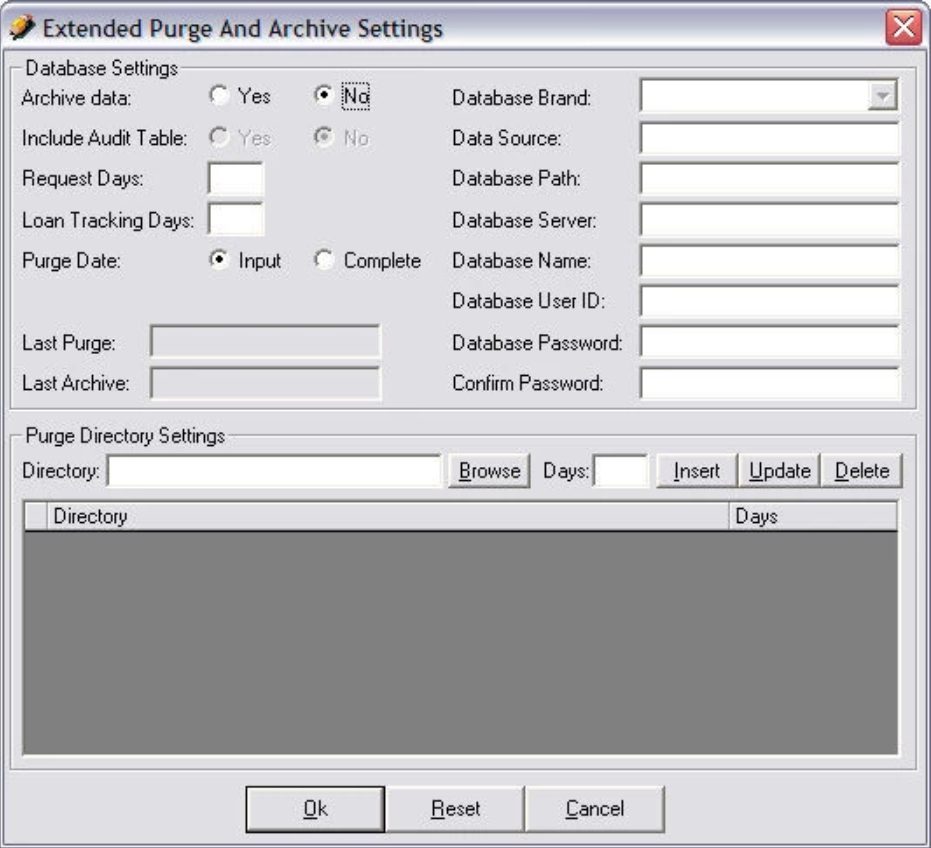
| Field | Characters | Description |
|---|---|---|
| Archive Data | Select Yes or No to specify whether data is to be archived before it is purged. | |
| Include Audit Table | If Archive Data is set to Yes, select Yes or No to specify whether the ID_AUDIT table is to be included as part of the archive. | |
| Request Days | Specify the number of days to wait before request data is purged. | |
| Loan Tracking Days | Specify the number of days to wait before data is purged for completed loans. | |
| Purge Date | Set to
|
|
| Last Purge | Displays the date/time of the last purge. | |
| Last Archive | Displays the date/time of the last archive. | |
| Database Brand | Select the type of database to be used for the archive database, e.g., SQLServer. | |
| Data Source | Enter the ODBC Data Source name used to connect to the archive database. | |
| Database Path | Enter the path and database name for the archive database. | |
| Database Name | Enter the name of the archive database. | |
| Database User ID | Enter the User ID for the archive database. | |
| Database Password | Enter the password for the archive database. | |
| Confirm Password | Confirm the password for the archive database. | |
| Purge Directory Settings | ||
| Directory | Browse to the directory from which files are purged. | |
| Days | Enter the number of days to wait before purging files in the directory. | |
| Insert, Modify or Delete |
|
|
Scrub patron information and delete patron records
In addition to the purging of completed requests greater than 'X' years old (as defined by your configuration), libraries can now choose to have the patron information scrubbed from completed requests that are yet to be purged and are older than 'X' days. In addition, a library can choose to have patron records deleted where no remaining requests are linked to the patron.
For libraries in shared systems, the settings to scrub patron information and delete patron records can be configured at the library level.
In order to use the delete patron records feature the library must also turn on "scrub personal information".
For libraries using NCIP
When the option to Delete Patron Records = Yes, when PurgeAndArchive.exe runs.
- For each patron record, check if there are any associated requests.
- If no, then delete the patron record.
- If yes, then do not delete the patron record.
If a patron record is deleted, the next time the patron uses Relais, a new skeletal patron record is created.
For libraries migrating to a new ILS and turning on NCIP
If when migrating to a new ILS or turning on NCIP the library does not do a patron merge, then remove the personal patron information from all requests and delete the old patron records.
For libraries using Patron Load
When the option to Delete Patron Records = Yes, when PurgeAndArchive.exe runs.
- For each patron record with Active = No, check if there are any associated requests.
- If no, then delete the patron record.
- If yes, then do not delete the patron record.
The onus is on the library to determine when to set a patron record with Active = No and to include this in the regular patron load update file.
Caution: For Relais hosted customers, the purge and archive utility is run from the hosted environment. If you are interested in turning this feature on, please contact OCLC Relais support at supportcenter@relais-host.com.
Configuration
For non-hosted Relais ILL customers, the purge patron information and purge patron records features can be configured through the Administer Settings application, under Application Settings > Post-processing > Purge and Archive as shown in the screenshot below.
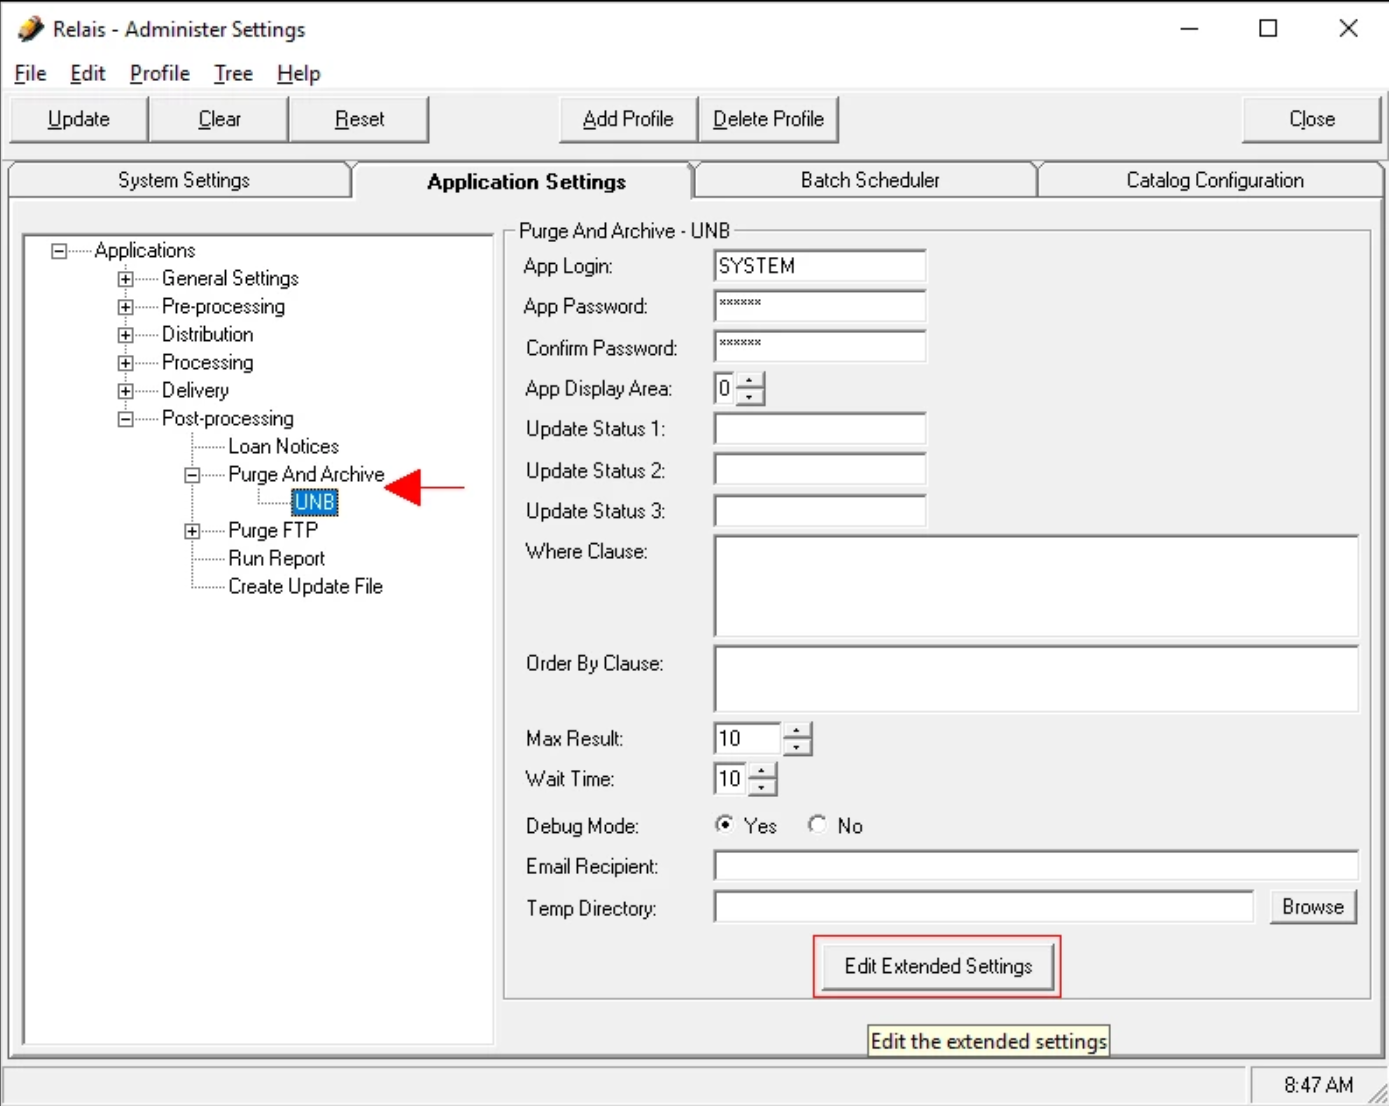
Through Edit Extended Settings, the new settings related to the scrubbing and deleting of patron data can be configured.
The settings appear at the bottom of the Extended Settings screen, as shown in the following Figure:
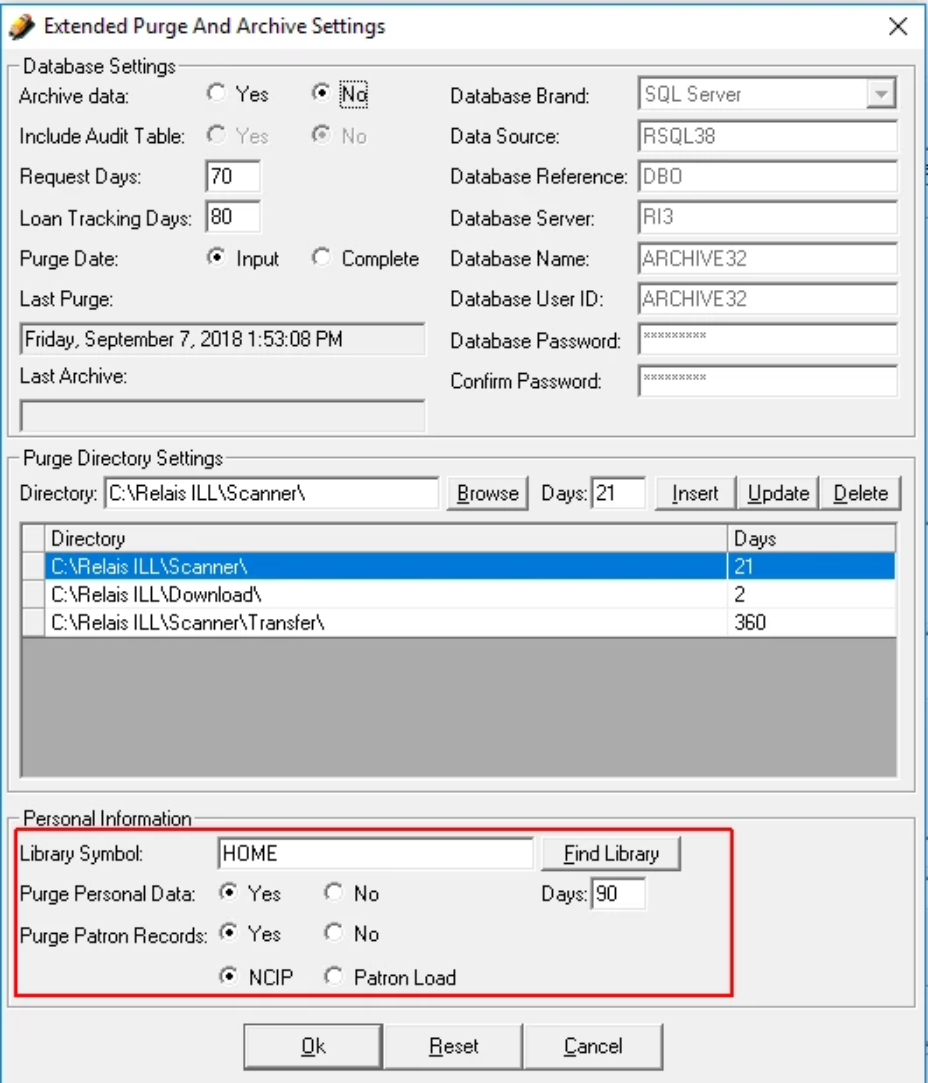
The option Purge Personal Data controls if Purge and Archive execute the process of scrubbing (cleaning) the personal information from completed requests. This process cleans the personal data by assigning NULL to all the fields that contain personal data from the ID_DELIVERY table for requests which have been closed or completed for more than the number of days configured.
Purge Personal Data:
- No (N) = Default
- Yes (Y)
Note: In the Relais.INI file, the settings are called: PurgePersonalInformation and PurgePersonalInformationDays.
Additionally, the option "Purge Personal Data" will now control the process of Deleting Patron records. Moreover, when "Purge Personal Data" = N, the settings related to the process of Purging (deleting) Patron Records will be disabled.
When "Purge Personal Data" = Y, the configuration settings for Purging Patron Records will be enabled.
Also, to enable the purge of personal information for different sites (Libraries), a new field called "Library Symbol" has been added. When the user enters a valid Library Symbol in this field, Purge and Archive will purge the personal information of the patrons of that particular Library.