View and edit the metadata map
When you view the Metadata Map for a collection, the Gateway initiates harvesting your metadata records for the selected collection. Harvesting takes place using the Open Archives Initiative Protocol for Metadata Harvesting (OAI-PMH). During the harvest, the Gateway transforms the Dublin Core records to WorldCat MARC records.
Note: While you are viewing or editing the Metadata Map, your metadata records are not being actively uploaded to WorldCat.
After transforming your metadata records to WorldCat MARC, the Gateway tests the MARC records to ensure they are valid. If there are validation errors, the Gateway reports which MARC fields contain the errors. Correcting validation errors requires changing the mapping to delete or remap the fields responsible for the error. It may be helpful to use the MARC view when making these adjustments. For more about MARC view, refer to Switch between views.
Note: To edit the metadata map, the collection must be assigned to the username you are using.
Select a metadata map template
- From the Home tab, select the collection and select Edit in the Metadata Map column.
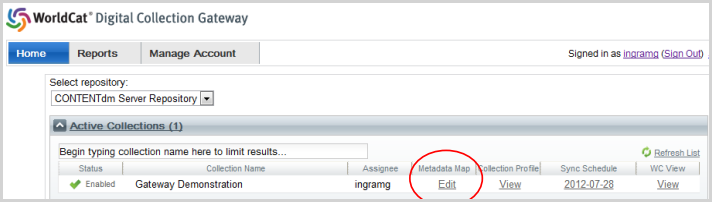
- OR Select the Edit Metadata Map Link in the Metadata Map section of the Collection Profile.
- The first time you view a collection using the Gateway, you are prompted to select a map template for the collection.
- Re-use map templates defined previously for other collections or select the System Default Map, which is created and maintained by OCLC. After selecting the map template, you can further edit it during the mapping process.
- Click Create Metadata Map. A progress dialog displays as the metadata processing begins. Records are displayed as they become available.
System Default Map
The System Default Map template provides a base for initial presentation or for alteration to better fit the syncing collection.
Note: The only non-editable default mapping feature is the View Online/Item Resolution URL. Default mapping will use the first dc:identifier that contains "http://" or "https://". Default mapping will take all other URLs in repeating Identifier fields and place them in repeating 856 fields, but with no $3 text.
Select a different metadata template
If the map template you selected for the collection results in inadequate mapping, you can select a new template.
- From the More pull-down menu, select Reset metadata map.
- When the Warning dialog box appears, click the drop-down list to display a list of available metadata map templates.
- Select the template to apply to the current collection.
- Click Reset Metadata Map to view the collection with the newly applied template.
Edit the metadata map
In the Metadata Map, yellow highlighting indicates an editable metadata field. Click the yellow highlighting to see which Dublin Core element is displayed in a particular field.
Delete a metadata element
- Click on the highlighted field to change. The Edit Mapping box displays.
- Click the drop-down list of Dublin Core elements.
- Scroll to the top and select No Mapping.
- Click Replace to unmap the contributor element.
Re-map a metadata element
- Click on the highlighted field to change. The Edit Mapping box displays.
- Click the drop-down list of Dublin Core elements.
- Select the appropriate element.
- Click Replace.
Add metadata elements
- For example, add a second Dublin Core element along with the existing type element in the Genre/Form field:
- Click the highlighted field you wish to change. The Edit Mapping box appears.
- In the drop-down list of Dublin Core elements, find and click the format element.
- Click Add to add the format element to the Genre/Form field.
Change the Edition/Format field
Since Dublin Core doesn’t have a reference field, the Gateway uses a default material type of Archival material for every record that is uploaded to WorldCat. Use Material Type mapping to get a finer-grained view of the records that you upload. Many repositories use the Dublin Core type element for this mapping. There is a different editor for the Edition/Format field.
- Click on the highlighted field to change.
- A new dialog box appears, with options for Change Material Type Key.
- Under Step 1, choose the method based on the materials in the collection:
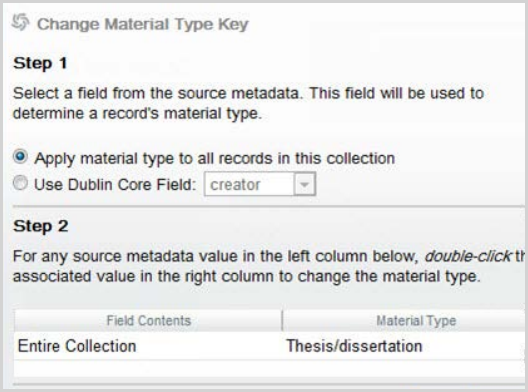
- Apply material type to all records in this collection
- Select this option if all records in the collection are of the same type.
- Use Dublin Core Field:
- For a collection containing multiple material types, you can map different field content values to different material types. Select this option and verify that the appropriate element contains the distinguishing value for a record selected from the drop-down menu.
- Step 2 will display a list of the values from the format field in the collection metadata.
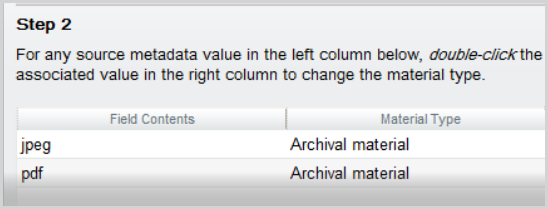
- You can select a different material type for each value.
- Apply material type to all records in this collection
- Click OK to save your changes.
Add a thumbnail image
CONTENTdm sites automatically include a thumbnail.
Map other fields
The default display shows standard fields displayed in a brief record, but other field options are available for mapping. Additional unmapped fields can be selected by following the steps below.
- From the More drop-down menu, select Show unmapped fields.
- These mappable fields display as blue highlighted text with sample data displayed in the WorldCat.org record.
- Select the highlighted field you wish to change. The Edit mapping box appears.
- In the drop-down list of Dublin Core elements, find and click the desired element.
- Click Add.
To see what other records will look like using the mapping that you have created, you can navigate in any of these ways:
- Click the gray left and right navigation arrows to move through the records one at a time.
- Use the gray slider bar to move quickly through the records.
- Enter a record number to see a particular record.
Advanced mapping features
In addition to the features described above, the Gateway provides several advanced metadata mapping features:
- Record blocking: Block metadata records from being loaded to WorldCat based on the data values of a particular metadata field.
- Field splitting: Split the data values of delimited fields so that each value is contained in its own field.
- Prefix and suffix data: Append prefix and/or suffix data to your existing metadata fields in order to provide additional information for a particular field.
Record Blocking
- From the More pull-down menu, select Update record blocking list.
- To block records based on the data values in a particular field, select the field from the pull-down list.
- To block all records having a certain data value, click the corresponding box.
- Click OK.
- When this collection is synchronized with WorldCat, all records that contain the specified data value will be excluded from WorldCat.
Field Splitting
By default, the Gateway maps the entire field to a single field in WorldCat. This option allows you to split the field into multiple fields based on the semi-colon delimiter.
- Select the MARC View tab.
- From the More pull-down menu, select Update field splitting rules.
- Select the field you want to split from the pull-down list and then enter the delimiter.
- Click OK.
- The field will now be split into multiple MARC fields.
- If necessary, you can edit the field indicators in the MARC view as appropriate.
Add a Prefix and/or Suffix to a Field
To provide better contextual information for WorldCat users, use the Update field prefix/suffix rules option to add a prefix or suffix to the desired field.
- From the More pull-down menu, select Update field prefix/suffix rules.
- In Step 1, use the pull-down menu to select the field for which you want to add a prefix or suffix.
The Gateway numbers your metadata fields in order to distinguish among multiple fields that are mapped to the same Dublin Core element. - In Step 2, select 1 to tell the Gateway to apply your changes to the first occurrence of the field.
- In Step 3, enter the text you want to be used as the prefix or suffix for the field.
- To ensure appropriate spacing and punctuation in the field, including commas and spaces as needed.
- Click OK.
- The additional text is added to the field.
You can also use prefixes or suffixes to expand a simple identifier such as a DOI or Handle into a full URL. This allows end users of WorldCat and other search engines to easily navigate to your digital content server when they find your items in WorldCat.
Use Constant Data
When there are elements that need the same value for all the records in a single collection, you can define constant data, which are predefined values for those elements.
- For example, when all of the metadata records should contain the same Dublin Core source data, and your original metadata does not contain that element in the Dublin Core source field, you may want to provide a constant data value for the source element.
- From the More drop-down menu, select Update constant data fields.
- Enter the constant data that you want to display in the appropriate Dublin Core element field.
- Click OK to save the constant data.
Switch between views
Use the tabs at the top of the window to switch between views:
- MARC View shows the record with its corresponding MARC tags.
Move between records
To move between the records one at a time, click on the arrow in the upper right corner under the Approve map and sync button. To skip to a specific record in the collection, click the Go to OAI ID button and type in the OAI Identifier.
Analyze the collection metadata
The More menu contains two options to help you analyze and understand the collection metadata.
- More > Open Dublin Core Summary in new window
- Displays a list of the metadata elements used in this collection and how often each element occurs.
- More > Open frequency analysis in new window
- In the Frequency Analysis window, click on any metadata element to see its data values and the number of occurrences of each value in the collection.