Learner guide: CONTENTdm Basic Skills 2 - Working with Text in CONTENTdm
Build a digital collection
- Add a collection.
- Configure the collection
- Create a project in the Project Client
- Configure the project
- Add digital items and/or objects
- Approve items/objects and index collection
Compound object types
- Postcard - Front and back images of two-sided items (e.g., tickets, baseball cards).
- Document - Sequential pages of a report, a journal, a photo album, etc.
- Monograph - Retain the hierarchical structure of documents, including chapters, sections, and pages.
- Picture Cube - Select up to six images to link together views of a 3-dimesional object.
Configure or reconfigure a collection for text
1: Metadata fields
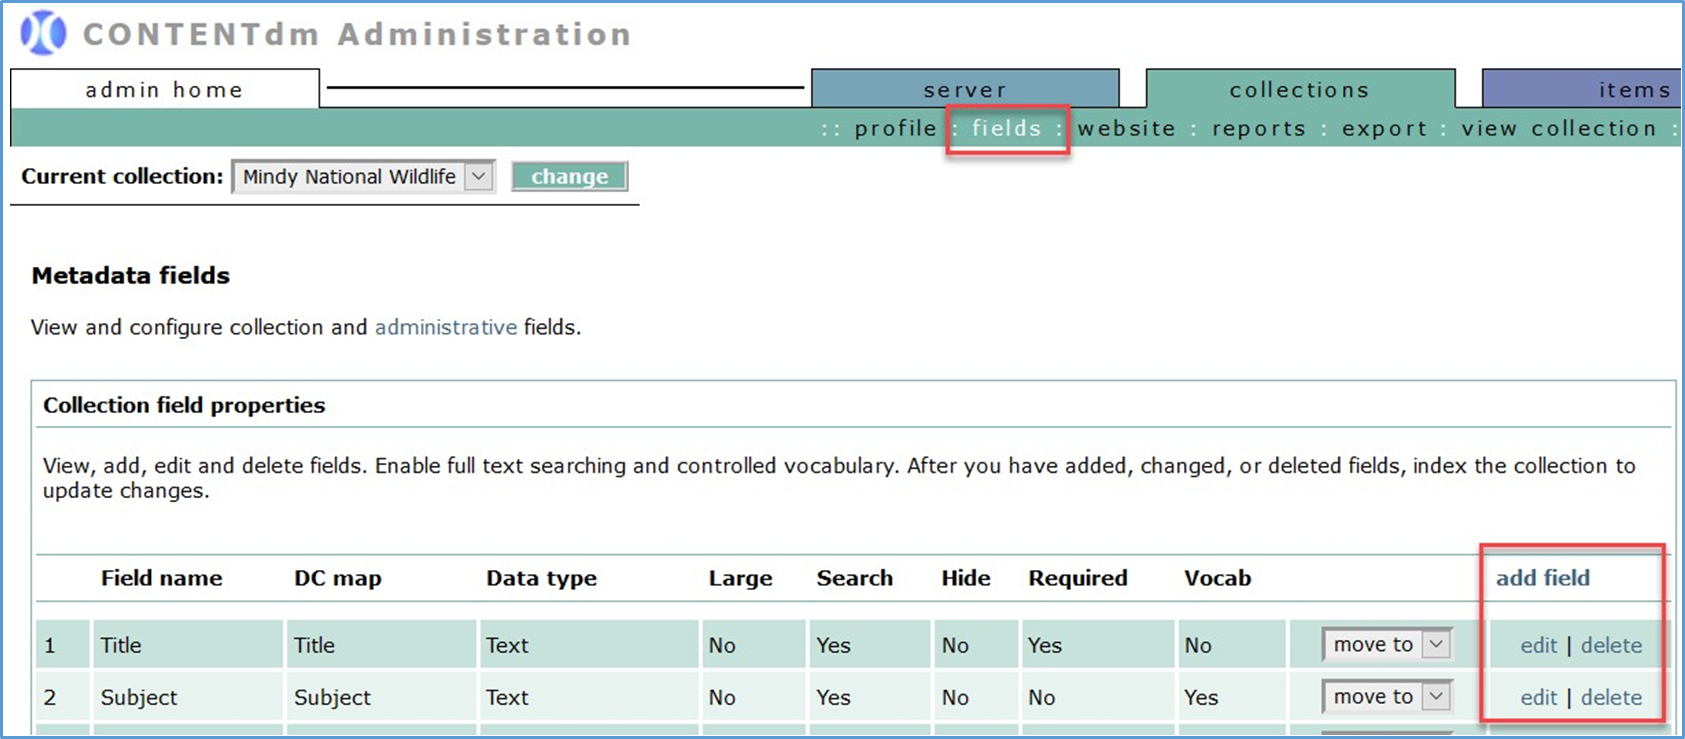
To edit metadata fields for the collection:
- Under the collections tab, click the fields link.
- View, add, edit, or delete metadata fields.
- To add a new metadata field:
- Click add fields.
- Enter data for the new field.
- Click Save changes to add new field.
- To edit an existing metadata field:
- Click edit next to the desired field to modify.
- Edit the field.
- Click Save changes to update.
- To delete an existing metadata field:
- Click delete next to the desired field to remove.
- Click Yes to confirm or cancel.
- To add a new metadata field:
- Use the move-to drop-down menu next to each field to reorder metadata fields.
- Index the collection to update changes to metadata fields. To index the collection:
- Click the items tab.
- Click index.
- Under Index scheduler, click index now.
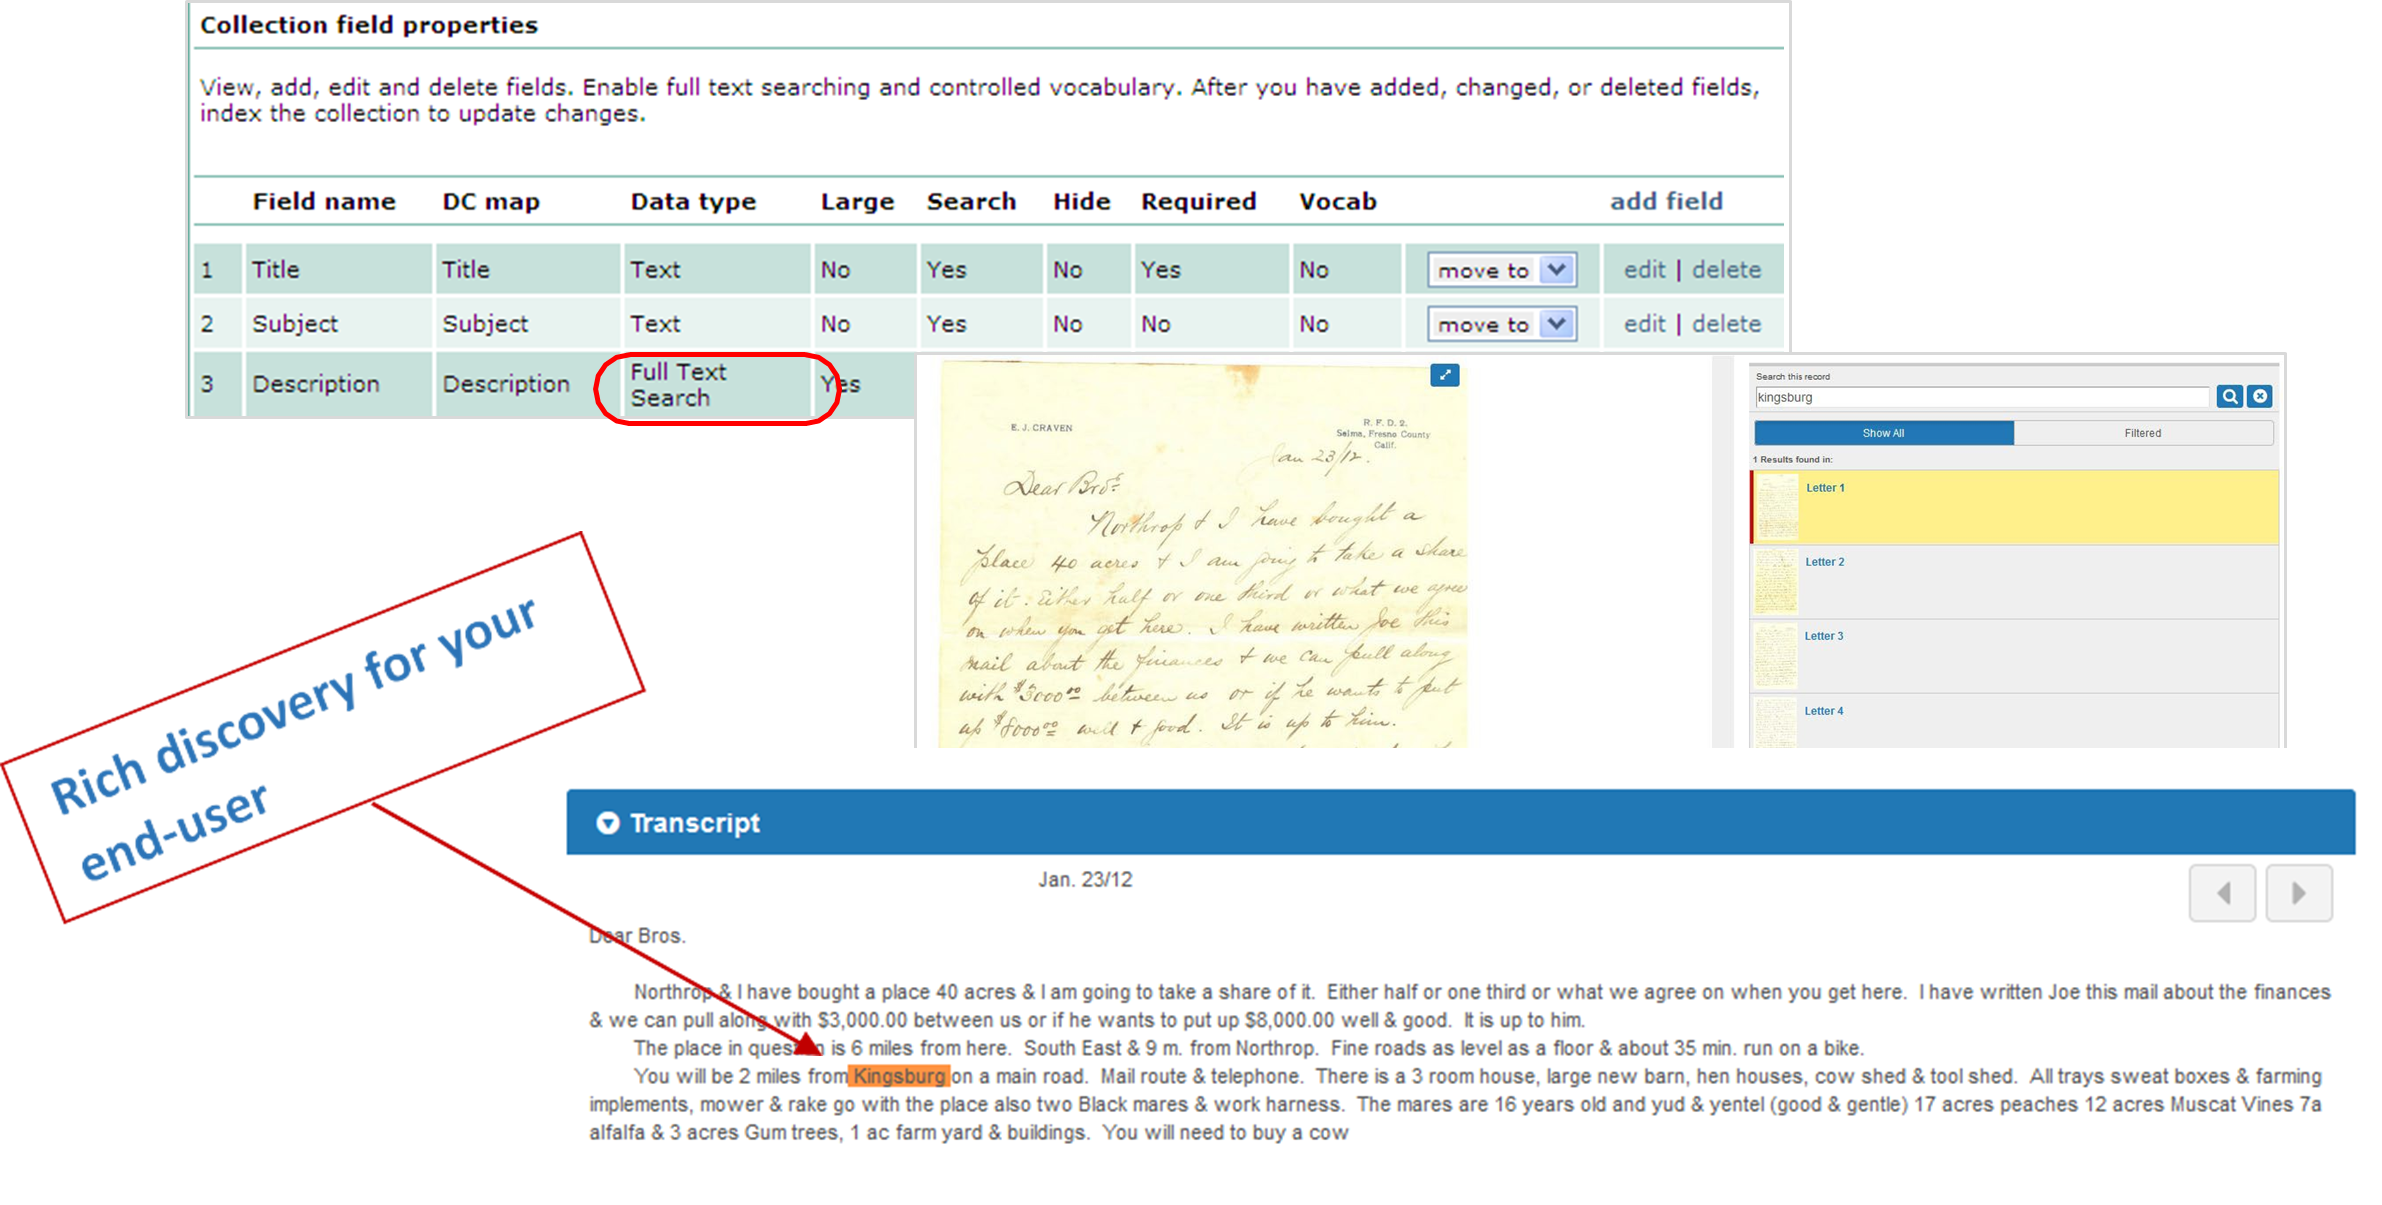
2: Data type - Full text search
Only one metadata field per collection may have a data type of full text search.
Compound objects - File organization
1: Postcards
- Only two image files can be imported for postcards
- Transcript files are optional - Can be one or two transcript files (.txt)
- Root file names for images must match optional transcript files
- All image files will be in one folder (or directory) and transcript fields in its own folder (or directory)
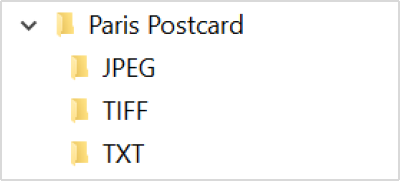
Image file name Transcript file name paris1.jpg paris2.jpg paris2.txt
2: Documents
- Transcript files are optional—can be one or two transcript files (.txt)
- Root file names for images must match optional transcript files
- All image files will be in one folder (or directory) and transcript files in its own folder (or directory)
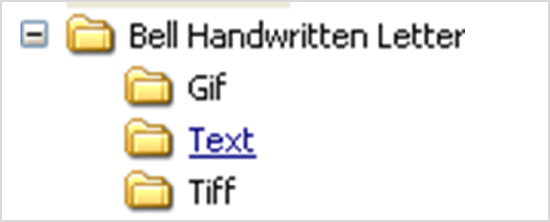
Image file name Transcript file name bell1.tif bell1.txt bell2.tif bell2.txt bell3.tif bell3.txt
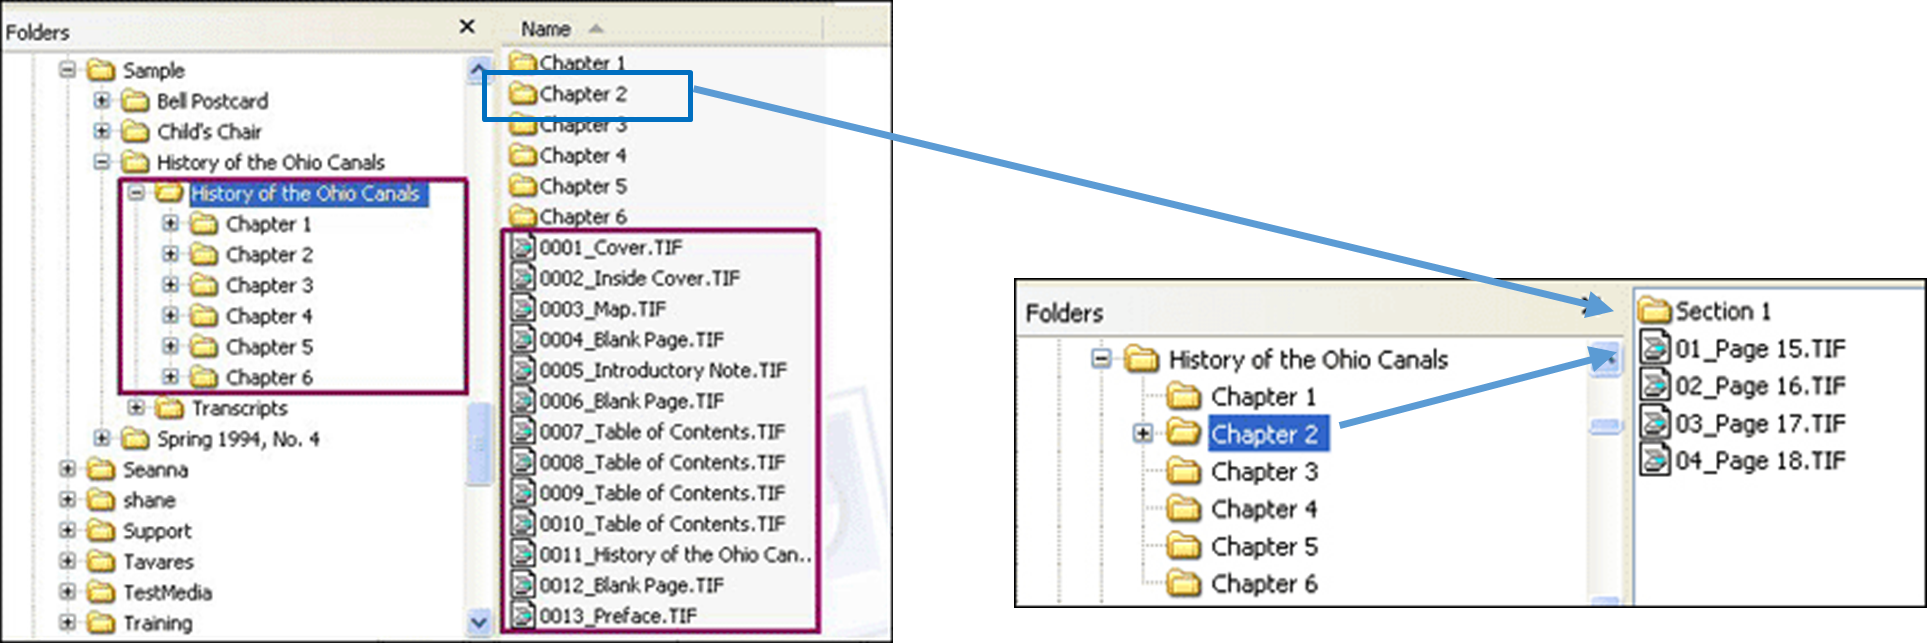
3: Monographs
- Organize image files to reflect the hierarchy of the monograph (e.g., images of chapters or sections in its own folder/directory
- All optional transcript files can be together in a separate folder/directory, but outside the hierarchy of the monograph
Project client: Import compound objects
1: Create a new project

- Open your Project Client.
- Click the Project menu, then select New.
- Enter the URL for your library’s CONTENTdm server.
- Enter your login credentials to the server. Click Next.
- Select the collection to associate with this project. Click Next.
- Enter a name for the project.
- Click Finish to create the new project.
2: Configure the project
Use the Project Setting Manager to configure your project.
- Click the tab with the name of the current project.
- Click the Project menu.
- Select Project Settings Manager.
- Select the setting you wish to configure.
- General settings: Contains information about the project and the collection to which it is contributing items; can export these setting for use in other projects
- Metadata templates: Use to streamline adding metadata to items imported into the project
- Metadata field types: Contains information about how the metadata fields are defined for the collection
- Images & thumbnails: Use to modify the size and type of your display images; create watermarks, brands, and bands
- Image rights: Use to configure the display of copyright information or indicate ownership of items in the collection; must be configured before importing items
- Processing and OCR: Use if you want to create fully searchable text
- Project options: Use to configure how upload items in the project to the collection on the server; use and setup the spell checker
- Find in Collection: Useful for maintaining already-built collections
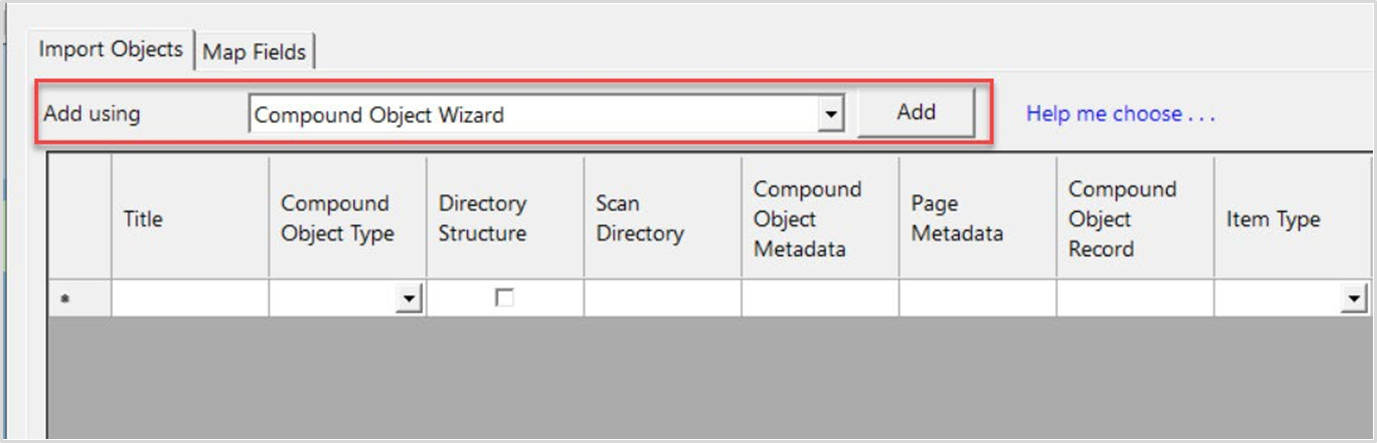
3: Add compound objects
Add digital files to the project
- Click the Add menu.
- Select Compound objects.
Note: Use this to add multiple related files (e.g., pages in a document, audio files on a CD, postcards, etc.).
- Add using Compound Object Wizard. Click Add.
- Select the type of compound object to create. Click Next.

- Browse to folder/directory to locate the desired image folder to add
- Select the desired folder. Click Next.
- Select Yes to generate display images. Click Next.
- Select Page Information, including page names and location of transcripts. Click Next.

- Click Finish to add compound object.
- Click Close to dismiss the Summary Screen.
View and edit the digital objects after they have been imported to the project
- In the project spreadsheet, double-click to open a compound object.
- Edit the object and items metadata.
- View Structure - Use the left-navigation to display and edit metadata for the object and each item in the compound object
- View Thumbnails - Use the thumbnails to display and edit metadata for the object and each item in the compound object
- View Spreadsheet - Display the object and each item in the compound object in a spreadsheet view for editing
- Click Save at the top of the editor to save changes.
Upload digital objects to the collection on the server
- In the project spreadsheet, select each object to upload (or use select all to select all objects).
- Click Upload for Approval at the top of the project spreadsheet.
- Fix any errors and select those items to Upload for Approval again.
Approve objects/items and index the collection
Approve items uploaded to the collection
- In the Project Client, click Administration menu.
- Select approve.
Note: This opens to the approval page in CONTENTdm Administration.
- (Optional) Can select to Approve all or Approve and Index All.
- Select individual items or select all to approve.
- Click go.
Index the collection
- In CONTENTdm Administration, click the items tab
- Click index.
- Under Index Scheduler section, click Index Now to index the collection immediately
Or - Schedule the index.
- Select Once on to schedule the index process to run on a specified date and time.
- Select Recurring at to specify day(s) and time for the index process to run more than once.
PDF files
PDF characteristics
- Ideal file format for documents initially created as digital documents (e.g., dissertations)
- Not ideal file format for scanned images because scanned items do not automatically contain embedded text
- Adobe Acrobat Reader required to read PDF files
PDF files in CONTENTdm
- A PDF file can be treated as:
- Single file
- Compound object
- An advantage to converting a PDF file to a compound object is that each page of the PDF becomes a page with its own metadata record.
Add PDF files
Add PDF as a single item
- Under Project Settings Manager, select Metadata templates. Configure PDF metadata template, as needed.
- To add a single PDF file:
- Click the Add menu.
- Select Item.
- Browse to folder/directory to locate the desired file to add.
- Select the desired file.
- Click Add to import the file into the project.
- Click Close to dismiss the Summary Screen.
Add PDF as a compound object
- Under Project Settings Manager, select Processing. In PDF File Conversion section, select convert PDF to compound objects.
- To add a single PDF file:
- Click the Add menu.
- Select Item.
- Browse to folder/directory to locate the desired file to add.
- Select the desired file.
- Click Add to import the file into the project.
- Click Close to dismiss the Summary Screen.
Test your knowledge
- What are the four types of compound object structures that CONTENTdm supports?
- How does CONTENTdm distinguish a monograph from a document?
- There is really only one required action that must be done as part of collection configuration to prepare the collection for transcript files. What is that step?
- When importing images and text as part of compound object, how does CONTENT match the image file to the appropriate text file? In other words, what does it match on?
- If you use the compound object wizard, it is not necessary for the files to be stored in a root directory.
- True
- False
- Do all PDF files contain embedded text?
- True
- False
- There are two options for importing PDF files in CONTENTdm. What are they?
- When viewing a compound object for which there is a transcript file, what is the advantage for the end user if the institution has chosen to use the OCR feature that is available through CONTENTdm?
Supplemental information
- CONTENTdm training - Find this class and additional training content here.
- CONTENTdm technical office hours - Find time and call-in information here.
- CONTENTdm FAQ & Troubleshooting articles
- CONTENTdm Community Center
- Connect with OCLC staff and peers using CONTENTdm.
- Attend webinar events and keep up with product news
Additional questions? Contact OCLC Support in your region.