Using a data ingest table
This information explains how to carry out a data mapping from a column in an external source database Table, to the appropriate OLSTF tag for OLIB. This involves the creation of an Import Batch record as normal, and the management of the import in general remains the same: Import a tagged file through OLIB Web.
Create Import Batch for source database table
Using OLIB Web, create an Import Batch record as follows:
- In the pin menu go to Data Exchange> Import Batch.
- Click New Record and complete the following fields:
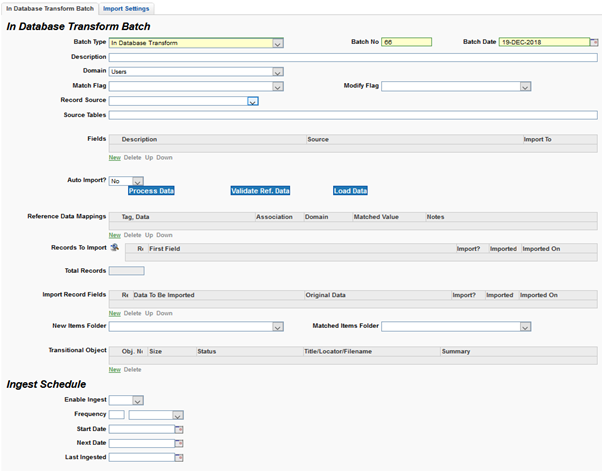
Import Batch fields
| Field | Description |
|---|---|
| Batch Type |
Defaults to MARC Exchange format. Change this to In Database Transform. The screen will change to the In Database Transform Batch screen. |
| Description | Enter some meaningful text as this will allow you to subsequently retrieve the Import Batch for processing. |
| Domain | Select Users from the dropdown. |
| Match Flag |
Select from the dropdown - either
depending on which value you are going to match records on for subsequent uploads. Using the Secondary Code value (SEC tag) with the primary key from the source system will allow changes to the Barcode value without complicating transaction, messaging or fine histories. The first tag in each record must be SEC, if matching on Secondary Code, and BAR, if matching on Barcode. |
| Record Source | Select from dropdown. |
| Source Tables |
In this text box, enter a comma separated list of OWNER.table_names. E.g. olib900sp12.marc_batch, olib900sp12.data_ingest |
| Fields | Click New. To obtain the Import Field Details window. |
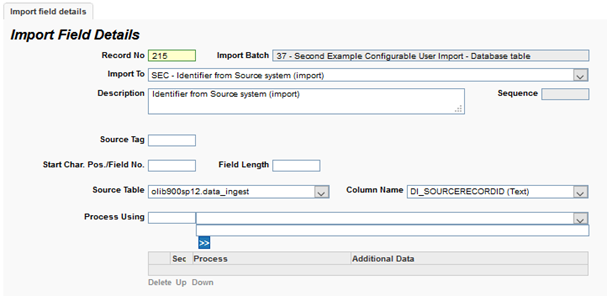
Import Field Details
Use the Import Field Details window to create a record to map each incoming field from your source database Table to the equivalent OLSTF Users tag.
Note: If any special handling of data is required, please contact OCLC Support.
| Field | Description |
|---|---|
| Import To | From the dropdown, select the required OLSTF tag that this field will map to. |
| Description | OLIB populates from your above choice, e.g. Identifier from Source system (import) |
| Source Tag | Not required for data ingest Table. |
| Start Char.Pos./Field No. | Not required for data ingest Table. |
| Source Table | This dropdown is populated from the tables you listed in the Import Batch screen. Select the table in which this column resides. The screen re-draws as OLIB populates the following Column Name dropdown. |
| Column Name | This is populated from the columns in your chosen table. Select a Column Name which will map onto the chosen OLSTF tag. |
| Process Using |
Input not required. If any data does not map to a tag, contact OCLC Support for advice. |
Data setup mapping
For the initial configuration, there must be a Data Setup mapping which identifies the records to retrieve. For usage of the system supplied data_ingest table, this normally involves adding several processing steps such as:
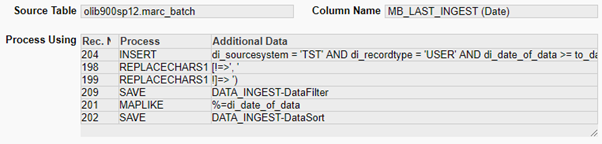
1. From Process Using, select “INSERT Add data to the beginning”
a. Specify “ di_sourcesystem = 'TST' AND di_recordtype = 'USER' AND di_date_of_data >= to_date(' ”
i. Where ‘TST’ and ‘USER’ are values supplied in the table by the source system
ii. Note the single quote at the end of the value, this is required
b. Click “>>”
2. Select “REPLACECHARS1 Replace all occurrences of this=>that”
a. Specify “ [!=>', ' “
b. Click “>>”
3. Select “REPLACECHARS1 Replace all occurrences of this=>that”
a. Specify “ !]=> ') “
b. Click “>>”
4. Select “SAVE Save the data for use later in this record”
a. Specify “DATA_INGEST-DataFilter”
i. This is case sensitive and will be used internally to select which records from the DATA_INGEST table to import, using the Date Last Ingested (from the Column Name field) as the date from which to select records
b. Click “>>”
5. Select “MAPLIKE Map Data Values using “like””
a. Specify “%=di_date_of_data”
b. Click “>>”
6. Select “SAVE Save the data for use later in this record”
a. Specify “DATA_INGEST-DataSort”
i. This is case sensitive and will be used internally to determine the order in which the records are processed from the from the DATA_INGEST table.
b. Click “>>”
Save your field mapping record. OLIB returns you to the Batch record. Click New and repeat to map all the fields that are required.
Address information
The User Import requires that the address information is presented in a separate OLSTF record. If the address information is present in the same line as the other user data, then a record separator is required before the address tags are mapped. Starting a new record also means adding the SEC or BAR identifier, too.
In Import Field Details, in order to add the separator, you must map a field that is always populated, for example the identifier.
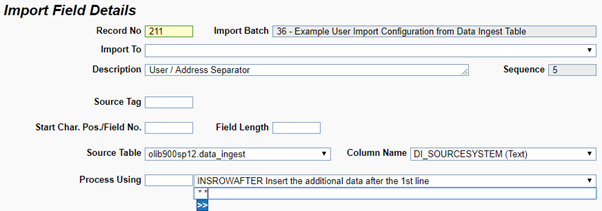
To process this as a separator, rather than a field, select “INSROWAFTER …” from the drop-down on the Process Using line and enter “* *” in the field below. Before Saving this field mapping, click on the “>>” button to add the process to the process steps:

Immediately after this must be the chosen record matching field (in the example here it is Barcode) so that the import can identify which user this address applies to. The address tags can then be mapped, giving a field list such as:
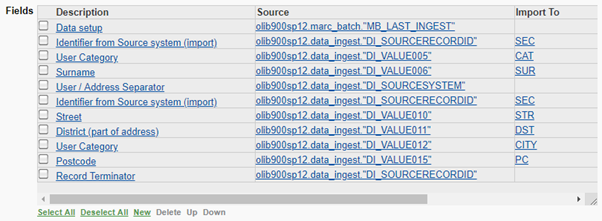
Note that the fields are processed in the order listed on the Import Batch and not the field order on the source table. Note also that a record terminator is required at the end of the processing.
When all the fields are completed click Process Data:

This populates the Records to Import and the Import Record Fields box.
It displays a row for each record showing the data to be imported and the original data:
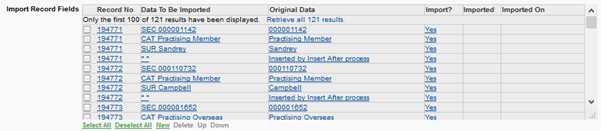
(Hover over a record to view more details.)
Edit field mappings
If the data is not going to map to the correct OLIB field, go back to Fields and simply click the link to edit the mapping in Import Field Details.
When you click Process Data again, the Import Record Fields will show which OLIB tag the original source data will map to.
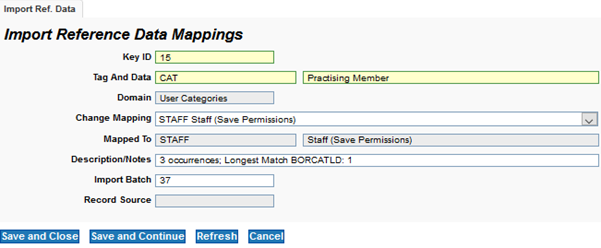
When the original fields are all set to map to the desired OLIB tag, you can use Validate Ref. Data (there must first be data in the Import Record Fields list) This populates Reference Data Mappings with a list of the source Tag and the domain and reference data it will map to:

To change a reference data mapping, click on the link to edit the value it will map to:
Import / Don't Import
Optionally in the Import Batch record, in Import Record Fields you can also choose to include or not include a field - select the box next to the field and in Actions choose Toggle Import/Don’t Import
The Import? column displays Yes/No accordingly.
When ready, press the blue Load Data button, OLIB responds:
The data load has been scheduled for immediate processing. (Job No: nnnnn)
Click OK and save the Batch record to proceed with the import. The Imported? and Imported On columns will be populated with Yes and today’s date/time when the data is loaded.
Checking progress
Check the Data Exchange> Import Log domain. If an import fails entries are made here containing reasons for failure. Even import batches that load correctly may still have some records missing. Search for import logs by Batch No.
There is more information about validating the reference data, monitoring and managing the import in general: Import a tagged file through OLIB Web
If necessary, rectify any import problems and restart the import process.