Import of csv file via daystart
OLIB can be configured to import a csv file of user data, by mapping the incoming csv fields to the appropriate OLSTF Users tag.
Create Import Batch record
Using OLIB Web, create an Import Batch record as follows:
- In the pin menu go to Data Exchange> Import Batch.
- Click New Record and complete the fields as follows:
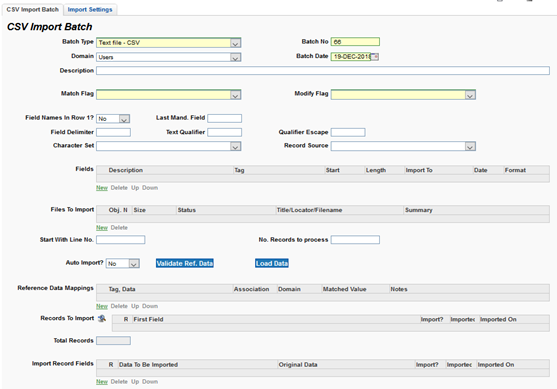
Import Batch fields
| Field | Description |
|---|---|
| Batch Type | Defaults to MARC Exchange format. Change this to Text file - CSV. The screen will change to the CSV Import Batch screen. |
| Domain | Select Users from the dropdown. |
| Description | Enter some meaningful text as this will allow you to subsequently retrieve the Import Batch for processing. |
| Match Flag |
Select from the dropdown – either · OLSTF Users: Match on Barcode value · OLSTF Users: Match on Secondary Code value depending on which value you are going to match records on for subsequent uploads. Using the Secondary Code value (SEC tag) with the primary key from the source system will allow changes to the Barcode value without complicating transaction, messaging or fine histories. The first tag in each record must be SEC, if matching on Secondary Code, and BAR, if matching on Barcode. |
| Field Names In Row1? |
In a CSV file, column headers are sometimes included as the first line, and each subsequent line is a row of data. In this case set to Yes. If the data commences in the first row of the file set to No. |
| Last Mand. Field | This setting is pertinent only if the incoming data contains line-breaks within the data. This is primarily relevant to Title data for Abstracts and not for User data. |
| Field Delimiter | Enter the character used in the file to separate the fields. For a CSV file this is normally a comma (,). |
| Text Qualifier | Normally for a CSV file you should enter double quotes (“). This prevents the comma in an actual field value from being interpreted as a field separator. |
| Qualifier Escape |
Normally set to double quotes (“) for CSV. Double quotes are used as above for the Text Qualifier, therefore you would need to escape this field wrapper itself. |
| Character Set | Select Unicode 3.0 UTF-8, unless advised otherwise by the supplier of the file. |
| Record Source | Optionally select from dropdown. This serves purely to help find the Import Batch. |
| Fields | Click New to obtain the Import Field Details window. |
In Fields above, click New to obtain the Import Field Details window.
Import Field Details
Use Import Field Details to create a record to map each incoming field from your source CSV file to the equivalent OLSTF Users tag.
Note: if any special handling of data is required, please contact OCLC Support.
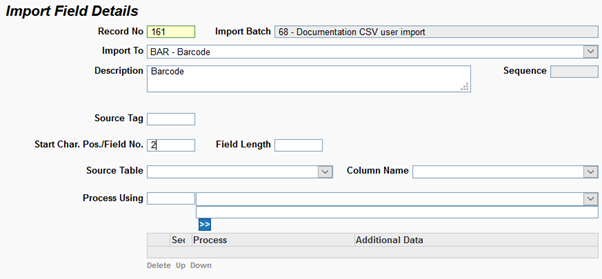
| Field | Description |
|---|---|
| Import To | From the dropdown select the OLSTF tag that this field will map to, e.g. BAR, SEC.. |
| Description | OLIB populates from your above choice, e.g. Identifier from Source system (import). |
| Source Tag | For CSV do not use. |
| Start Char.Pos./Field No. | For CSV enter the column number from your source file. |
| Field Length | This is for fixed width files only. |
Save the details and repeat for all the fields that are required – in the batch record, click New in Fields, enter the details above and save.
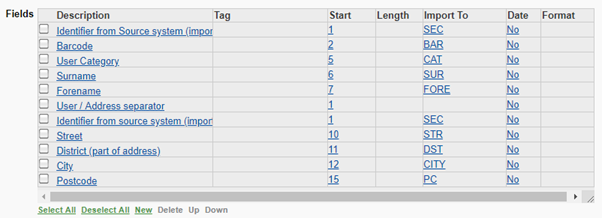
On completion, the CSV Import Batch record displays the mapping in the Fields box:

Address information
The User Import requires that the address information is presented in a separate OLSTF record. If the address information is present in the same line as the other user data, then a record separator is required before the address tags are mapped. Starting a new record also means adding the SEC or BAR identifier, too.
In order to add the separator, you must map a field that is always populated, for example the identifier:
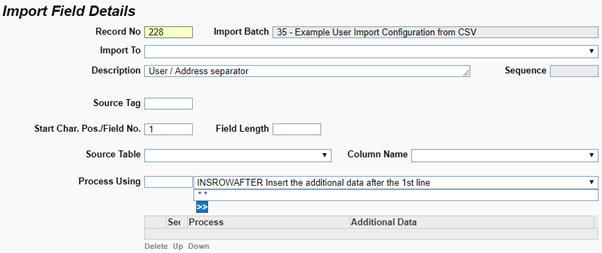
To process this as a separator, rather than a field, select “INSROWAFTER …” from the drop-down on the Process Using line and enter “* *” in the field below. Before Saving this field mapping, click on the “>>” button to add the process to the process steps:

Immediately after this must be the chosen record matching field (in the example here it is Barcode) so that the import can identify which user this address applies to. The address tags can then be mapped, giving a field list such as:
Note that the fields are processed in the order listed on the Import Batch and not the field order on the incoming file. Note also that a record terminator is automatically added after each of the incoming lines has been processed, so a final terminator is not required to be specified here.
Tip: you can add more new fields, if you later find that a field should be added. To do this:
1. In modify mode, check the box to select a record in the list, above which the new field should be positioned.
a. This is critical if you are adding a new user field mapping (such as LOC for Location) so that the field is not mapped in the address record.
2. Click New and complete the above fields as normal. In Start Char. Pos / Field No, enter the appropriate column number for this new field.
3. Save and Close - OLIB now displays the new field above the one you had selected.
Note, you can also change the numbers if required.
On completion, Save and Continue. Next, you attach the file to import.
In the CSV Import Batch record, in Files to Import, click New to load the subsequent window for the import file details and the file attachment - Object fields.
Object Fields
| Field | Description |
|---|---|
| Type | Select Comma Separated Text |
| Title | Optionally enter a suitable title for the file attachment, e.g. User data import. If left blank OLIB inserts the Locator or Filename to display in the Import Batch record. |
| Version | Optional. |
| Status | Not required. |
| Locate by |
Select Filename from the dropdown. |
| Exclude from Export? | Not required. |
| File | Check the box. |
| Thumbnail | Not applicable. |
| In Database | Ensure this is set to Yes. |
| Import Now? | Ensure this is set to Yes. |
Tip: it is vital that the In Database and Import Now? fields are set to Yes for the import to work.
When you Save and Close the Object record, OLIB displays the Select Files To Attach alert:

To attach the csv file
In the above alert box, click on the Browse button, locate and select the file, and click Open.
Next click on the Save and Close button and the file will be uploaded to OLIB. You will be returned to the Import Batch screen with the file name displayed in the Files To Import field.

Click on Save and Continue.
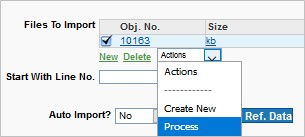
Use the Process data function next, prior to validating reference data: select the file in Files to Import and choose Process from the available Actions:
OLIB loads the following Alert screen:
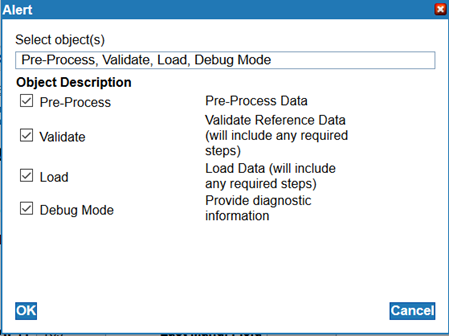
In the above example we have selected all the processes to run. When you click OK
OLIB displays the following:
The data load has been scheduled for immediate processing. (Job No: 9373)-OK
The data load has been scheduled for immediate processing. (Job No: 9373)-OK
The actual job number will vary, but it may be useful to note for support purposes if there are any problems. Click OK to acknowledge this message and return to the batch record. In the background, OLIB will populate the records for import in the Import Record Fields:

This displays a row for each record showing the data to be imported and the original data. Hover over a record to view more details.
Import / Don't import
You can toggle between these options by checking the box to select a record and clicking Toggle Import/Don’t Import in the Actions drop down. The Import? column displays Yes/No accordingly.
Save the Batch record to proceed with the import. The Imported? and Imported On columns will be populated with Yes and today’s date/time when the data is loaded.
Tip: there is more information about validating the reference data, monitoring and managing the import in the general
Check progress
Check the Data Exchange> Import Log domain. If an import fails entries are made here containing reasons for failure. Even import batches that load correctly may still have some records missing. Search for import logs by Batch No.
If necessary, rectify any import problems and restart the import process.