Configure print requests
Overview
The Print Request application manages the processes for printing pickslips. Print Requests print pickslips to your local printer.
Pickslips can be printed automatically (on a pre-determined schedule, see Automatic scheduling for more information) or be triggered by staff to print on demand.
Configure what printer to use for each instance of Print Request
To change the printer associated with an existing instance of Print Request
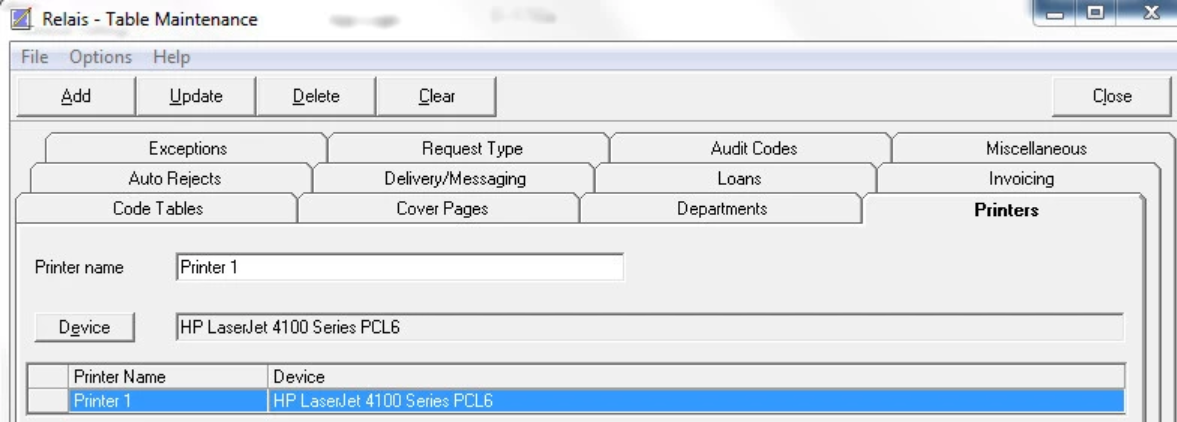
- Login to Table Maintenance.
- Select the Printers tab.
- Select the Printer name associated with the specific instance of Print Request, e.g, ILL Office - note this must be entered exactly as it appears in Application Settings - Print Request.
Note: If no particular Print Request instance has been defined, the Printer name should be named "Printer 1". - Click Device to display the Windows Print box listing all known local/network printers.
- Select the printer to use or add a new one.
- Click Print.
- Click Update to update the Device name.
If no printer is specified then the default Windows printer is used.
If you do not want to use the default Windows printer, then the first Printer should match the first instance set via Administer Settings.
Printer names must match Print Request instances found in Application Settings. The names are case-sensitive.
Configure printing a Summary Sheet
An optional summary sheet can be printed at the end of each set of pickslips printed or emailed.
This summary sheet lists the request number of all requests in the batch just printed.
For customers using the Relais Hosted Service and the Print Request application is run from the server rather than locally, please contact Support to turn this option on/off.
Turn on the summary sheet
- Login to Administer Settings.
- Select the Application Settings tab.
- Open the Distribution section.
- Open the Print Request section.
- Highlight the instance of Print Request for which the summary sheet is to be turned on or off.
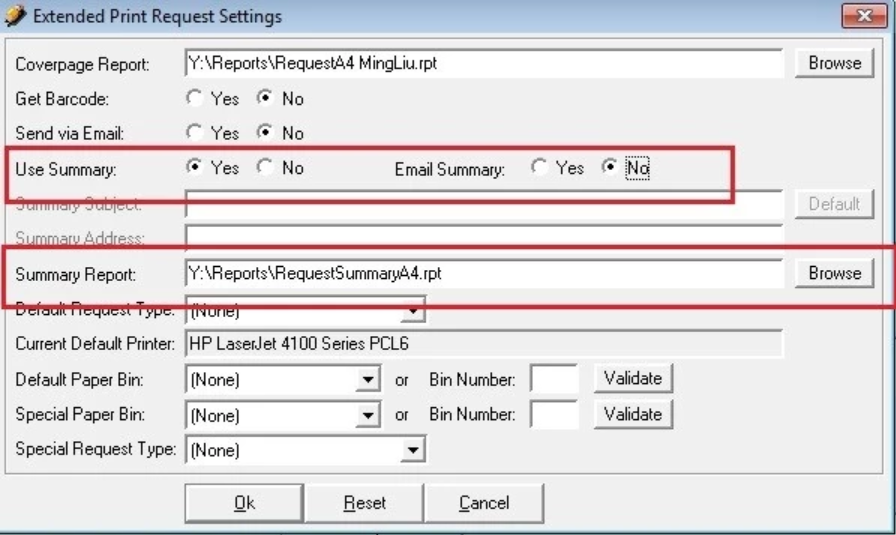
- Click Edit Extended Settings.
- Set Use Summary = Yes.
- Set Email Summary = No.
- Browse to the rpt to use. The choices are:
- RequestSummary.rpt - Lists request numbers on 8.5" X 11"
- RequestSummaryA4.rpt - Lists request numbers on A4
- RequestSummaryBarcode.rpt - Lists request numbers and corresponding barcodes on 8.5" x 11"
- RequestSummaryBarcodeA4.rpt - Lists request numbers and corresponding barcodes on A4
- Click Ok.
Repeat the above process for each instance of Print Request for which the summary sheet is to be turned on.
Turn off the summary sheet
- Login to Administer Settings.
- Select the Application Settings tab.
- Open the Distribution section.
- Open the Print Request section.
- Highlight the instance of Print Request for which the summary sheet is to be turned on or off.
- Click Edit Extended Settings.
- Set Use Summary = No.
- Click Ok.
Repeat the above process for each instance of Print Request for which the summary sheet is to be turned off
Configure the Summary Sheet to be sent via email
For customers using the Relais Hosted Service and the Print Request application is run from the server rather than locally, please contact Support to turn this option on/off. Please provide the email address(es) to use if turning this on.
Turn on sending the summary sheet via email
- Login to Administer Settings.
- Select the Application Settings tab.
- Open the Distribution section.
- Open the Print Request section.
- Highlight the instance of Print Request for which the summary sheet is to be turned on or off.
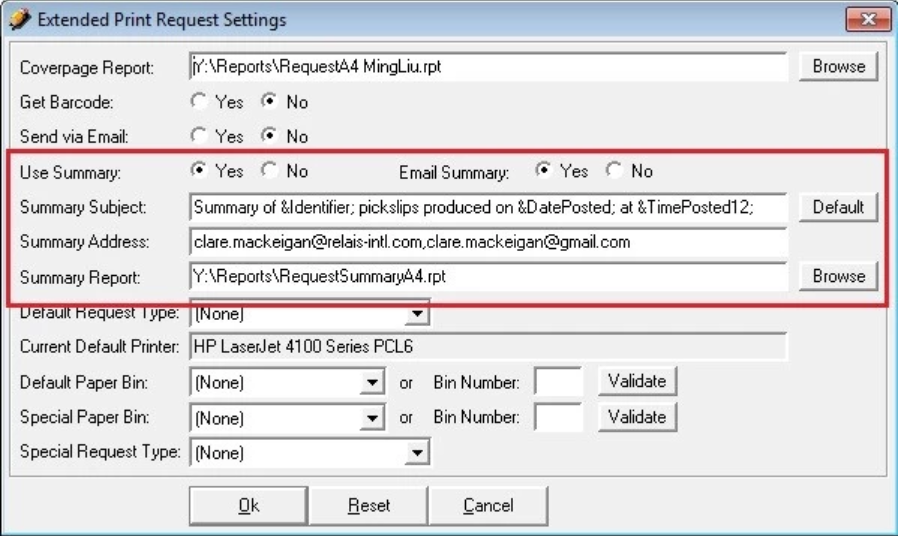
- Click Edit Extended Settings.
- Set Use Summary = Yes.
- Set Email Summary = Yes.
- Enter the Subject to be used for the email - Click Default to see the default subject (this can also be modified). The following tokens can be used in the subject:
- &Identifier; - Replace with the name of the instance of Print Request.
- &Date; - Replace with the date on which Print Request was run.
- &Time12; or &Time24; - Replace with the time on which Print Request was run (using either a 12 hour or 24 clock as specified).
- Enter the email address(es) to which the summary sheet is to be sent. If multiple email addresses are specified, separate them with a comma.
- Browse to the rpt to use. The choices are:
- RequestSummary.rpt - Lists request numbers on 8.5" X 11".
- RequestSummaryA4.rpt - Lists request numbers on A4
- RequestSummaryBarcode.rpt - Lists request numbers and corresponding barcodes on 8.5" x 11".
- RequestSummaryBarcodeA4.rpt - Lists request numbers and corresponding barcodes on A4.
- Click Ok.
Repeat the above process for each instance of Print Request for which the emailing of the summary sheet is to be sent via email.
Turn off sending the summary sheet via email
- Login to Administer Settings
- Select the Application Settings tab.
- Open the Distribution section.
- Open the Print Request section.
- Highlight the instance of Print Request for which the summary sheet is to be turned on or off.
- Click Edit Extended SettingsSet Use Summary = Yes.
- Set Email Summary = No.
- Click Ok.
Repeat the above process for each instance of Print Request for which the emailing of the summary sheet is to be turned off
Sorting and Scheduling
"Print Request" uses the Order By Clause to ensure that pickslips are printed in a predefined sort order.
Sorting options are the Supplier Code, Call Number, and TitleWith these automated sorting rules, scheduling each instance less frequently will increase the batch size and thus maximize the sorting benefits.
In order to take advantage of the sorting it is recommended that scheduling the printing of pickslips is based on staff availability. For example, 1 hour before staff start in the morning and then once or twice during the day depending on staff hours. For customers that choose to run batches continually, the minimum frequency is 30 minutes.