Items
Use the Items configuration to set options available when end users view items in your collections. For example, manage print and download options, choose whether to display hyperlinks for fields with controlled vocabulary, and configure AddThis settings for sharing.
If enabled, the Print feature displays a Print button above the record search box. End users can then click to print the item.
The printing behavior varies depending on the type of digital item. For example, PDF items will open in a PDF viewer from which you can print. To print the PDF item preview with metadata, use the browser’s print function.
If you have a compound object of images or PDFs, you can set it so users can choose to print just one page or the entire compound object by selecting from the dropdown menu of the Print button. For PDFs, choose to Convert multiple-page pdf files to compound objects in CONTENTdm Administration, see PDF conversion, or in the Project Client, see Work with PDF files. For image compound objects, choose to Create print PDF on the Page Information screen while using the add compound objects wizard, see Choose a type of compound object to create.
Note: The Print button can be added or removed from the item page, but if the item is a PDF, they can still print the item using their browser's capabilities, even if the Print button has been disabled on the item page.
Configure the Print button
- From the Website Configuration Tool, select the Global Settings or Collection-level Settings tab.
- From the left-side menu, select Items > Print.
- Select Enable Print button.
- Click Save, then choose to Preview or Publish.
Download
If enabled, the Download feature displays a Download button above the record search box, allowing the end users to download the digital file.
Note: Even if enabled, the Download button won't display for metadata-only items.
For images, you can also choose options for download sizes. End users can choose from these options through a dropdown menu. These options are not applicable to items other than images.
Note: The Download button can be added or removed from the item page, but if the item is a PDF, they can still download the item using their browser's capabilities, even if the Download button has been disabled on the item page.
Configure the Download options
- From the Website Configuration Tool, select the Global Settings or Collection-level Settings tab.
- From the left-side menu, select Items > Download.
- Select Enable Download button.
- Select the checkbox for each size option you want to display for image files. Also, edit the Menu Label to be used.
- Small Image (maximum 250 x 250 pixels)
- Medium Image (maximum 500 x 500 pixels)
- Large Image (maximum 1000 x 1000 pixels)
- Extra Large Image (maximum 2000 x 2000 pixels)
- Full Size Image (full resolution of stored image)
- Archival Image (original image stored in Archive File Manager)
- Click Save, then choose to Preview or Publish.
Images
Note: Global Settings only.
Choose whether to enable IIIF Image API for your website. For more information about IIIF, please see IIIF API.
Hyperlinks
If enabled, the Hyperlinks setting will display controlled vocabulary in metadata fields as hyperlinks. End users can click those hyperlinks to bring up a search for that term in the field for the current collection. For more information on controlled vocabulary, see Use controlled vocabulary.
Note: This feature does not affect hyperlinks added manually to metadata fields. Those hyperlinks will always display, regardless of the configurations set in this menu.
Configure hyperlinks for controlled vocabulary
- From the Website Configuration Tool, select the Global Settings or Collection-level Settings tab.
- From the left-side menu, select Items > Hyperlinks.
- Choose to Enable for fields with controlled vocabulary or Disable for all fields.
- Click Save, then choose to Preview or Publish.
Share
CONTENTdm previously supported the Share function using a free sharing service called AddThis. As of May 31, 2023, Oracle has terminated the AddThis service. Refer to AddThis for more information.
If you previously added this functionality, remove it from your site or collection.
Disable the Share feature
- From the Website Configuration Tool, select the Global Settings or Collection-level Settings tab.
- From the left-side menu, select Items > Share.
- Delete the ID in the AddThis ID box.
- Deselect the Enable AddThis Functionality checkbox.
- Click Save, then choose to Preview or Publish.
Saved Items
If enabled, the Saved Items feature allows end users to save items and export or share a link to those items, similar to the favorites feature for CONTENTdm 6.X.
Once enabled, the Save option will appear on item pages and search pages on your website. Click the Save button to save the item. The button will update to read Saved. Click Saved to unsave the item.

You can also save a child page of a compound object, which is especially useful for compound objects with a large number of pages. The Save button operates on what’s currently displaying (use the URL to confirm), either the parent object or the current child.
A Save All button will also appear on the search/browse pages, saving all items on the current page. If all items are saved, the button changes to Remove All, which unsaves all items on this page.
View and manage your saved items through the Saved Items page at https://.../digital/saved. To use the Saved Items page, add a link to it in your main navigation through Global Settings > Navigation > Menu, or by customization.
On the Saved Items page, items are sorted in the order they were saved. You can add up to 200 items to your Saved Items.
There are 3 action buttons on this page:
Note: These operations will apply only to those items that are selected.
- Remove: Remove the selected items from the Saved Items page.
- Create Link: Build a permanent link to the selected items. The URL will include random characters, and you can append custom link text to help identify it.
- You cannot modify the set of items for a link after it is created. To share a different set of items, create another link.
- Save or bookmark the created link, as you cannot retrieve a created link once you have closed the dialog box.
Note: reCAPTCHA is used to prevent bots from creating junk links. If your site is using a custom domain and would like to use the Saved Items feature, please contact OCLC Support to have your custom domain added to reCaptcha.
- Export: Choose to save a plain text file or a Simple HTML file, which can be emailed or shared with others.
-
Note: The Public URL defined in Website Configuration Tool > Global Settings > Analytics & SEO > Public URL is used to generate links in the exported files. Make sure your URL does NOT include a "/" at the very end for the links to work properly in the exported files (even though the example URL shows the /).
-
If you save restricted items in your list and share a link (or exported file) to those items, anyone viewing that link will not be able to see those items unless they also have access rights to view them.
The fields for display (list view) on the Saved Items page, shared link page, exported .txt and .html files all follow the search/browse page display, which can be set in Website Configuration Tool > Global Settings > Results > Choose fields for display and order they appear in.
Note: The first display field set in Website Configuration Tool must be the first field in CONTENTdm Administration for it to appear properly for Saved Items.
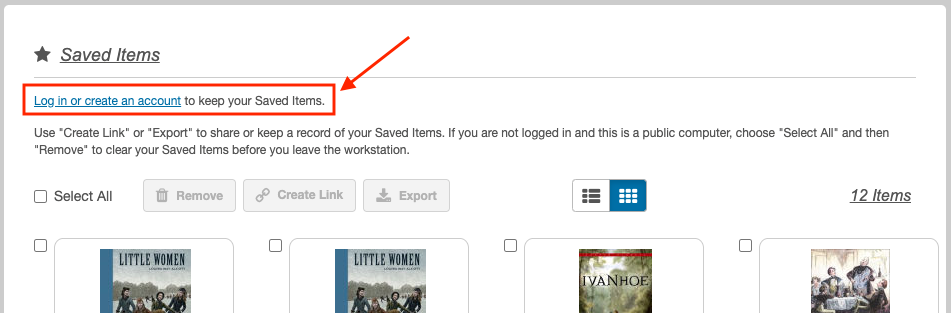
You can use the Saved Items feature without logging in. If used without logging in, items added to the Saved Items page are kept in the browser’s cache. If you are using a public computer, use Remove to clear all saved items before you leave the workstation. (You can also clear saved items by deleting the browser's cache.)
If you want to keep your saved items, you should create an account with CONTENTdm and log in. On the Saved Items page, you can follow the link to the Log in page to create an account or log in:
CONTENTdm user accounts use OCLC LDAP accounts, which are the same as CONTENTdm administration accounts. (The same account will work for all CONTENTdm sites that have the Saved Items feature turned on. But the saved items lists will be different for each site.) For the account function to work, you need to have enabled your login page in Website Configuration Tool.
Note: If, for some reason, you want your users to use the Saved Items feature but don’t want to enable the login page or only want them to use the Saved Items anonymously, you can modify the interface text on the Saved Items page so that there won’t be a link to the login page.
If you save some items as an anonymous user and then log in, the system will try to merge them with the items you already have in your account. If the total number of items would exceed 200 during merging (after removing duplicates), the newest saved items before you logged in would be discarded – those over 200.
If you log out while some items are saved, they will remain in the browser's cache. This means if you are working on a public computer, you should log out and remove all of your saved items before you leave.
You cannot work across browsers/devices when you are logged in simultaneously – the items might not sync correctly. You will need to log out of the browser/device you stopped working on and log in to the browser/device you intend to work on. CONTENTdm does have a time-out mechanism built-in for inactivity.
Enable and configure the Saved Items feature
- From the Website Configuration Tool, select the Global Settings tab.
- From the left-side menu, select Items > Saved Items.
- Select Enable saved items.
- Follow the instructions below to add a link on your website to the saved items management page using /digital/saved as the URL.
- Turthe n on login page by going to Navigation > Menu, select Enable login.
- Click Save, then choose to Preview or Publish.
- If you are using a custom domain, contact OCLC Support to have your custom domain added to reCaptcha to use the Create Link function.