Circulation hold workflow
Find an overview and flowchart describing the hold workflow in WorldShare Circulation.
Circulation hold flowchart
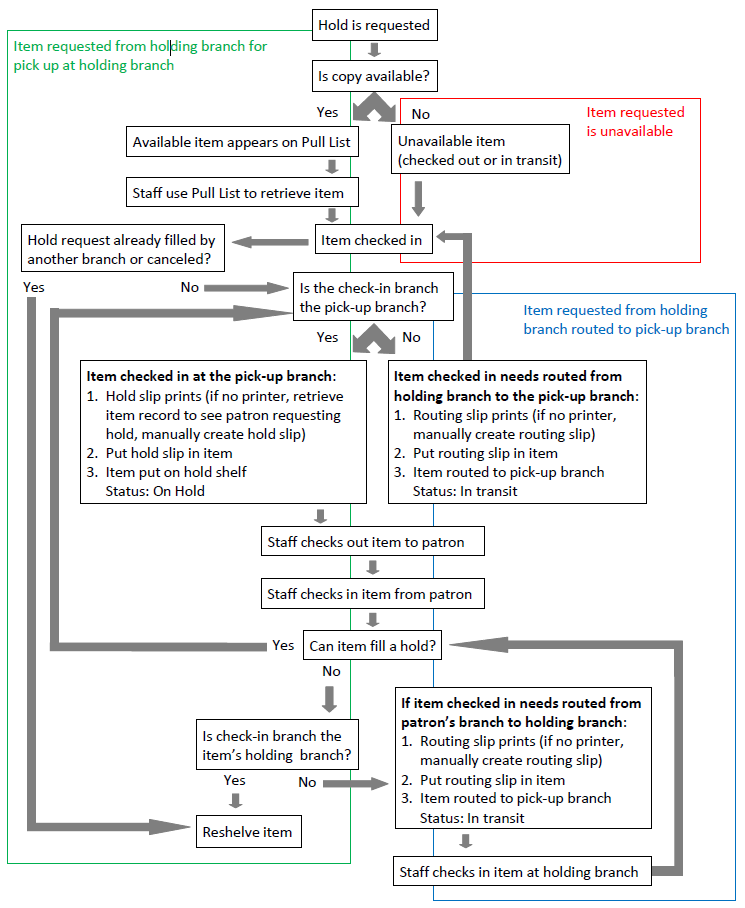
Common hold workflows
Patron requests item owned by branch A for pickup at branch A (See green part of flowchart)
- Patron requests hold on item owned by branch A for pickup at branch A.
- If a copy of item is available, it appears on branch A's Pull List.
- Staff uses Pull List to retrieve item from the stacks.
- Staff checks in the item (if WMS says to reshelve the item, the hold request was filled by another branch or was canceled). WMS prints Hold Slip (if no printer, staff retrieve item record to see patron requesting hold and manually create hold slip).
- Staff place item on Hold shelf.
- Patron notified via email that item is available for pickup.
- When patron arrives, staff checks out item to patron.
Patron requests item owned by branch B for pickup at branch A (See blue part of flowchart)
- Patron requests item owned by branch B for pickup at branch A.
- If a copy of item is available, it appears on branch B's Pull List.
- Branch B staff uses Pull List to retrieve item from stacks.
- Branch B staff checks in item (if WMS says to reshelve the item, the hold request was filled by another branch or was canceled).
- WMS prints Routing Slip and tells staff to route item to branch A (if no printer, manually create routing slip).
- Item sent to branch A.
- When item arrives at branch A, staff checks in item.
- WMS prints Hold Slip (if no printer, staff retrieve item record to see patron requesting hold and manually create hold slip).
- Staff place item on Hold shelf.
- Patron notified via email that item is available for pickup.
- When patron arrives, item is checked out to patron.
- When patron returns item to branch A, staff checks it in. WMS prints Routing Slip and tells staff to route item to branch B (if no printer, manually create routing slip).
- Item sent to branch B.
- When item arrives at branch B, staff checks in item.
Unavailable items (checked out or in transit when hold is requested (See red part of flowchart)
- Patron or librarian requests a hold on an item, but it's checked out to another patron.
- When the item is returned, staff checks it in. The Action column on the check in screen says "Hold."
- WMS prints Hold Slip and tells staff to place item on Hold shelf (if no printer, staff retrieve item record to see patron requesting hold and manually create hold slip).
- Patron notified via email that item is available for pickup.
- When patron arrives, staff checks out item to patron.