Check out
Standard check out
- In the left panel Assist Patrons area, scan or type the patron barcode in the Enter barcode box. If you type the number, click Go or press <Enter>. The Checkout tab of the patron record appears.
- In the Enter barcode box, scan or type the barcode for the item. If you type the number, click Go or press <Enter>. The item appears in the list of checked out items. The system assigns the due date specified in the Loan Policy or the due date specified by the staff member at check out.
- Scan or type the barcodes for any additional items.
- After checking out or renewing the last item, the check box (first column on the left) is automatically checked so you can choose whether to print or email a receipt. To print or email another receipt, check the boxes for the items and click Receipt.
You can look up a patron if the patron barcode is unavailable. See Look up patron.
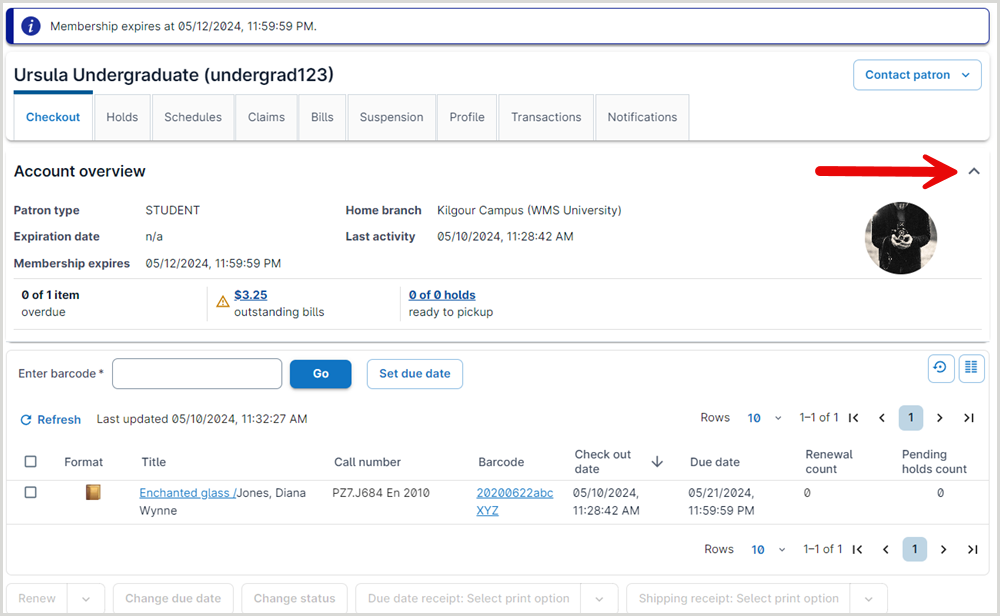
Account overview
Includes Account Overview (totals for loans, overdue items, and holds), balance for unpaid bills, an item scanning area, and a list of items currently checked out.
Close the Account overview accordion using the expand and collapse chevron on the right side of the screen. The system remembers your preference when you open the next patron account.
Notes:
- If the patron has overdue items, unpaid bills, holds ready for pickup, or claimed loans, then the accordion will open by default regardless of your preference.
- Notes in a patron's user account will not force the Account overview accordion to open. If library staff need to review patron notes, consider adding the alert flag (!) to the beginning of the note text which will trigger a pop-up modal to appear when the patron's account is opened. Refer to Patron notes for more information.
- If the library user has a membership status, the status will appear at the top of the screen. Expiration dates for the membership status will appear in Account Overview. See Manage library memberships for more information.
- If a user is suspended, the end date and time of the suspension will appear at the top of the screen. See Suspend patrons for more information.
Due dates automatically move
There are two situations in which the system will automatically move a due date. If a due date occurs:
- Within a period that the library is closed, the system moves it to the next date the library is open.
- After the expiration of a patron's library membership, the system moves it to the day before the expiration date.
Default receipt option
Once a receipt option is selected, it will be the default receipt option until either:
- Another receipt option is selected
- The browser history is cleared
Configure columns
Note: Preferences are retained per your user account.
- On the right side of the screen, click the Show columns button
 .
. - In the Show Columns window, check or uncheck the columns you want to show or hide.
- Th
- Close the Show Columns window by clicking anywhere outside it.
Check out a held item
When you enter or scan the barcode of a patron, they may have a held item ready to pick up.
- In Checkout, in the Account Overview, there will be one or more requested items ready to pick up. Click the ready to pickup link in the Account Overview or the Holds tab.
The system displays the Holds tab with the Holds section expanded to list requested items. The Queue column shows the status for each request. A number indicates the position on the hold queue for the item. The On Shelf status indicates an item available for pickup from the holds shelf. - Retrieve the item from the holds shelf if the patron has not brought it to the circulation desk.
- If you are viewing the Account screen, click the Check Out link to return to the Checkout screen.
- In the workspace, in the Enter barcode area, scan the barcode for the first item or type it in the box. If you type the number, click Go or press <Enter>. The system adds the item to the list of checked-out items and assigns a default due date. The Account Overview indicates that no requested items are available for pickup.
Check out a temporary item
A temporary record can be created for an item that has not been cataloged, and for an item that is received from interlibrary loan. For more information about Circulation integration with Interlibrary Loan, see WorldShare Interlibrary Loan integration and Tipasa integration.
This feature is intended to circulate temporary (uncataloged) items. An uncataloged item is anything that does not have a WorldCat record, such as laptops or other equipment, temporary items, or items that are on reserve, etc.
- Scan or type the temporary item's barcode in the Enter barcode area. If you do not know the item's barcode, search for it.
The only way to search for a temporary item is by author, title, or barcode. For details, see Look up item. - Once you have the barcode, check the item out as normal in Check out.
Add a temporary item
To circulate items received via ILL you can
- In the left panel Assist Patrons area, scan or type the patron barcode in the Enter barcode box. If you type the barcode, click Go or press <Enter>.
- On the Checkout tab, in the Enter barcode box, scan or type the barcode of the item to be created. If you type the barcode, click Go or press <Enter>.
- In the Create Temporary Item window, fill in the fields. Make a note of the barcode, author, and title, so the item can be retrieved.
- Select an option for Set item status.
- Check out item: Click Create Item. The temporary item is created and checked out to the patron.
- Place hold on item: Click Create Item. Go to step 5.
- In the Place hold window, change the settings as needed.
- Pickup branch/location: If the patron prefers a different location, select the preferred library from the list.
- Hold: To set an expiration date, click the calendar button and select a date.
- Suspend (Optional) - If the patron does not need the item between certain dates, specify the starting and ending dates using the calendar button.
- Move patron to top of queue - Makes the patron the first person in the holds queue for the item.
- Notes: Add a Public note, visible to the patron, or a Staff note that is only visible to staff.
- Click Create item.
- For items placed on hold:
- If the patron does not have permission to place items on hold, an alert message appears. Depending on your account, you may have to enter an override code. To place the hold, click Acknowledge.
- If the item cannot be placed on hold, an alert message appears. Depending on your account, you may have to enter an override code. To place the hold, click Acknowledge.
- If the item is available, it appears on the Pull List (in the Reports section of the Circulation module). The item's status is In Queue.
- If the item is unavailable (on loan or in transit), it cannot appear on the Pull List. Instead, when the item is checked in, its status changes to On Hold automatically.
- For details on the above steps, see Pull report.
- For items placed on hold:
Watch a video
Check out
Run time: 2:39
In this brief video see how to check out materials in WorldShare Circulation.