WorldShare Acquisitions Release Notes, March 2021
Release Date: March 25, 2021
Introduction
This release of WorldShare Acquisitions provides 5 new features and enhancements. These features will help you manage more complex workflows, including:
- Enhancements to the bulk subscription renewal process
- New user preferences and institution settings related to order addresses
- Importing MARC orders to the next budget period
- Importing the external order ID using MARC order data
- Support for more invoices using EDIFACT invoice import
Many of these enhancements are the direct result of your feedback.
Recommended actions
For this release, we recommend that you review the following checklists and complete the relevant tasks so that you can adjust your policies and workflows and train your staff. These checklists identify updates that we have determined as significant for most institutions. We encourage you to review all of the items in the release notes to determine whether there are other items that might require additional action or follow up by your institution.
Administrative actions
These items require immediate action or decisions.
| Action |
|---|
|
None at this time. |
Follow-up actions
In an effort to keep your staff informed of new features and changes, you may also want to consider these items.
| Action |
|---|
|
Consider setting the default reply-to contact for your shipping addresses. |
New features and enhancements
Enhancements to the bulk subscription renewal process
You can now use a number of new features related to the bulk subscription renewal process. This includes:
- Adding individually selected items to a renewal list
- Using order price instead of payment price
- Entering the percentage increase with up to two decimal places
- Updating target budget periods during fund mapping
- Automatically placing order(s) upon renewal
- Refreshing fund mapping and order items being renewed tables automatically
- Calculating price of monographic series based on price of volumes
These features are described below in more detail.
Add individually selected items to a renewal list
You can now add individually selected items from a search result to a renewal list. This allows you to add a handful of items from a search result, rather than having to add all the items from a search result. Previously, you could only add all order items in your search result to a renewal list. Now, you can add only selected items to a renewal list, saving you time in constructing a search query that only shows the results you want to add to your renewal list.
To add individually selected items to a renewal list:
- Go to Orders > Subscription Items.
- Conduct a search of subscription items.
- On the left-hand side of the page, select the item(s) that you wish to send to a renewal list.
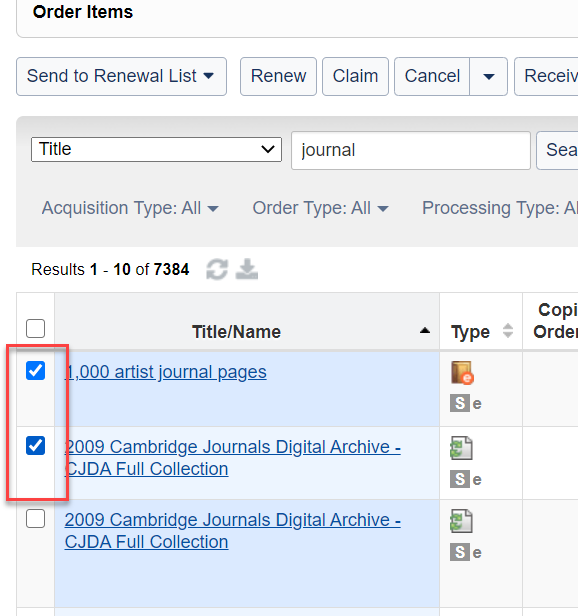
- Click Send to Renewal List > Selected Order Items.
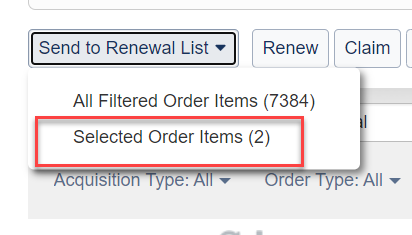
- This will then open Send to Renewal List dialog. To finish adding selected items to the renewal list, either select a renewal list and click Send, or click New Renewal List.
Use order price instead of payment price
You can now use the order price instead of the payment price as the source price when renewing order items. This allows you more flexibility when renewing items. Previously, you could only use the payment price as the source price, but now, you can choose between order price and payment price.
To use the order price instead of payment price as your source price:
- After creating the renewal list and adding items to it, open the renewal list.
- In the Renewal List Settings accordion, open the dropdown next to Increase Based on this Source Price and select Order Price.
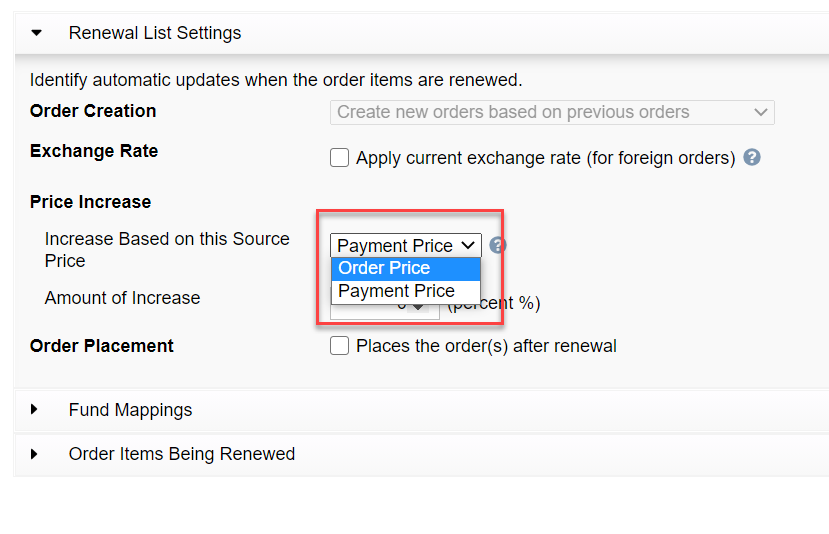
- Finish configuring the renewal list and then renew items on list.
- The price of the new items created will be based on the order price, rather than the payment price.
Enter percentage increase with up to two decimal places
You can now enter the percentage increase for the renewal list with up to two decimal places. This allows you to enter a more precise percentage for your renewal list. Previously, you could only enter percentages without decimal places for the percentage increase, but now, you can enter a more precise percentage increase.
To enter a percentage with up to 2 decimal places:
- After creating the renewal list and adding items to it, open the renewal list.
- In the Renewal List Settings accordion, click into the number input next to Amount of Increase.
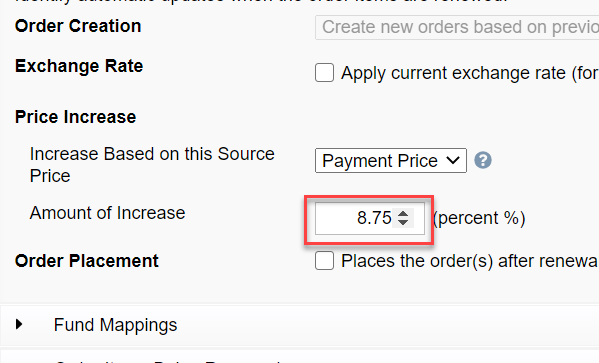
- Enter the percentage you want to use, e.g. 8.75.
- Note: If you want to increase the percentage by .01 at a time, use the up and down arrows next to the number input.
- Save the renewal list and when ready, renew the renewal list.
- The percentage increase of the price of the new items will be based on the percentage increase entered above.
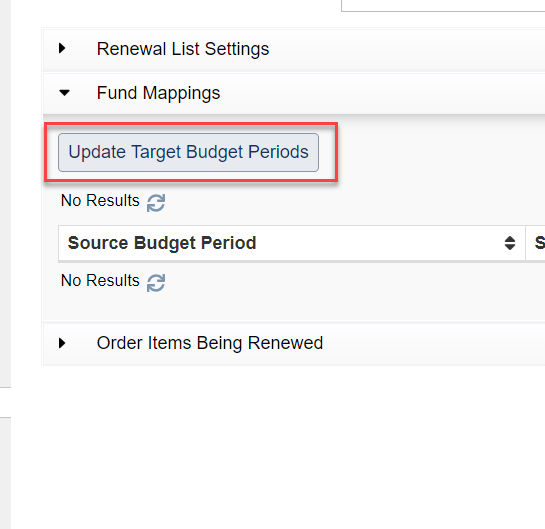
Update target budget periods during fund mapping
You can now update the target budget period mapping for your fund mapping table as part of the renewal process. This allows you to map older budget periods to either the current or next budget period as you prefer. Previously, budget periods for the order items being renewed were mapped by default to the earliest budget period enabled for use, but now, you can choose to which budget period you want to map each budget period.
To update the target budget period mapping:
- After creating the renewal list and adding items to it, open the renewal list.
- In the Fund Mappings accordion, click on Update Target Budget Periods.
- This will open the Update Target Budget Periods dialog.
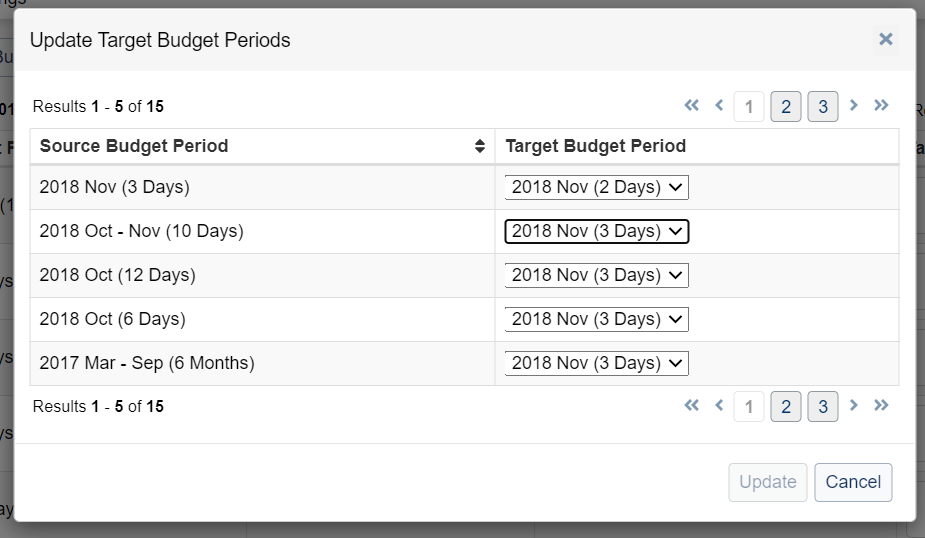
- Simply select the target budget period to which you wish to map the source budget period and click Update.
- The fund mapping table will refresh with your new budget period mapping. Complete your fund mapping before renewing the renewal list.
Automatically place order(s) upon renewal
You can now have the system automatically place the orders created upon renewal. This allows you to not have to locate the orders created and place them manually. Previously, orders were created by the renewal process, but they were not placed, so you had to visit each order individually and place it to complete the renewal process. Now, you can select the option to automatically place orders upon renewal, saving you much time and effort.
To automatically place order(s) upon renewal:
- After creating the renewal list and adding items to it, open the renewal list.
- In the Renewal List Settings accordion, select the Order Placement checkbox to "Places the order after renewal."
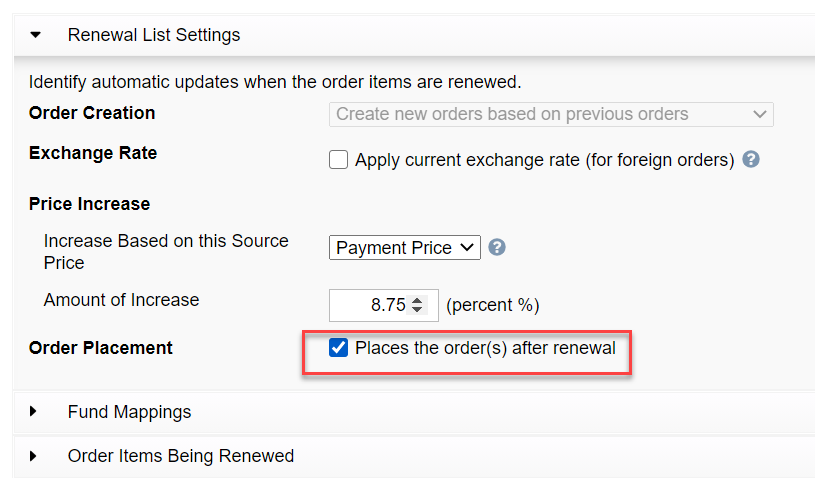
- Save the renewal list and when ready, renew the list.
- Upon renewal, the orders created as part of the renewal process will be placed automatically.
- If there are any problems with placing the orders, the items will be marked as Renewed with problems, and the status reason set to Cannot Place Order.
Refresh fund mapping and order items being renewed tables automatically
The system will now refresh the fund mapping and order items being renewed tables automatically when the renewal list is renewed. This means that you do not have to manually refresh these tables upon completion of the renewal process. Previously, if you wanted to see the results of the renewal in the Order Items Being Renewed table, for example, you would have to manually refresh the table. Now the table refreshes automatically upon the renewal process being completed.
To refresh the fund mapping and order items being renewed tables:
- Renew a renewal list.
- Wait for the renewal process to complete and for a message to appear saying the process is completed.
- Open the Fund Mapping and Order Items Being Renewed accordions.
- The tables are automatically refreshed with the new information. (For example, the order items being renewed now contain the new order name and order item number in the right-hand columns.)
Calculate price of monographic series based on price of volumes
Fixing a known issue with the last release, the system now properly calculates the price of monographic series based on the price of the volumes. Previously, when using payment price as the source price, the system would set the price of monographic series items to 0.00 despite the fact that their volumes had invoices with a total greater than 0.00. Now, upon renewal, the system takes the prices of all volumes of a monographic series, sums them up, and then divides the total by the order item quantity. The system does this for the Unit Price, Service Charges, and Shipping. For the Tax 1 and Tax 2, the system takes the tax rate for the earliest invoice item for the monographic series.
New user preferences and institution settings related to order addresses
You can now configure new user preferences and institution settings related to the addresses listed on the order. This allows you to save time and effort setting this information for every order, and instead, use helpful defaults for these fields. Previously, you had to manually select information like the shipping address, billing address, and reply-to contact for every order, but now, you can set personal or institution defaults for these fields, allowing you to save time setting these fields manually.
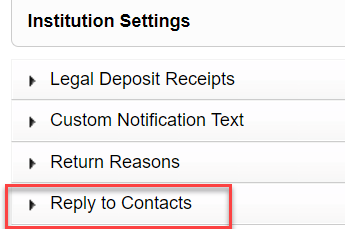
Default reply-to contact by shipping address
You can now set the default reply-to contact to use for an order based on the order's shipping address. This allows you to save time having to select the reply-to contact for every order when sending the order to the vendor. Previously, the default reply-to contact was set using the first contact in the Registry for the main institution. If you wanted to use a different reply-to contact, you had to select one manually when placing the order. Now, you can assign a default reply-to contact for each shipping address, so that when you select the shipping address for the order, you are also automatically assigning a default reply-to contact for the order.
To assign a default reply-to contact for an order:
- Click on Settings > Institution Settings in the left-hand menu.
- Open the Reply-To Contacts accordion.
- Select from the dropdown menu the Branch or Institution whose shipping addresses you want to set the default reply-to contact for.
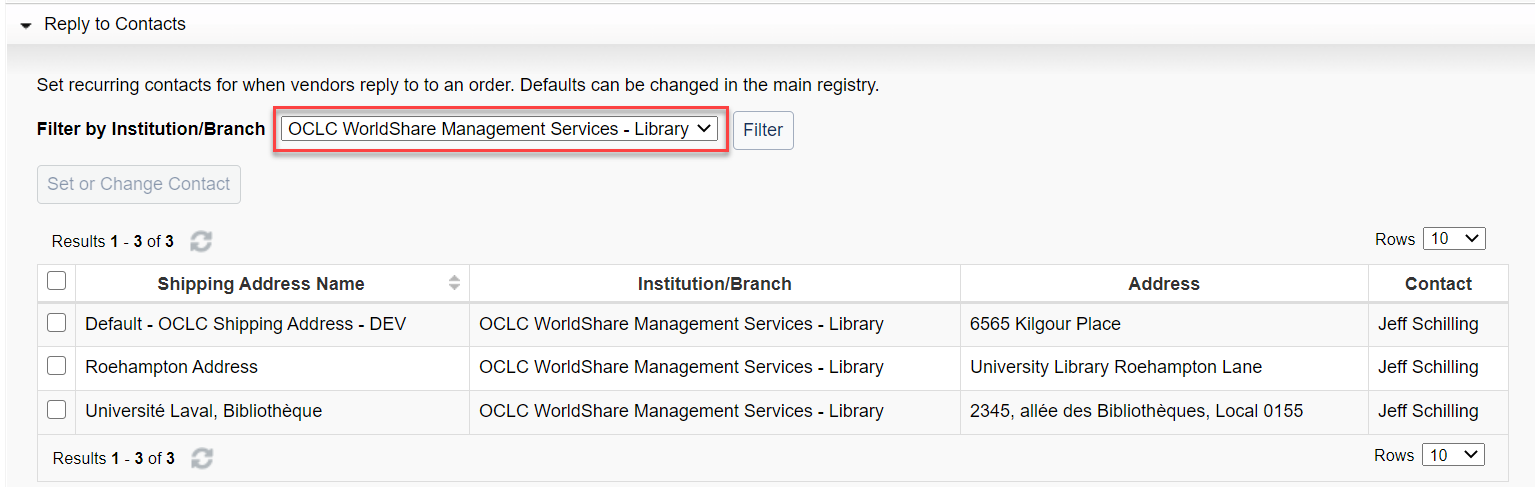
- Note: You can select the main institution registry record as well as those of each branch.
- Once selected, the shipping addresses for that branch or institution will display in the table below.
- Select all shipping addresses for which you want to set the default reply-to contact.
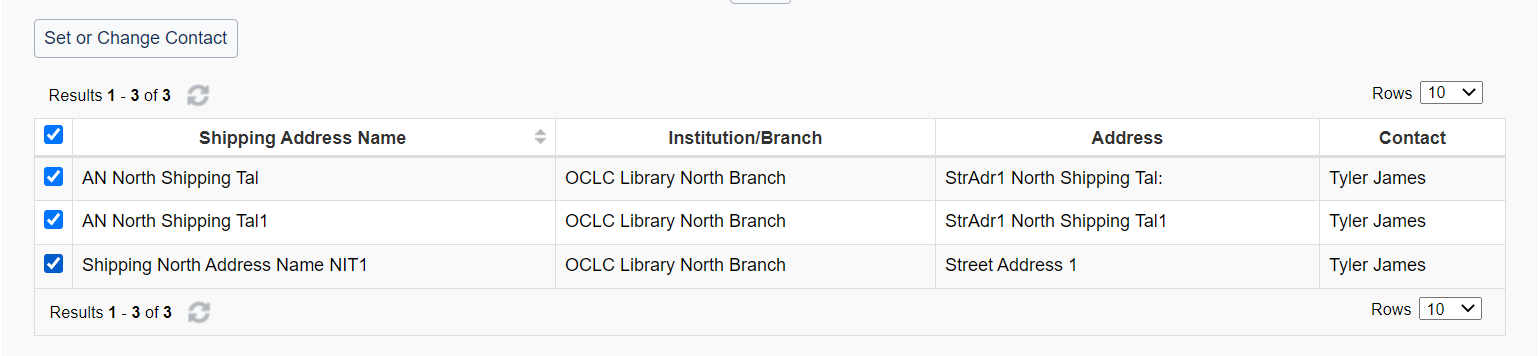
- Click Set or Change Contact above the table.
- A dialog will appear. In the dialog, you can select one of the following:
- Registry contact for the branch or institution you have selected.
- Any user contact in your patron user accounts.
- Do not reply.
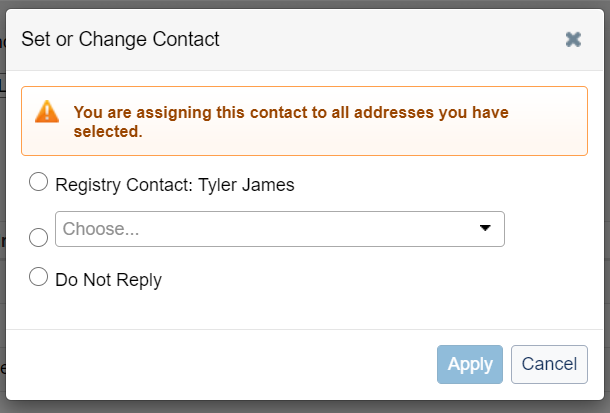
- Click Apply
- The Reply-To Contact for that shipping address will be updated.

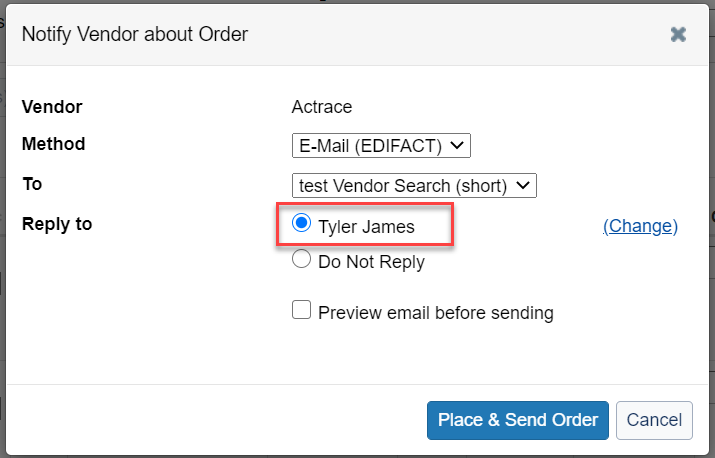
- When you go to place an order and notify the vendor of the order, the default reply-to contact will be selected based on the shipping address of the order.
Assign user preferences for shipping and billing address
You can now set a default shipping and billing address to use for your user account when creating new orders. This save you the time and effort of setting this shipping and billing address manually when you create orders. This is especially useful if you typically create orders for the same shipping and billing address. Previously, the order would always default to the main institution for the shipping and billing address. Now you can assign a user preference for your account that determines the shipping address and billing address that is used when creating new orders.
To assign user preferences for shipping and billing address:
- Go to Settings > User Preferences.
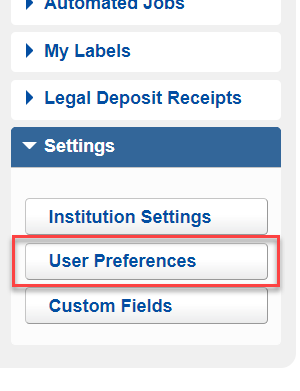
- Open the Shipping and Billing Defaults Accordion.

- Select a Shipping Branch and Shipping Address to use as your default. Note: The Shipping Branch dropdown also includes the main institution record, so that you can select the main institution as your shipping branch.
- Select a Billing Branch and Billing Address to use as your default. Or alternatively, select the Default Billing Address to be the "Same as the shipping address."
- Click Save at the top of the page.
- The next time you create an order, the default shipping and billing address will be set based on your selections above.
Import MARC orders to the next budget period
You can now import MARC orders to the next budget period rather than the current budget period. This allows you to start importing order data for your next budget period before you have closed the current budget period. Previously, when importing MARC order data, the orders created were always for the current budget period. Now, when importing MARC order data, you can choose to import the order data using the next bookable budget period.
To import MARC order data using the next budget period:
- Go to Vendors in the left-hand menu.
- Search for the vendor for which you want to import data.
- Open the vendor and go to the Partner Exchange Services accordion.
- Click Upload File.
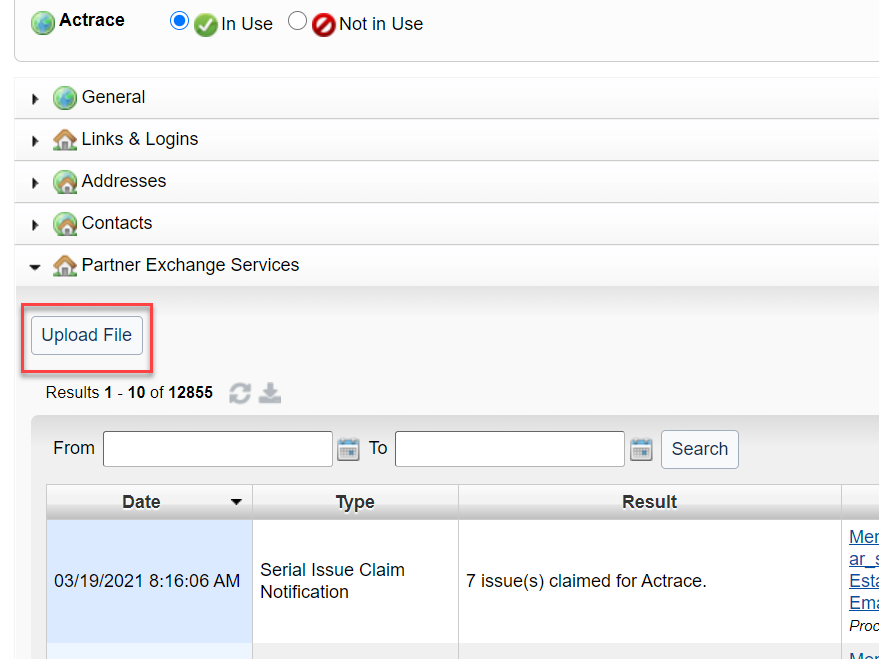
- In the dialog that opens, select the Import order data (MARC) from the Type dropdown.
- Select from the Target Budget dropdown the budget you want to use when importing these order items. By default, this is the current budget period, but you can also select the next budget period, if enabled for use.
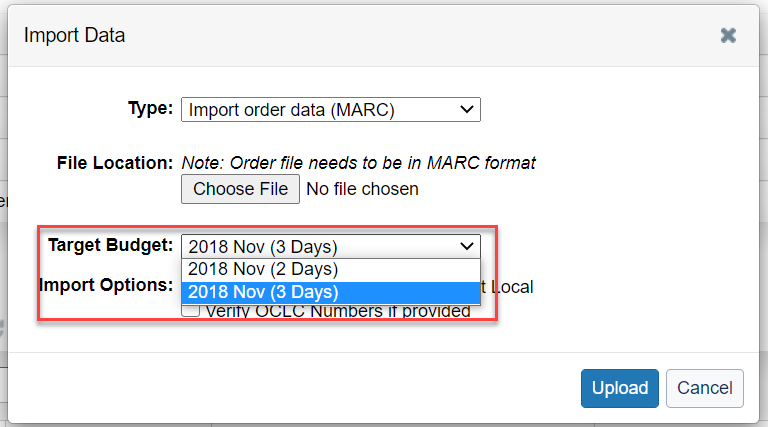
- Choose the file you want to upload under File Location, and then upload the file.
- The order items created from the records in the file will use the budget period you have selected for the imported fund data.
Import the external order ID using MARC order data
You can now import the external order ID using MARC order data. Because of this, if you are using external order IDs in your outgoing orders, you may not need to manually enter the external order ID into the orders, instead simply importing this data from the vendor. Previously, you could manually enter the External Order ID on the order, but not import this data using MARC order data. Now, you can choose whether you want to import the External Order ID or manually input this value.
To import the external order ID using MARC order data:
- Work with your vendor for them to communicate the External Order ID in the 981 $e MARC sub-field of your MARC order records.
- Take the file provided by the vendor and upload to WMS using the Upload File button under Partner Exchange Services on the vendor page.
- Once uploaded, the External Order ID will be inserted into the new orders created as a result of the MARC file.
- If the value of the 981 $e is greater than 50 characters, the input will not be imported and an error will show in the logs.
- If the value of the 981 $e is different for two records for the same order, then the first External Order ID will be used and an error will display in the logs.
Support for more invoices when importing EDIFACT invoice data
You can now import up to 100 invoices when importing EDIFACT invoices, rather than the previous limit of 50. This saves you time and effort uploading EDIFACT data multiple times. Previously, when importing EDIFACT invoice data, if you attempted to import more than 50 invoices, the system would only import the first 50 invoices. Now, you can import up to 100 invoices in an EDIFACT invoice data file.
Important links
Support website(s)
Support information for this product and related products can be found at: