3. Edit a spine label
Edit a spine label
Note:
- Edits made to a spine label do not affect the information in the record and will only display on the Label Print List.
- Label format options selected in the Label Editor (font, size, styling, line spacing, etc.) are specified within a label type under My Labels > Label Templates.
- In the left navigation, click My Labels > Label Print Lists.
- From the Label Print Lists screen, click the Label Print List Name for which you want to edit labels.
- In the Layout accordion, click Edit on the label you want to edit.
- From the Label Editor screen, use the Edit Label Text box or Edit Label Content table to edit the label format and content as needed. As you make changes, they will automatically appear in the Preview Label area.
- (Optional) Click the Add button (
 ) to add an additional label line or content or click the Remove button (
 ) to remove an existing label line. If you add more blank lines then are on the label (according to its size), some lines will move into the non-printable area.
 - (Optional) Click Reset Label > Reset Label to clear out all fields and restore default settings in the label.
- To save your edits, click Save Label > Save Label.
Or
Click Go Back > Save.
Edit multiple spine labels
You can edit multiple labels in the same label print list in the Label Editor.
Note:
- Edits made to a spine label do not affect the information in the record and will only display on the Label Print List.
- Label format options selected in the Label Editor (font, size, styling, line spacing, etc.) are specified within a label type under My Labels > Label Templates.
- In the left navigation, click My Labels > Label Print Lists.
- From the Label Print Lists screen, click the Label Print List Name for which you want to edit labels.
- In the Layout accordion, click Edit on the first label you want to edit.
- From the Label Editor screen, use the Edit Label Text box or Edit Label Content table to edit the label format and content as needed. As you make changes, they will automatically appear in the Preview Label area.
- (Optional) Click the Add button () to add an additional label line or content or click the Remove button () to remove an existing label line. If you add more blank lines then are on the label (according to its size), some lines will move into the non-printable area.
- Use the navigation buttons to navigate to the next label you want to edit.
- Repeat steps 4 through 6 until you have edited all of the labels you wanted to edit in the label print list.
- To save your edits, click Save Label > Save Changed Labels.
Or
Click Go Back > Save.
Reset label edits
When editing multiple labels in the same label print list, there are two ways to clear out all fields and restore default settings:
- Click Reset Label > Reset Label to clear out all fields and restore default settings for the label you are currently editing.
- Click Reset Label > Reset Changed Labels to clear out all fields and restore default settings for all of the labels you have edited.
Label Editor interface overview
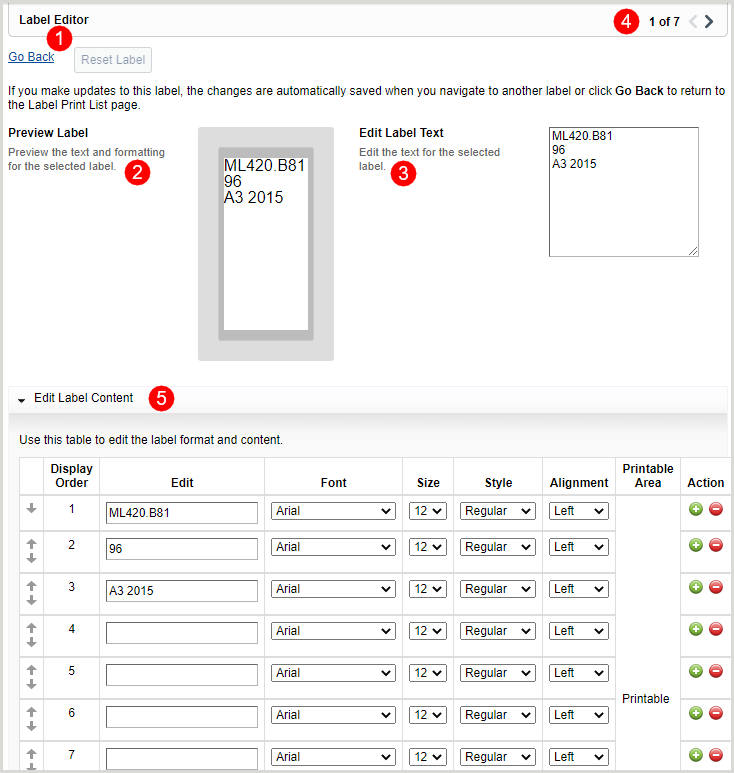
1. Label Editor actions
Note: Label edits are automatically saved when you navigate to another label in the list or click Go Back to return to the Label Print List screen.
In the Label Editor, you can click the:
- Go Back link to return to the Label Print List.
- Reset Label button to reset the label to its previously edited condition. The Reset Label is only enabled if the label has not been saved.
2. Preview Label edits
As you edit the label in the Edit Label Text box or Edit Label Content table, the Preview Label will automatically update to reflect the changes you've made.
3. Edit Label Text
The Edit Label Text box allows you to edit label text directly instead of using the Edit Label Content table.
4. Label navigation
If multiple labels need to be edited, use the navigation buttons to move between labels.
5. Edit Label Content
Use the Edit Label Content table to edit the label format and content of your spine labels. You can also change the order of the rows within a label using the up and down arrows (  ) in the table.
Available label format and content options
| Format | Options | ||||||||||
|---|---|---|---|---|---|---|---|---|---|---|---|
| Edit | Edit the label text for a specific line. | ||||||||||
| Font |
Note: Not all fonts support non-Latin script character sets. If the font you selected is incompatible with a non-Latin script character set, the label preview will show a replacement character (e.g., ⌧). The following table provides fonts that are compatible with commonly used non-Latin scripts.
|
||||||||||
| Size |
|
||||||||||
| Style |
|
||||||||||
| Alignment |
|
||||||||||
| Action |
|