Set up and use course reserves
About
Course Reserves functionality is available for:
- Libraries using WorldShare Management Services (WMS)
- Libraries that migrated from WorldCat Local service to WorldCat Discovery
- Libraries using WorldCat Discovery that are not WMS libraries but have purchased this option
For more information on purchasing Course Reserves, see Ordering.
Get started
In order to begin using Course Reserves, you need to complete the following steps. The instructions for each step are listed on this page:
Assign Course Reserves roles
See Course Reserves roles for more information.
WMS libraries
To assign Course Reserves to your staff, complete the following steps:
- Sign in to the WorldShare interface.
- Click Admin.
- Search for the staff member and open their record.
- Click Roles > Edit.
- Click the check box next to COURSE-RESERVES_MAINTAINER or COURSE_RESERVES MANAGER.
- Click Save. Your staff member will now have access.
Note: If you are having problems assigning Course Reserves roles, contact orders@oclc.org and include the information listed below for WorldCat Discovery libraries.
WorldCat Discovery libraries
If you are a library using WorldCat Discovery, you need to contact order services to enable Course Reserves and assign roles to your staff:
- Email orders@oclc.org with the following information:
- Your first and last name
- Your institution's name and OCLC symbol
- Your email
- Your OCLC Services username (WorldShare account). If you do not have an OCLC Services (WorldShare) account, send your desired username, otherwise a username will be created for you.
- Information on any staff members who need WorldCat Discovery staff accounts and/or need to be assigned Course Reserves roles.
- You will receive either a system-generated email or an email from OCLC Order Services:
- If you had an existing account for access to staff features in the WorldCat Discovery interface, you receive a confirmation email from Order Services saying that you now have access to Course Reserves
Activate Course Reserves
To activate Course Reserves, you must turn on the Course Reserves link in OCLC Service Configuration.
- Navigate to WorldCat Discovery and WorldCat Local > User Interface Options.
- Under General display options, find Activate Course Reserves and select Show.
- Click Save Changes.
Confirm Course Reserves Activation
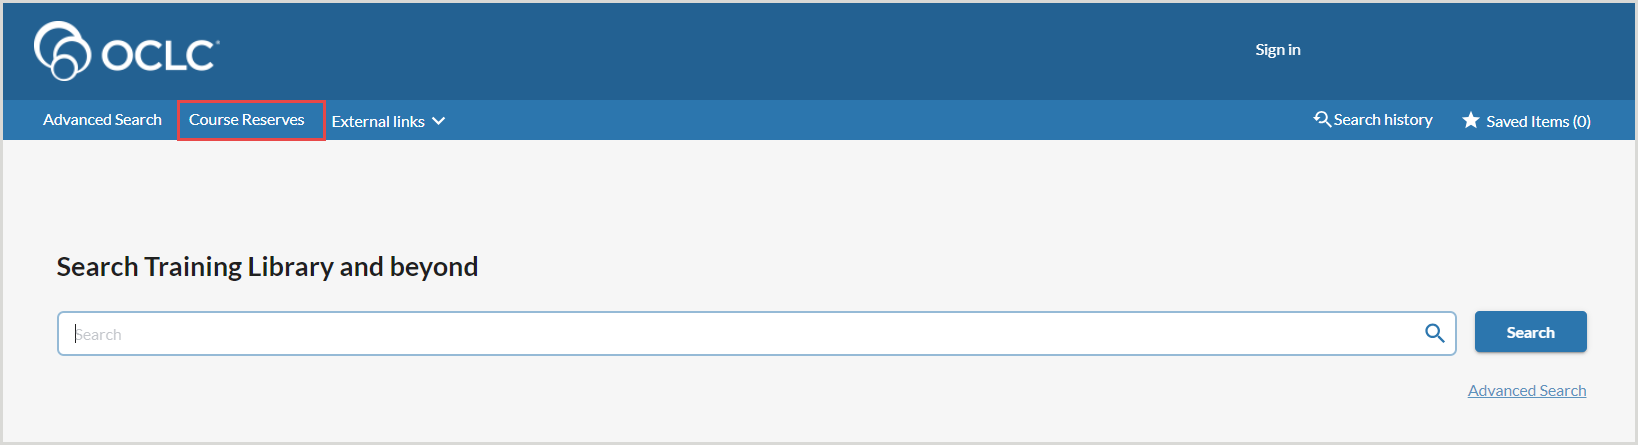
Course Reserves appears on the navigation bar in the modernized WorldCat Discovery interface after it has been activated in OCLC Service Configuration. Course Reserves appears to the right of Advanced Search.
A banner appears at the top of the screen indicating the user is in Course Reserves mode. The Reserve button will display directly beneath cover art on search results and on item details.
Sign In
To begin using Course Reserves, sign in using your WorldCat or WorldShare Management Services account. After you sign in, click Course Reserves. You will see either the Course Reserves Manager View or Course Maintainer View, depending on your role.
Search for courses
Courses can be searched by:
- Course or Instructor
- Course Name
- Instructor Name
- Department
- Prefix
- e.g. ART, CHEM, TECH
Searches only work for the field selected from the list.
- Enter in the search box any terms that are part of a course record.
Note: WMS can search by barcode to locate a course or course reserve item. - Press enter or click the magnifying glass. Courses that match your search are displayed.
- (Optional) Filter your results to display only Active or Inactive courses.
From the search results screen, you can:
- Click a course title to go to course details (and see materials on reserve for that course).
- Manage courses using the gear icon to reserve materials for the course, or to edit, duplicate, or delete the course.
- Use the navigation links (bottom of the page) to move between the results pages.
Manage courses
You need the Course Reserves Manager role to create, edit, or delete courses. From the Course Reserves Manager View, you can view and edit Courses.
Create a course
- Click the Create a Course button. The Create Course Details screen appears.
- Enter a Course Name and any details (see below) that you want to include.
- Click Save course. The Course Reserves screen appears with a confirmation message and a link to reserve materials for the course.
Edit a course
- Click the gear icon next to the course you need to edit and select Edit Course.
- Edit the course.
- Click Save course. The Course Reserves screen appears with a confirmation message and a link to reserve materials for the course.
Duplicate a course
- Click the gear icon next to the course you need to duplicate and select Duplicate Course. The Duplicate Course Details screen appears with all course metadata auto-populated.
- Make changes to any of the metadata.
- Click Save course. The Course Reserves screen appears with a confirmation message and a link to reserve materials for the course.
Delete a course
- Click the gear icon next to the course you need to delete and select Delete Course. A Confirmation message appears
- Click Delete to remove the course, or click Cancel to go back.
Manage temporary materials
Staff can create and manage access to temporary materials in course reserves. This feature enables users to find professor-owned books, electronic media, and other materials that a library may not wish to permanently add to its collection for circulation.
Create temporary materials
- From the Course Reserves view, click Temporary Materials.
- Click Create Temporary Material. The Create Temporary Material Details screen appears.
- Provide a Title and any details (see below) that you want to include.
- Click Save material. The Course Reserves screen appears with a confirmation message.
Add temporary course reserve materials to your circulating collections through WorldShare Circulation. Once added to circulating materials, the call number can be added during temporary material creation in Course Reserves to help users locate the material.
Edit temporary materials
- Click the gear icon next to the material you want to edit and select Edit item.
- Make edits to the material.
- Click Save material. The material is updated and a confirmation message appears.
Duplicate temporary materials
- Click the gear icon next to the material you want to duplicate and select Duplicate item.
- Make the edits.
- Click Save material. A new record is created for the added temporary material. No changes are made to the original material selected for duplication.
Delete temporary materials
- Click the gear icon next to the material you want to delete and select Delete item.
- Confirm Delete. The material is removed from all courses it is attached to and deleted.
Add and delete course materials
Once you have created the course, you will need to add reserve materials. Both the Course Reserves Manager and the Course Reserves Maintainer roles can add or delete course materials.
Note: There is a limit of 100 items that can be added to an individual course. Items are listed in alphanumerical order.
Add permanent bibliographic materials
There are two ways to begin adding materials to a course.
- When you finish creating a course, in the title confirmation message that appears on the top of the screen, click Reserve Materials for this course.
orClick the gear icon and select Reserve Course Materials for the course to which you want to add materials.
The search screen appears with the message: You are reserving course materials for [Course Name]. - Search by keyword for materials to add in the search field.
- Press <Enter> or click the magnifying glass icon.
- (Optional) Filter the search results by selecting values from the facets.
- (Optional) Use the navigation links (bottom of the page) to move between the results pages.
- When you find a material to add, click Reserve.
orClick on the material Title to review details and then click Reserve.
- If the material you are adding is a serial or monographic set, click on the Reserve drop down list to select the volume of the journal you want to reserve.
- Click Reserve. A confirmation message appears and the material is added to the course.
- Click View Course to go to the Course Reserves screen.
orClick OK to continue searching for additional materials.
- When you are finished adding materials, click I'm done reserving materials.
Add temporary materials
- When you finish creating a course, in the confirmation message that appears on the top of the screen, click Reserve Materials for this course.
orClick the gear icon and select Reserve Course Materials for the course to which you want to add materials.
- Click the Browse temporary materials at the top of the screen.
- Click Reserve. A confirmation message appears.
- Click View Course to go to the Course Reserves screen.
orClick OK to continue searching for additional materials.
- When you are finished adding materials, click I'm done reserving materials.
Once you add a physical material to a course, you still need to locate the material and place it on reserve using the methods provided by your circulation system.
Reserving materials in WorldCat Discovery does not update Circulation location or availability. Temporary circulation records are needed for these items, that are created in your Circulation system.
For some systems, placing materials in a separate location is required. Other systems may change the material type to "Reserve" or a similar category. You may find it helpful to print the list of materials on reserve for a course, gather the materials from the shelves and deal with them appropriately.
Find Course Reserves items with availability and access online
When course reserve items are searched in WorldCat Discovery, users can view item availability. Permanent bibliographic items with a full-text link display the “Access Online” button and locally-available items display information about availability. Temporary materials require manual entry of the call number and do not display the availability status.
Course Reserves availability is configured in OPAC Statuses, Locations and Circulation Policies.
To configure availability and shelving locations:
- In OCLC Service Configuration, go to WorldCat Discovery and WorldCat Local > OPAC Statuses, Locations and Circulation Policies.
- Open the Item Availability from OPAC accordion.
- Under Item availability on Search results, check the box to Associate particular shelving location with course reserves availability.
Note: Wild cards are honored to key multiple locations*.
-
Enter the Course Reserves shelving location in the Shelving Location field.
-
Click Save changes.
* Wild card use example: "*Reserves*" is entered in the Shelving Location field. The shelving location will match any shelving location with the word “Reserves” in it, such as “2 Hour Reserves” or “4 Hour Reserves.” Without the wild cards, only a location that exactly matches “Reserves” will display.
If no copies of an edition or format are in the reserves location, the first available copy displays with its location.
Watch a video
Course Reserves in WorldCat Discovery
Run time: 8:28
This video provides an overview of how to activate, access, manage and search Course Reserves in WorldCat Discovery.