Automated Request Manager for Lending
Using the Automated Request Manager, lenders can choose to apply designated constant data records to lending requests based on the identity of the borrowing library, the type of request, or the material format being requested. This ensures that lending charges, notes, policies, and addresses are accurately applied to lending requests, saving staff time and ensuring compliance with local policies and preferences. Additionally, lenders can automatically apply request tags to incoming lending requests.
Prior to using the Automated Request Manager for lending:
- Ensure your institution has lender constant data records configured for the combinations of loan periods, charges, return addresses, and lending notes you regularly use. Refer to Constant data, Lender Data for more information.
- If you would like to charge different borrowers different fees, create a custom holdings group for each set of symbols you typically charge a given amount. Refer to Custom Holdings Group for more information.
- Policies applied through automation should match what is included in the Policies tab in your OCLC Policies Directory entry. Refer to Manage Policies for information about updating your stated policies so that they match actions applied through lending automation.
Setup lending automation
With the above pieces in place, you are ready to set up lending automations in ARM.
- Sign in to OCLC Service Configuration with your WorldShare account.
- On the left navigation, click WorldShare ILL > Automated Request Manager.
- Select the Lending tab.
- Click + Add New.
- Enter a Name and assign a Priority. See Main Automation fields for Lending for more information.
- Select any desired match criteria from the Matches drop-down menu. See Automation Match criteria for Lending for more information.
- If you do not select a match criteria, the automation will apply to all requests.
- Click the
 Add a match button to configure additional match criteria.
 - Select any desired actions from the Actions drop-down menu. See Automation Actions for Lending for more information.
- Click the
 Add an Action button to configure additional match criteria.
 - Click Save.
Use lending automations with Tipasa
Below are examples of lending automations.
Basic lending automations
The following are examples of using lending automations
- Charge $10
Charge certain groups of lenders $10.
After creating and naming your automation:
- Assign a priority. If this is your first lending automation, we recommend a priority of 10. This allows for the addition of future automations that could either come before or after this one in priority.
- Under Matches, select Borrower Group.
- Click the Select Custom Holdings Groups and/or Profiled Groups link.
- In the window that opens, select from a combination of your Custom Holdings Groups and OCLC Profiled Groups.
- At least one group must be selected.
- Use the Add buttons to move the groups into the Groups Chosen for this Automation box.
- Click Select at the bottom of the window when you have completed your selections. You will be returned to the configuration of your automation.
- Under the Actions, select Apply Constant Data.
- Select the appropriate lender constant data record which specifies a $10 fee from the selection list that appears.
- Click Save. By default, the automation is enabled and effective immediately.
- AV Loan Periods
Assign a shorter loan period for audiovisual materials than for books.
After creating and naming your automation:
- Assign a priority. If this is your first lending automation, we recommend a priority of 10. This allows for the addition of future automations that could either come before or after this one in priority.
- Under Matches, select Formats.
- In the selection window that appears, use the ctrl key to select multiple formats. Suggested formats include: all sound recording types and all visual material types.
- Under Action, select Apply Constant Data.
- Select the appropriate lender constant data record from the selection list that appears. This should be a constant data record that specifies your desired loan period for AV format.
- Click Save. By default, the automation is enabled and effective immediately.
Advanced lending automations
The following are examples of multiple automations working towards a desired action.
Example: I want to apply specific loan periods for AV vs. books and I charge some libraries $20 and all other libraries $0. I don't charge anyone for copies.

The above configuration puts the more specific use cases first moving towards more generic:
- AV requests from a group that should be charged $20.
- Assigns a shorter AV loan period and a $20 lending charge via the AVLOANPERIOD20CHARGE constant data record.
- AV requests from everyone else at no charge.
- Assigns the same shorter AV loan period but has no lending charge.
- Loan requests for all other formats from libraries that should be charged $20.
- Assigns a longer loan period and passes on a $20 lending charge.
- Loan requests for all other formats from any other libraries besides the ones that should be charged.
- Assigns a longer loan period and has no lending charge.
- All copy requests.
- Assigns a copy-related constant data record with no lending charge and no return address, since copies do not need to be returned.
- Assigns a copy-related constant data record with no lending charge and no return address, since copies do not need to be returned.
Example: I don't charge some libraries, charge others $20, and everyone else is charged a default $15 charge, regardless of request type.

The above configuration puts the more specific cases first and then adds an automation with no match criteria last, which will match on all other requests. This is a good way to make sure constant data gets applied if the user has a default use case:
- Requests from libraries in the lender's FIRST Custom Holdings Group or the LVIS profiled group will have a constant data record applied with no lending charges.
- Requests from libraries in the lender's CHARGE20 Custom Holdings Group will have a constant data record applied with a lending charge of $20.
- All other requests from libraries not in any of these groups will have a constant data record applied with a lending charge of $15.
Example: I don't charge anyone, but if I get a request for an e-book, I need a specific staff member to look at those requests and consider them individually.
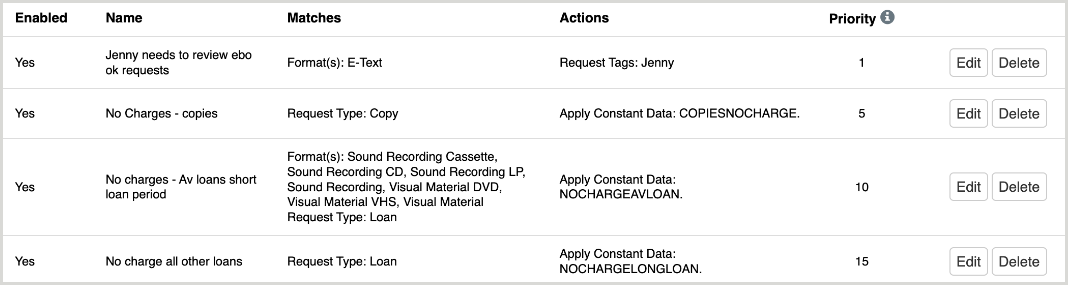
The above configuration shows a full set of lending automations that will:
- Tag all requests for e-books (copies or loans - chapters or full books) with a staff member's name.
- Apply copy-specific constant data with no charge to all other copy requests.
- Apply an AV-specific constant data record to all loan requests for AV items.
- Apply a no charge loan constant data record to all other loan requests.
Example: I want to know which requested items are held at my remote locations so that I can more efficiently retrieve them. I prefer to fill from my main library first and only need to retrieve items remotely if they are not held at the main library.

- Tag all requests held at the Main branch with a Main Library tag.
- Because the automation that tags requests held at the main library has the higher priority, only those items not also held at the Main Library will be tagged with West Library.
- When working with staff at the West Branch to obtain items shelved there, this allows library staff to request only items that are not also available at the main location.
Lending Automation History
In the Request History section of the Request Details screen, lending requests include an Automation History section. Information included:
- The timestamp for when the lending automation event was processed
- All requests will have a lending automation event even if the lender has no lending automations currently enabled.
- The name of the matched automation or if there are no automations for the request, the system will indicate that no matching automation occurred or no automations exist.
- The success or failure of constant data being applied.
- The success or failure of request tags being applied.