Pickup notices
Overview
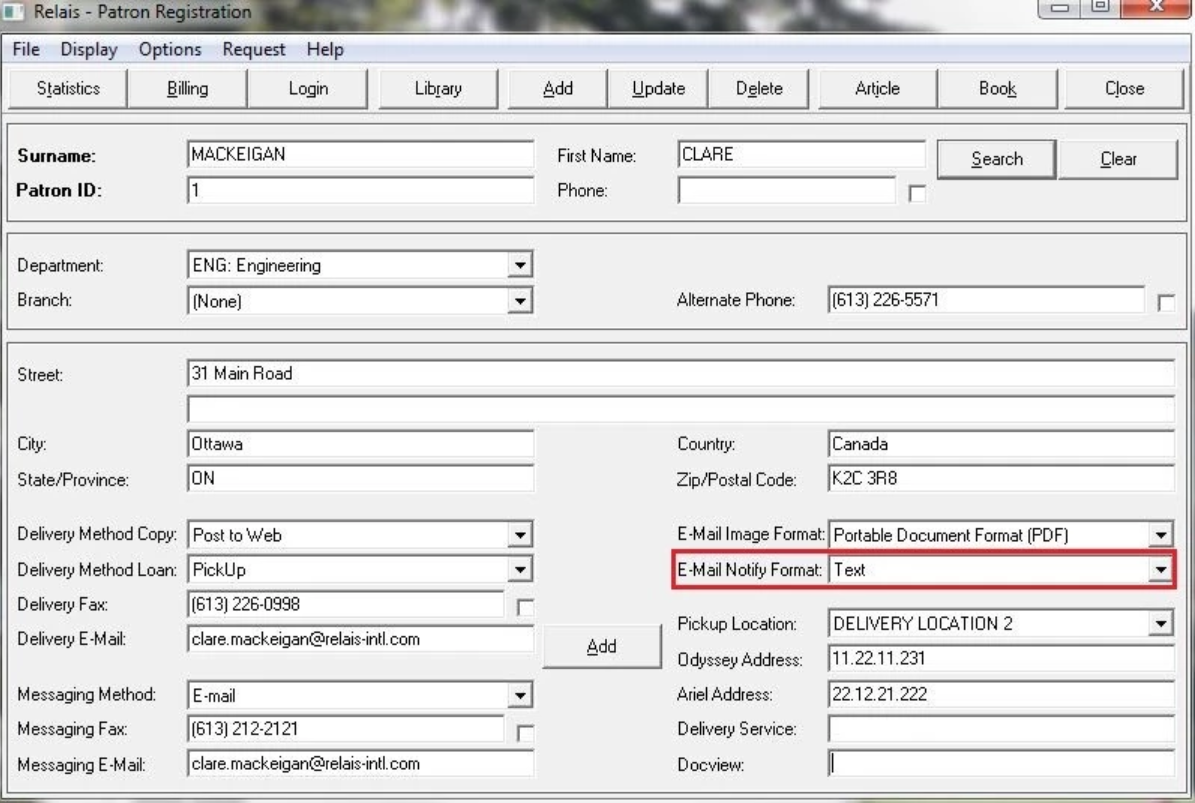
When a request is updated as a loan and the Delivery Method is Pickup and there is an email address for the requester, then a pickup notice is sent at the time the cover page is printed.
The pickup notice can be sent as a text message or a PDF attachment as specified in E-Mail Notify Format in the requester record. For example:
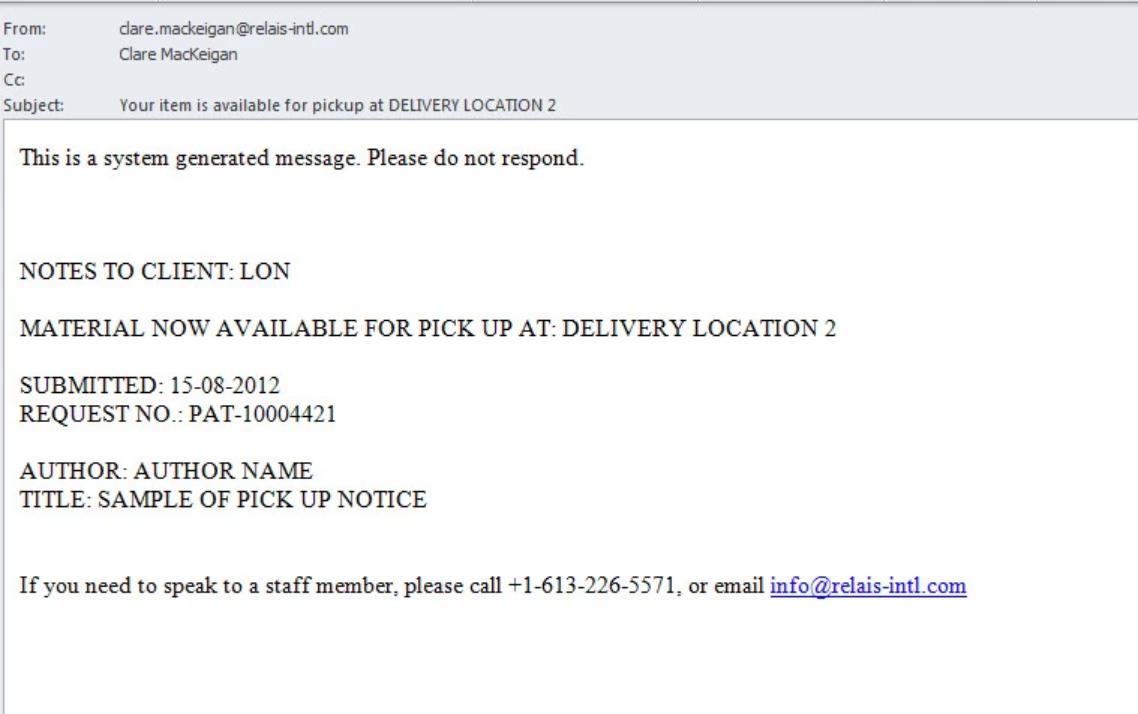
Following is a sample of a text version of the pickup notice received by a patron.
Several parts of the notice are configurable. See Configure pickup notices for more details.
Configure pickup notices
Overview
Five elements of the pickup notice are configurable
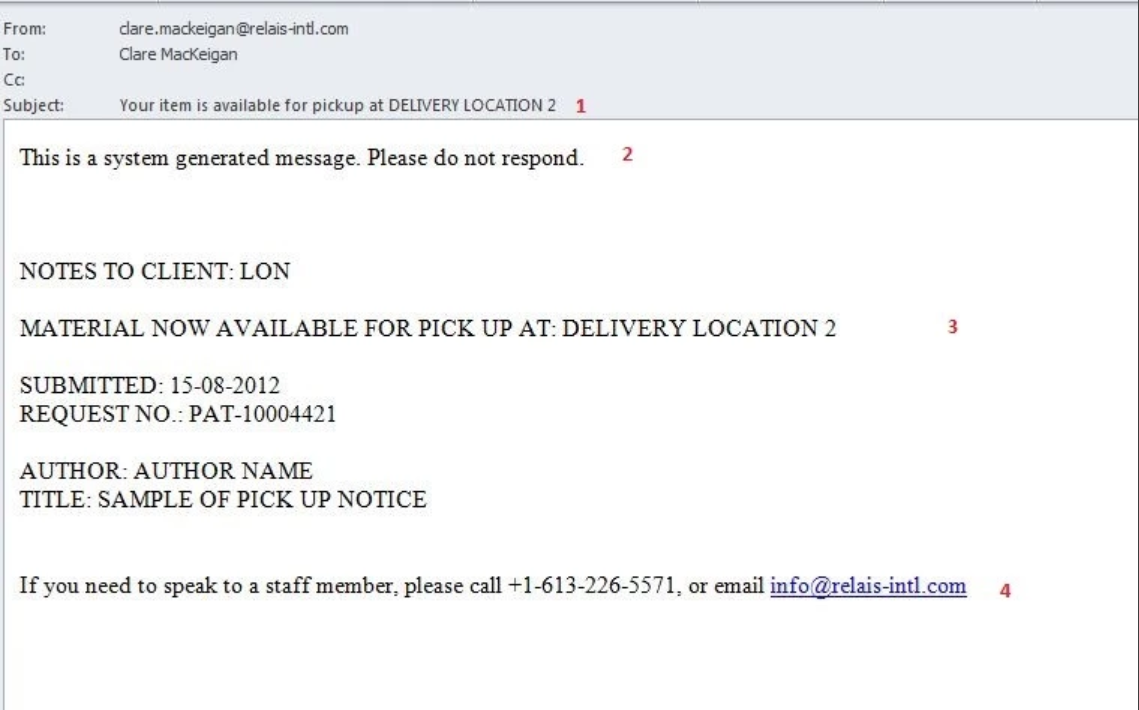
- The Subject Line
- The message header
- The pickup message (new in V2014)
- The body of the message
- The message footer
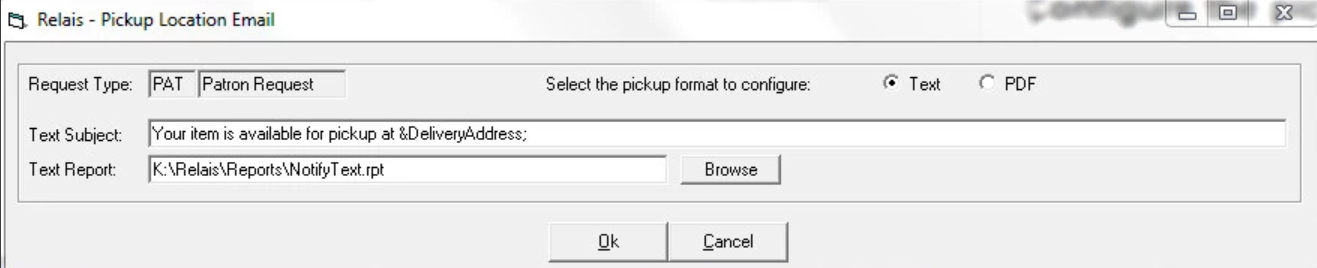
Update the Subject Line
- Login to Table Maintenance.
- Click the Cover Pages tab.
- Select the Request Type for which the subject line is to be updated, e.g., Patron Request (PAT).
- Click the Pickup button, to display the Pickup Location Email popup box.
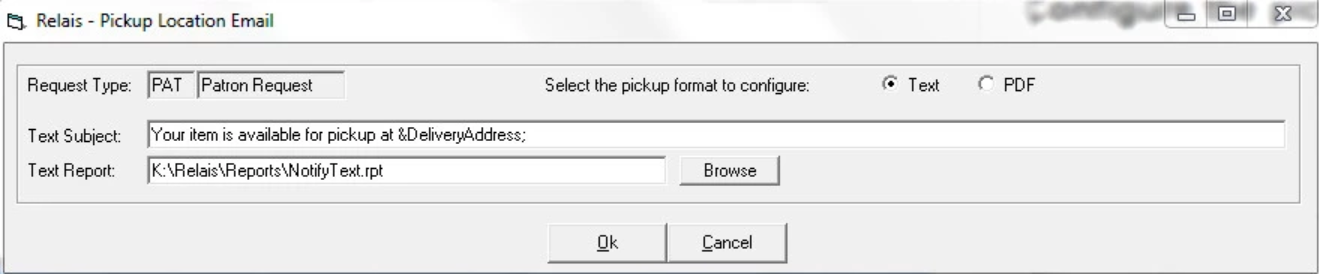
- Select the format of the pickup notice to be updated, i.e., Text or PDF, it is possible to have a different Subject Line for each format.
- In the Text Subject box, update the text of the subject line. Note that use of the &Delivery Address token is allowed. At the time the pickup notice is created and sent this token is replaced with the pickup location associated with the request.
- Click Ok.
Update the message header
- Login to Table Maintenance.
- Click the Cover Pages tab.
- Select the Request Type for which the subject line is to be updated, e.g., Patron Request (PAT).
- Click the Notify/Cancel button, to display the Notify/Cancel Email screen.
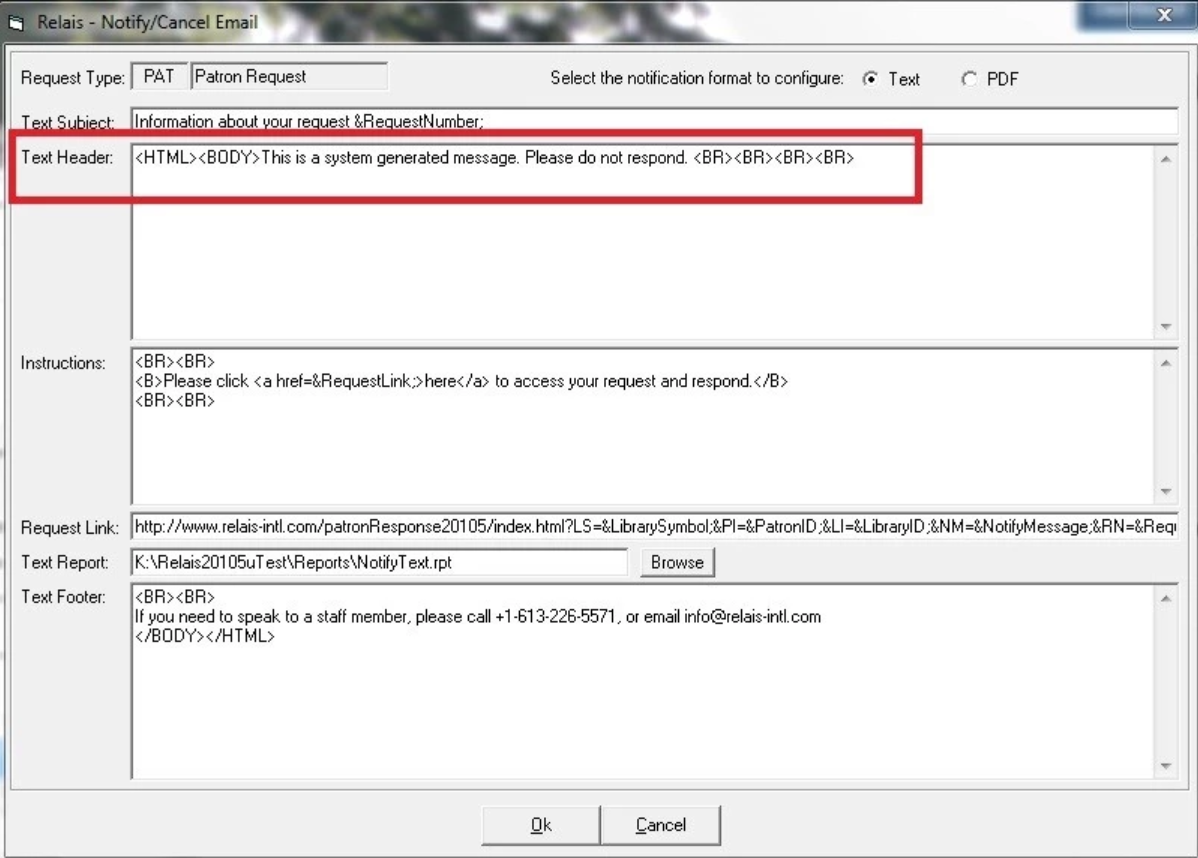
- Select the format of the pickup notice to be updated, i.e., Text or PDF, it is possible to have a different message header for each format.
- In the Text Header box, update the text.
- Click Ok.
Note: This text is used as the message header for multiple types of messages, not just the pickup notice and so should be generic enough to be used in different situations.
Update the pickup message
Note: For customers using the Relais Hosted Service and the Delivery Local application is run from the server rather than locally, please contact OCLC Support to updated this message.
- Login in to Administer Settings.
- Select the Application Settings tab.
- Open the Delivery section.
- Open the Delivery Local section.
- Highlight the LON instance of Delivery Local (or which ever instance or instances are used to print cover pages for loaned material).
- Click Edit Extended Settings.
- Enter the text for the pickup message, e.g., THE ITEM YOU REQUESTED WILL BE AVAILABLE FOR PICKUP IN 3 BUSINESS DAYS AT: &DeliveryAddress; - the token will be replaced with the patron's pickup location
- Click Ok.
Update the message body
- The body of the pickup notice is defined in NotifyText.rpt (for Text format) and Notify.rpt (for PDF format) This report is pre-defined. It includes the following information:
- Note to say the material is available for pickup at the requesters specified location
- Date request submitted
- Request number
- Author/Title
- This report can only be changed if you have access to and knowledge of Crystal Reports. Please contact Relais International before making modifications to the rpt.
Should you define and want to use a different rpt
- Login to Table Maintenance.
- Click the Cover Pages tab.
- Select the Request Type for which the subject line is to be updated, e.g., Patron Request (PAT).
- Click the Pickup button, to display the Pickup Location Email popup box.
- Select the format of the pickup notice for which the rpt is to be updated, i.e., Text or PDF, it is possible to have a different rpt for each format.
- Click Browse and browse to the location of the rpt to be used.
- Click Ok.
Update the message footer
- Login to Table Maintenance.
- Click the Cover Pages tab.
- Select the Request Type for which the subject line is to be updated, e.g., Patron Request (PAT).
- Click the Notify/Cancel button, to display the Notify/Cancel Email screen.
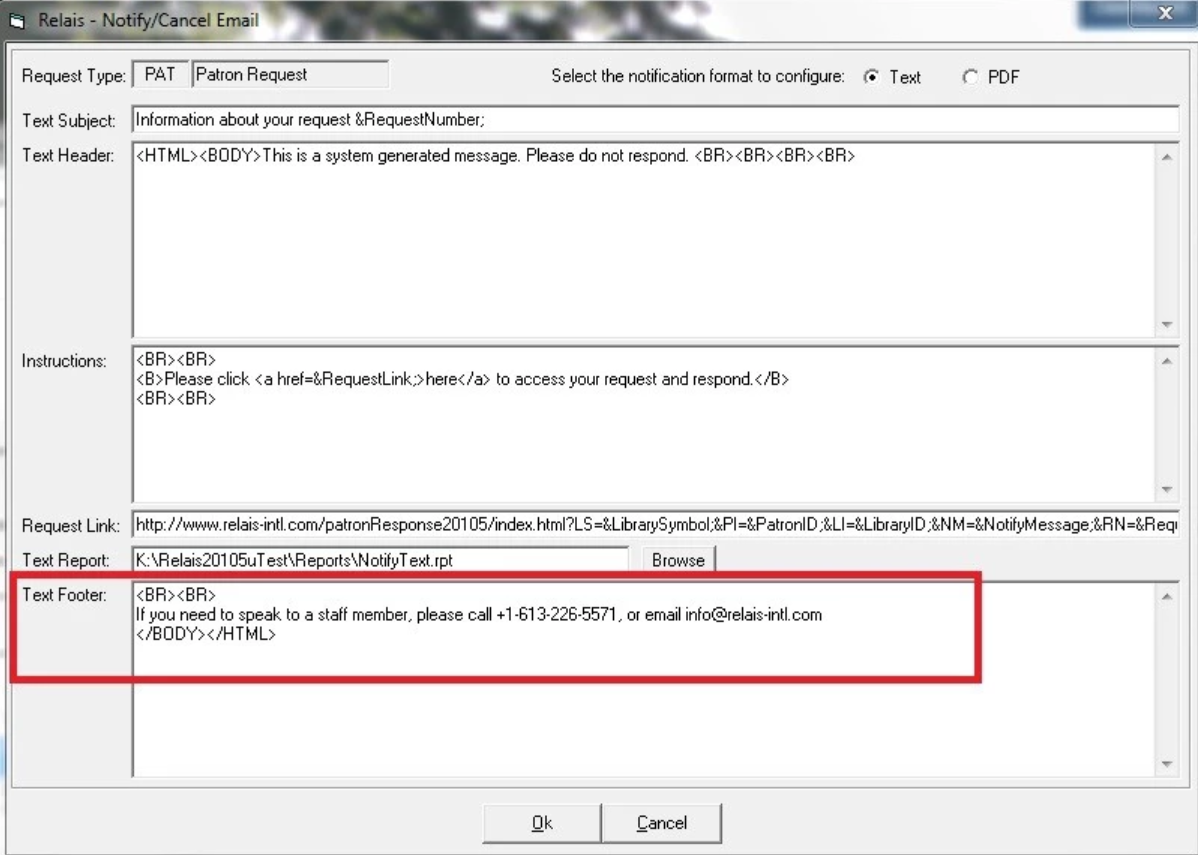
- Select the format of the pickup notice to be updated, i.e., Text or PDF, it is possible to have a different message header for each format.
- In the Text Footer box, update the text.
- Click Ok.
Note:
- This text is used as the message footer for multiple types of messages, not just the pickup notice and so should be generic enough to be used in different situations.
- To avoid the inclusion of <BR> in your outgoing messages be sure to include at minimum <HTML> in the Text Header and </HTML> in the Text Footer. This will interpret the HTML encoding and display it correctly.