About LHR bulk actions
Overview
Note: In order to use the local holdings record (LHR) bulk actions, you will need to have the CATALOGING_BULK_EDIT role in addition to one other cataloging role. For more information, see Cataloging roles.
Local holdings record (LHR) work lists allow you to apply scripts to multiple records at a time. Work lists are user-specific, and each Record Manager user can create up to 10 record work lists. You can also select a default record work list to increase efficiency during the record selection process.
With a LHR record work list, you can:
- Add up to 9,000 records to each work list
- Preview changes for up to 25 records at a time before applying a script
- Update a maximum of 9,000 records when applying a script
To access your LHR record work list, navigate to Record Manager > Record Work Lists > LHR.
LHR - Record Work Lists screen
In this area, you can:
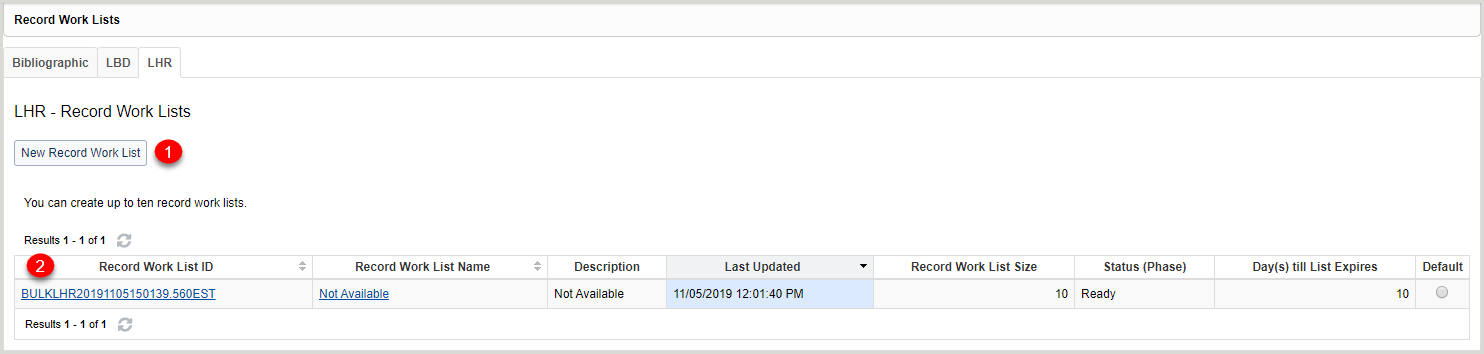
1. Create a record work list
You can create up to ten record work lists from the LHR - Record Work Lists screen. Each record work list must have a unique name that is three characters or more in length.
- Click New Record Work List.
- Enter a name for the new list in the Record Work List Name form field.
- (Optional) Enter a description for your record work list in the Description form field.
- Click Save. A confirmation message appears stating that the record work list has been created.
2. View available record work lists
Your record work lists are viewable and accessible from the LHR - Record Work Lists screen. Individual record work lists can be accessed from the record work lists table, which contains the following columns:
| Column name | Description | Notes |
|---|---|---|
| Record Work List ID | The ID of the record work list. Click to access the LHR - Record Work List screen. |
This column can be sorted (A to Z; Z to A). |
| Record Work List Name | The name of the record work list. Click to access the LHR - Record Work List screen. |
This column can be sorted (A to Z; Z to A). |
| Description | The description of the record work list. | This column will only be populated if you entered a description when you created the record work list. |
| Last Updated | The last time a change was made to the record work list. | This column can be sorted (ascending/descending). By default, it is sorted in reverse chronological order. |
| Record Work List Size | The number of records in the record work list. | |
| Status (Phase) | The status of the record work list. Statuses include:
|
|
| Day(s) till List Expires | The number of days left until the record work list expires. | Any record work lists that have not been modified in the last 30 days are automatically deleted to clean up expired lists. |
| Default | The default record work list to which LHR records are sent. | You can change the default record work list at any time using the radio buttons in this column. |
LHR - Record Work List screen
In this area, you can:

1. Perform record actions
The Actions drop-down menu allows you to perform the following actions:
Add records
The Add flyout menu allows you to add LHRs to your work list by providing a list of LHR control numbers or barcodes.
Note: You can also add LHRs to your work list from a LHR search results list.
Add target records using control numbers
Add target records using barcodes
View Records
The View Selected Record(s) flyout menu allows you to view current records and preview records with script changes.
Note: The actions available from the View Selected Record(s) flyout menu are enabled once you select a record.
View current records
- Select up to 25 records that you want to view.
- Click Actions.
- Select View Current Record(s) from the View Selected Record(s) flyout menu. The View LHRs - Current Record(s) screen displays the current records selected.
- Click Go Back to return to the LHR record work list.
- (Optional) Select a different set of records (up to 25) and repeat steps 1 through 4.
Preview records with script changes
- After you have selected a script, select up to 25 records that you want to preview.
- Click Actions.
- Select Preview Record(s) after Edit Action Applied from the View Selected Record(s) flyout menu. The View LHRs - Preview Record(s) after Edit Action Applied screen displays the selected records after the script change, including any validation errors.
- If a record contains a validation error:
- Click the LHR Control Number to open the MARC editor.
- From the MARC editor, correct any errors in the local holdings record and save your edits.
- If a record contains a validation error:
- Click View Current Record(s) to view the selected records in their current state. From the View LHRs - Current Record(s) screen, click Preview Record(s) after Edit Action Applied to return to the View LHRs - Preview Record(s) after Edit Action Applied screen.
- Once you have confirmed the script changes appear as expected, click Go Back.
- (Optional) Select a different set of records (up to 25) and repeat steps 1 through 5.
Remove records from list
The Remove from Record Work List flyout menu allows you to remove selected records or remove all records from your work list.
Remove selected target records
Note: The Selected Target Records action is enabled once you select a record.
- Select the record(s) you want to delete.
- Click Actions.
- Select Selected Target Records from the Remove from Record Work List flyout menu.
- Click Remove in the Remove Target Record(s) dialog window.
Remove filtered target records
Note: Filtered Target Records action is enabled once you apply a filter to the records in your work list.
- Filter the records in your work list by using any of the available filters.
- Click Actions.
- Select Filtered Target Records from the Remove from Record Work List flyout menu.
- Click Remove in the Remove Target Record(s) dialog window.
Remove record work list and all records
- Click Actions.
- Select Record Work List and All Target Records from the Remove from Record Work List flyout menu.
- Click Remove in the Remove Record Work List and All Target Record dialog window.
Edit records
The Edit flyout menu allows you to apply a script to selected records or all records in your work list.
Apply script to selected target records
Note: The Edit > Selected Target Records action is enabled once you select a script and a record.
- After you have selected a script, select the record(s) to which you want to apply the script.
- Click Actions.
- Select Selected Target Records from the Edit flyout menu. The script running process is asynchronous. The time it takes to run varies depending on how many records you are editing. While the process is running, you can: perform other actions in Record Manager outside of the LHR tab in the Record Work Lists screen.
A confirmation message appears identifying how many records were successfully updated or failed to update when the script has finished running. If a record failed to update, the confirmation message provides a reason.
Apply script to filtered target records
Note: The Edit > Filtered Target Records action is enabled once you apply a filter to your work list.
- After you have selected a script, click Actions.
- Select Filtered Target Records from the Edit flyout menu. The script running process is asynchronous. The time it takes to run varies depending on how many records you are editing. While the process is running, you can perform other actions in Record Manager outside of the LHR tab in the Record Work Lists screen.
A confirmation message appears identifying how many records were successfully updated or failed to update when the script has finished running. If a record failed to update, the confirmation message provides a reason.
Apply script to all target records
Note: The Edit > All Target Records action is available once you select a script.
After you have selected a script, click Actions and then select All Target Records from the Edit flyout menu. The script running process is asynchronous. The time it takes to run varies depending on how many records you are editing. While the process is running, you can perform other actions in Record Manager outside of the LHR tab in the Record Work Lists screen.
A confirmation message appears identifying how many records were successfully updated or failed to update when the script has finished running. If a record failed to update, the confirmation message provides a reason.
Deselect all selected target records
To deselect all selected records, click Actions > Clear All Check Box Selections.
View History
The View History flyout menu allows you to view the scripts that have been applied to your work list. This action is enabled once you apply a script to your record work list.
View history for all records
You can view every script run on each record in your record work list.
- From the LHR record work list, click Actions.
- Select All Records from the View History flyout menu. A new row appears beneath each record in your work list, displaying the script history for the record in reverse chronological order.
- Each history will have the following fields:
- Reference ID
- Script Name with Status
- Each history provides the three most recent scripts applied to the record. If more than three scripts have been applied, click See More . . . to view the entire history for the record.
- Each history will have the following fields:
- Click Actions > View History > All Records to remove the script history from your record work list.
View history for record work list
You can view every script that has been run on your record work list. This option is available once you have applied a script to your record work list.
- From the LHR record work list, click Actions.
- Select Record Work List from the View History flyout menu. The View History - LHR Record Work List screen opens and displays all edits made to your record work list in reverse chronological order. Each edit set has its own header and summary.
- Click Summary to open the summary view for each Reference ID. The summary view provides counts for the following actions taken during the edit set:
- Total Records Processed
- Updated
- Not Updated - Apply Failed
- Not Updated - Merged
- Not Updated - Missing Summary
- Not Updated - No Script Changes
- Not Updated - Permission Issue
- Not Updated - Record Not Found
- Not Updated - Script Syntax Issue
- Not Updated - Script System Issue
- Not Updated - Validation Issue
- If multiple actions have been taken on your record work list, repeat step 3 for each Reference ID.
- Click Go Back to return to the LHR record work list.
2. Record Work List details
- Record Work List Name – The name you assigned to the record work list.
- Record Work List ID – A read-only ID assigned to your LHR work list. If you have not yet added records to your LHR record work list, or if you have removed all records from your work list, the Record Work List ID will be New.
- Description – The description you provided for the record work list. You can edit the description in the form field. If you edit the record work list description, click the Save button to save your edit.
3. Script Information
This section is used for editing target records using scripts.
- Select a script type from the Edit Action drop-down list.
- Base Script - See Bulk actions for local holdings records for available base scripts.
- Customized Script - See Create a customized LHR script for more information.
- Script Package - See Create a LHR script package for more information.
- Click Enter Script Name and enter the name of the script you want to apply in the form field. As you type, the system automatically suggests names of potential matches. Select the name of the script that you want to apply when it appears.
Or
Browse the drop-down list of available scripts and select the name of the script that you want to apply when it appears.
4. Filter records
Records in your work list can be filtered using the filters in the Filter by drop-down list.
- Select a filter from the Filter by drop-down list.
- Enter or select additional information for the filter selected.
- (Optional) Click the Add button (
 ) and repeat steps 1 and 2 to add an additional filter.
 - Click Apply Filter(s).
- (Optional) To remove the filter(s), click Reset. You can also remove an individual filter by clicking the Remove button (
 ).
).
5. About columns in LHR record work list
| Column name | Description | Notes |
|---|---|---|
| LHR Control Number | The control number associated with the existing record. This number is system-supplied for all new LHRs. Click a LHR Control Number to view the current record as well as a link to the bibliographic record with which the record is associated. Click Close to return to the work list. |
This column can be sorted (ascending/descending) |
| Call Number | Displays call number subfield data from the shelving designation and copy number subfields of the 852 field of your local holdings records (LHRs). Subfield display is dependent upon the content of data in your LHR and can include:
|
|
| LHR Audience Level | Displays the audience level of each LHR. | This column only displays for WorldShare Management Services libraries. |
| Title | The title with which the LHR record is associated. Hover over the information icon ( |
|
| Last Edit | The last edit was made to the record. | This column can be sorted (A to Z; Z to A) |
| Status | The status of the record. | |
| Date/Time Added to List | The date and time the record was added to the work list. | This column can be sorted (ascending/descending) |
| Action | Click the View button to view the LHR record in its current state. |