MARC Records Institution Settings (Fundamentals)
Notes:
- If you are a WMS library or using full WorldShare Collection Manager, please see MARC Records Institution Settings.
- MARC Record output is only available for OCLC Cataloged collections.
Institution Settings > MARC Records
Institution settings apply across all your collections. Use caution when changing existing settings as the changes might impact other collections. Please remember to click Save after you select settings. If your session times out, you could lose your work.
Navigate to the institution MARC Records settings:
- Sign in to the WorldShare interface at your library's WorldShare URL. Replace yourlibrary with your library's identifier: https://yourlibrary.share.worldcat.org/wms
- Navigate to Metadata > Collection Manager Fundamentals > Institution Settings > MARC Records.
Enable MARC Record Delivery
Use the MARC Records setting to enable record delivery. Note that collection-level record delivery settings will remain disabled. You will need to enable record delivery within your collections before records will be delivered.
To enable record delivery in the institution settings:
- Navigate to Institution Settings > MARC Records.
- Select Yes for Enable MARC Record Delivery.
Once you enable record delivery, tabs of settings to customize your records will appear. The settings in these tabs apply across all collections and records you output from Collection Manager Fundamentals. To customize your records, complete the settings in each tab, Customize Records and Record Delivery.
Watch a video
Enable MARC records for all collections in Institution Settings
Run time: 9:40
Customize Records
You need only one configuration of the record settings. The settings apply across all of your collections. Customize your records as much or as little as your library requires. Note that you need to map the data values you need for one of your collections, those for all of your collections, and so forth. Collection Manager Fundamentals offers several options within each collection to configure collection-specific data.
All Collections
Holding library code (049 $a)
Leave the field blank or to enter a four-character code. Use any holding library code that you want mapped to the 049$a of all of your records.
Delete Fields
To delete fields from your records:
- Select a Tag and Indictors from the drop-down lists.
- Use the add button (+) to add another field.
Delete Subfields
To delete subfields from your records:
- Select a Tag and Indicators from the drop-down lists.
- Select a Subfield from the drop-down list.
- Use the add button (+) to add another field.
Add Fields
Use the Add fields area of the Customize Records tab to map data elements to your records. Map all data elements you need in records from any of your collections in this single profile area. Record customizations apply across all records you receive from Collection Manager Fundamentals. See the default values in records from Collection Manager Fundamentals.
To add fields:
- Enter a Tag, Ind 1, and Ind 2 or leave them blank.
- Enter a Subfield.
- Choose from the Data values in the Value drop-down list to map the associated data to your records.
- If desired, nest multiple values under a single subfield or multiple subfields under a single tag:
- Use the add button (+) to add another value to the subfield.
- Alternatively, use the add button (+) to add an another subfield to the tag and then choose a value.
- If you would like to add another tag, use the add button (+) to add another field and enter a tag.
Data values
See the Data values you can map to your MARC records and find instructions on how to use them.
Knowledge Base Collection 856 Field
WorldCat records include 856 fields and various URLs that are not accessible to your institution. For records from knowledge base collections, Collection Manager Fundamentals removes the URLs from WorldCat records and adds your library-specific links.
Titles are often available through more than one provider. If you have a title in multiple knowledge base collections, Collection Manager Fundamentals will deliver a single record for the knowledge base title and the record will have multiple URLs. By default, your library will receive updated records when titles are available through new providers and the relevant URLs will be added in those records. Likewise, your library will receive updated records when providers no longer offer titles and the relevant URLs will be removed in those records.
If your ILS requires a separate MARC record with a single URL for every instance of an electronic title, you can select collection-level settings to have the records for a collection delivered in a separate file and select a setting to isolate the file output from other collection activity. For more information, see the knowledge base collection-level Delivery File Output settings.
WorldCat 856 Field
Collection Manager Fundamentals will retain all of the URLs from the WorldCat record. If you enter domains in the 856 field customization settings, Collection Manager Fundamentals will retain only the URLs that match the domains you define. If a title with the same OCLC number is in one of your knowledge base collections, we will use the 856 field from your knowledge base, not from the WorldCat record.
To see examples of the WorldCat 856 field in records, see 856 field processing in records.
Local Data
You have the option to have Local Holdings Records (LHRs) interleaved with your records and/or to have Local Bibliographic Data (LBD) embedded in or interleaved with your records.
When including local holdings records (LHRs) to records, you must select MARC 21 with MARC-8, MARC-21 with UTF-8 Unicode, or MARCXML with UTF-8 Unicode in the Record Delivery tab.
- Include LHRs
-
To include LHRs:
- Select Include my local holdings records.
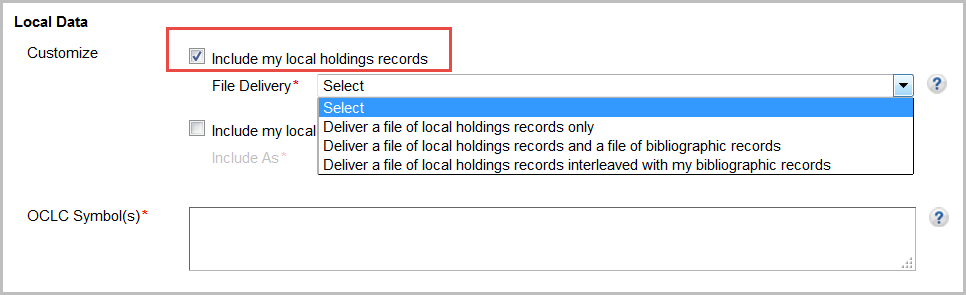
- Select from the drop-down list a delivery method. Options include:
- Deliver a file of local holdings records only
You will receive a file of local holdings records only. The file name will include "lhr" as follows: metacoll.XXX.new.lhr.D20160213.T042239.1.mrc - Deliver a file of local holdings records and a file of bibliographic records
You will receive local holdings records and bibliographic records in separate files. - Deliver a file of local holdings records interleaved with my bibliographic records
You will receive each bibliographic record followed by its associated LHR(s). Updated bibliographic records and their interleaved LHRs will be output if any associated LHR is deleted, added, or updated. You will receive an updated record and all associated LHRs, including those that have not changed. This allows you to replace all LHRs for a record without the need to figure out what has been changed. Note: Local bibliographic data will not be included.
- Deliver a file of local holdings records only
- Enter your OCLC Symbol(s). If you have multiple OCLC symbols, separate each symbol with a space.
- Select Include my local holdings records.
- Include LBD
-
To include LBD:
- Select Include my local bibliographic data.
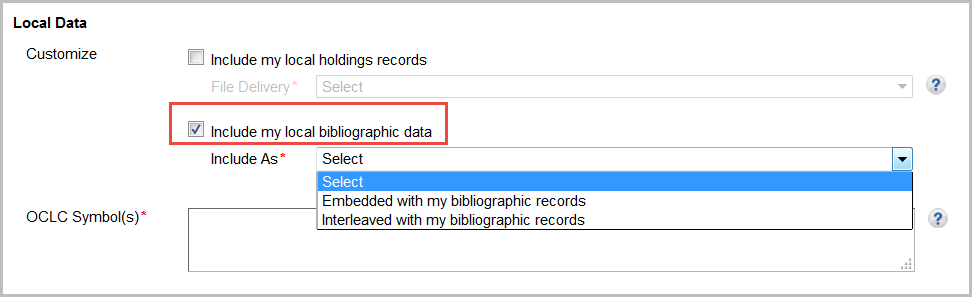
- Select from the drop-down list how you would like your LBD included with your records. Options include:
- Embedded with my bibliographic records
Select if you want local bibliographic data, such as subjects and notes, embedded in your records. - Interleaved with my bibliographic records
The option to have LBD Interleaved with records is useful for libraries that need to determine which metadata is local and which is coming from the WorldCat bibliographic record.
- Embedded with my bibliographic records
- Enter your OCLC Symbol(s). If you have multiple OCLC symbols, separate each symbol with a space.
- Select Include my local bibliographic data.
Record Delivery
Format
If desired, change the default record format. Available formats:
- MARC 21 with MARC-8 (default)
- MARC 21 with UTF-8 Unicode
- MARCXML with UTF-8 Unicode
- Dublin Core Qualified with UTF-8 Unicode
- Dublin Core Simple with UTF-8 Unicode
- OCLC Dublin Core Qualified with UTF-8 Unicode
- OCLC Dublin Core Simple with UTF-8 Unicode
- MODS with UTF-8 Unicode
- Use a default suggested field set or choose custom fields to include in TSV files. Refer to TSV settings.
Note: You must select MARC 21 with MARC-8, MARC 21 with UTF-8 Unicode, or MARCXML with UTF-8 Unicode, if you choose to add LHRs to your records.
If you specify record customizations in the Customize Records tab, you must enter MARC 21 fields. For more information about record formats, see MARC 21, Dublin Core, and MARC XML and MODS.
Delivery Frequency
For collections that output records on an ongoing basis, change the "Daily" default delivery frequency if desired. Available frequencies:
- Daily (default)
- Weekly
- Monthly
- Quarterly (every 3 months)
Daily files will not be output immediately. You will receive an emailed report around the time when your file is ready if you completed the settings in Institution Settings > Reports. See Record output and timing.
File Output
Select separate file delivery for all of your serials and/or for all WorldCat update records based on your holdings in WorldCat (if you enabled the settings in the WorldCat Updates tab).
Select from the file output options:
- Unselected (default)
- Deliver my serials in a separate file (.ser)
- Deliver records for WorldCat updates in a separate file (.wcholdings)
You will be able to distinguish files from different types of collections by their file names. See Files of records and file names.
Uniform Resource Identifiers (URIs)
Links in records make resources more integrated with the Web and more discoverable for end users. If you select URI settings, linked data URIs will be embedded in your MARC records for 1XX, 6XX, 7XX and 8XX fields and will be included in the $0 subfield. $0 is a valid field for linked data URIs even if your ILS currently does not use the linked data information.
If you would like to download records with linked data URIs, select the identity service(s) from which you would like to retain links. If you select more than one identity service, multiple $0s will be appended to the appropriate tags with the appropriate URIs. The order of $0s will follow the order listed in the interface.
By default, none are selected:
Name Headings Identity Services
- GND Authorities - (Die Gemeinsame Normdatei, German)
- LC / NACO Authority File - (Library of Congress / Name Authority Cooperative Program)
Subject Headings Identity Services
- GND Authorities - (Die Gemeinsame Normdatei, German)
- LC Subject Authority File - (Library of Congress)
- MeSH Authorities - (Medical Subject Headings)
For more information about Authorities, see Authorities: Formats and indexes.
TSV settings
Export WorldCat data directly to TSV format. Choose specific MARC fields for export by adding the required fields to the Selected fields section. Local fields appear for selection when the Customize local data settings are selected under Customize Records within the MARC Records drop-down.
The Select MARC fields to export section contains all available MARC fields for export. The Selected fields section shows the ones currently selected for export. Use the Search field to retrieve specific fields.
- Use the arrows to move individual fields to and from the Selected fields section.
- Use the Transfer all button to move all the fields to the Selected fields section.
- To remove all of the fields from the Selected fields section, select Remove all.
Note: Once selections have been made, you cannot return to the default, initial selections.