Make changes to sheets
►Admin Client Configuration> Layouts
The system administrator needs to be logged in to make these changes.
To modify an existing sheet we recommend you normally do this by accessing the relevant sheet via its' Layout record as described in the procedure below, rather than the sheet record. This is so that you can clearly see the context of the record you are editing. For example, many sheets have non distinctive names such as "Main Details"; accessing the sheet via the layout overcomes this problem.
To make changes to a sheet you create a draft copy. In this way, the changes you make do not appear until you decide to 'publish' the sheet. First follow the procedure below.
If radical changes are intended it may be preferable to create new layouts and sheets rather than to edit existing sheets.
Edit a sheet
- Logged in as a system administrator, go to the domain where you would like to make changes, e.g. Users.
- Display any record in full details and view the sheet you would like to edit.
- Click on Sheet Actions and select Create and Modify Draft. This creates a draft copy in modify mode, of the current sheet you are viewing. The sheet is added to the layout as the last sheet and is called the same as the original (+ Draft).
- To change multiple controls, use the attribute actions that remain constantly on-screen (top right: Select All · Deselect All · New · Delete · Up · Down).
- To change a single control click once to select it. When a single control is selected, its' Control Properties show in a popup that you can use to edit it. Continue to make changes to Controls as described below.
- When completed, save the changes and Publish the Sheet as below.
Tip: you can search for all Sheets that are currently at Draft status. Go to Admin Client Configuration> Sheets. Enter wildcard % in the Sheet Name and use Refine Search. Refine the search by Sheet Status = Draft.
Add controls to a sheet
The Attribute choices for adding a new Control will be dependent on the current domain you are in.
- Go to the domain where you want to add the controls and display any record details.
- Click on Sheet Actions and select Create and Modify Draft.
- Select a single Control next to where you would like to add the new Control. When selected, the Control displays with a blue background. (Tip: click on the Control again, if you want to deselect it).
- On the top right you will see a set of links next to the Actions drop down:
Select All · Deselect All · New · Delete · Up · Down
- If you have multiple fields to add, you may wish to use the following time-saving Actions using the drop down:
| Create Close Copy | Creates an exact copy of the Control you have currently selected. It is positioned immediately after the copied controls. | OLIB will match the styles and label widths used elsewhere on the sheet. |
| Insert Labelled Attributes | This displays a popup window listing attributes that are not yet on the current sheet. Check the boxes to select those attributes you want to add to the sheet. OLIB will automatically include the field label (based on the attribute description) and the help text. |
- If you have only one field to add, you can click New to obtain properties for one new Control at a time. Some defaults will already be provided; complete the details using Control Properties for field help. OLIB places the new Control at the foot of the Sheet. Note, this method only adds one control at a time - you will also have to add the field label separately.
- Save and Close the sheet record. The draft sheet shows the changes.
- Publish the sheet as shown below.
Remove controls from a sheet
- Go to the domain where you want to remove the controls and display any record details.
Click on Sheet Actions and select Create and Modify Draft. - Select the required Controls for deletion. A blue background indicates it is selected.
- From the links on the top right, select the Delete link. OLIB prompts whether you are sure you want to remove this item.
- Save your changes and Publish the sheet as below.
Change the sequence of controls
- Go to the domain where you want to remove the controls and display any record details.
- Click on Sheet Actions and select Create and Modify Draft.
- Select the Controls you would like to move. For example in Users select the Barcode field label and edit box.
- On the top right you will see a set of links on the left. Click Up or Down to reposition the Controls.
- Save your changes and Publish the sheet as below.
Tip: you can re-position a single field by selecting other multiple fields instead, and moving them Up / Down in relation to the specific field.
Note: alternatively, for any of the above tasks, as soon as the draft sheet is available, click the Controls (Advanced) tab. The Controls are displayed in a tabular format. You can select the Controls you want to move, copy, edit or delete by clicking the relevant link.
Use snippets
Snippets in Layout Manager are a collection of related fields/attributes arranged together, with help text, to provide a simple way to add a feature to your own layout(s). When you choose to add the snippet, all the attributes are added to the sheet in one action. This includes field labels, buttons and help text; OLIB also matches the styles and label widths used elsewhere on the sheet.
These are available in the Titles domain only. They are helpful if you want your own Layout and Sheets to take advantage of the Type-ahead / fast entry fields for cataloguing.
- When editing a Titles sheet, select a Label where you want the new fields to appear. The new fields will be inserted above the label.
- In the Actions drop down on the top right choose Insert Snippet.
- OLIB displays the available snippets in a popup window. The fields included with each snippet are as follows:
| Snippet | Attributes included |
|---|---|
| Agents (Authors, Editors, etc) Entry | Name Combo (ti_author_typeahead) Responsibility Type (ti_prresbty) Add Name Button (ti_name_add) Authors / Names (titleauths) |
| Classmark Entry |
Classmark Combo (ti_class_typeahead) |
| Copies Entry | Copy Barcode Entry (ti_copybarcode_entry) Default copy location (ti_defcopyloc) Default copy category (ti_defcopycat) Shelfmark Prefix (ti_sm_prefix) Copy Shelfmark Entry (ti_shelfmark_entry) Add Copy Button (ti_copy_add) Copies (ti_copies) |
| Publication Entry | Type of Publication information (ti_pub_mxxi_ind2) Place Combo (ti_place_typeahead) Publisher Combo (ti_publisher_typeahead) Publication Date Entry (ti_pub_tdate) Publication (ti_publisher) |
Tip: in Admin Client Configuration> Sheets, you can search for all Snippets. Enter wildcard % in the Sheet Name and use Refine Search. Refine the search by Sheet Status = Snippet.
Example
Here we add the Agents (Authors, Editors etc) Entry snippet - you can add all the fast entry Author details to the Sheet/Layout in one go:
- Go to the Titles domain, search for any record, and select the Layout you require from the Layouts drop down.
- Display the Sheet you want to edit, e.g. Main Details.
- From Sheet Actions, select Create Draft and Modify.
- Select the Label control above which you want to add the Authors fast entry attributes, e.g. the Edition label.
- From the Actions drop down on the top right, select Insert Snippet.
- In the popup window tick the box to choose Agents (Authors, Editors, etc.) Entry and OK.
- OLIB inserts a set of 5 new Author fields as shown:
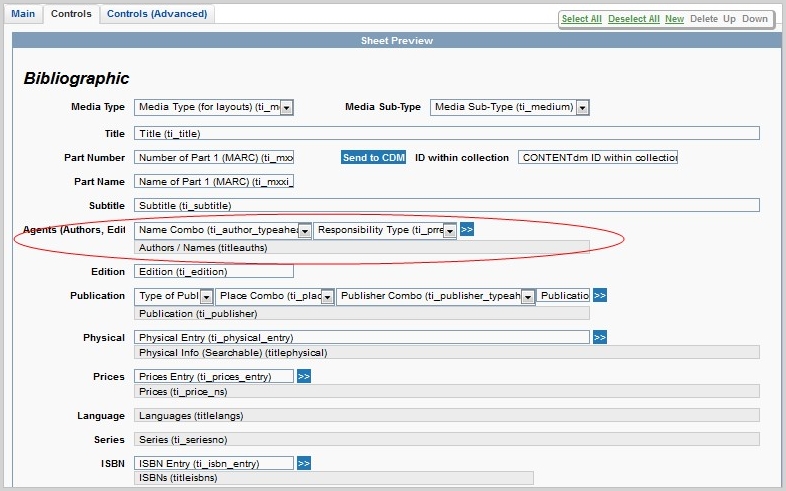
Save the changes for them to take effect in the Sheet and publish the sheet as below.
Caution: do not add the same snippet more than once to a Sheet as this will cause problems for the type-ahead fields.
Add button fields to sheets
These fields are present in cataloguing especially, and their purpose is for speedy data entry, for example when adding a Copy barcode in Availability, or adding the ISBN. These controls are available in the General Layout, but if other layouts are used for cataloguing, they can be added to those Layouts too.
In the Titles domain, General Layout, the Control Attributes are called:
Add Copy button
Add ISBN button
Add Note (Internal) button
Add Note button
Add Physical button
Add Prices button
- To add one of these buttons follow the procedure above to add a new Control. In the Control Details box, select one of the above named Attributes.
- Publish the sheet as below.
Publish the draft sheet
Once you are satisfied that the changes you have made are complete then you are ready to 'publish' the sheet so that it overwrites the original.
- Go to the draft sheet.
- In Sheet Actions select Publish.
The draft sheet will now replace the original, without the need to rebuild configuration data.
Create a new sheet
The above procedure shows you how to make a draft copy of a sheet so that when you 'publish', it replaces the current sheet. In addition if major changes are required you can create a completely new sheet, which is automatically 'published'. If you create a sheet via the Layouts domain, it is associated with that layout. if you create it via the Sheets domain, you will have to associate it with the relevant layout afterwards.
In the Layouts domain
- Go to Admin Client Config> Layouts and follow the procedure to create a new layout.
- From the Sheets tab click New. Enter a meaningful Name for the Sheet. Indent and Top Margin for most OLIB Sheets are set at a value of 10. Type is set by OLIB and will become either Draft or Published.
- Click the Controls tab. From the links available, select New for each label and attribute you require for this sheet. More help with Controls is available.
- Finally, click the Info Types tab and select the Info Types for which you want this Sheet to be available. When the domain is Titles for example, the Info Types will actually be cataloguing reference data - Media Types.
In the Sheets domain
Before you create the new sheet first make sure of the domain name that the sheet will be used in.
- Go to Admin Client Config> Sheets.
- Click New Record and enter the sheet details as above.
Note: the Actions Insert Labelled Attributes and Insert Snippet (for Titles layouts) are very labour saving when you want to add multiple fields. Save the details.
- Go to Admin Client Config> Layouts and search for the correct layout.
- In full details switch to modify and use the Sheets tab.
- Click Search to assign the new sheet to the layout. The list of sheets includes only the ones available for this domain.
- Tick to select the new sheet and Save and Close.
The new sheet is immediately available for the relevant domain.
Create a copy of a Sheet
Go to the relevant domain that contains the Sheet you would like to copy. Using Sheet Actions you can make a copy of a Sheet - Create Copy. Make any amendments you require to the copy. The new Sheet can be linked to the new Layout using Search from the Sheets tab.
You can also use the following action to quickly copy a sheet in a layout:
| Copy Sheet for this Layout | This will copy the sheet that the layout is currently linking to. It will replace the original sheet in the current layout and be placed in the same position on the current layout only. (The original Sheet still remains in the system and would be found in the Sheets domain. |
Make Public
When viewing a Sheet, the Sheet Actions also include Make Public. This action is rarely used. For an already published, customised sheet it will remove the “customised” flag from the sheet and ensure that when other users login they will pick up the changes to layouts in this domain.
Permissions
Permissions can be applied to Layouts and Sheets in the same way that Permissions are applied to other 'objects' such as Folders or Saved Searches.
You use the Layouts domain to set Permissions on a Layout.
- Go to Admin Client Config> Sheets.
- Display the Sheet details.
- Use the Permissions drop down on the top right to apply permissions.