ZOPACs Installation
Amlib ZOpacs (web-based Z-client) enables searching of a range of library targets worldwide using the Z39.50 standard, as well as displaying holdings and circulation status for target databases which support the Z39.50 standard for holding.
For maximum effectiveness the latest Amlib ZServer version 5.1 module (optional) should be installed on your web server to enable display of holdings (items) and their current circulation status when searching your local Amlib database.
IMPORTANT: DO NOT PROCEED WITH THE INSTALLATION PROCESS UNLESS YOU HAVE ALREADY INSTALLED AMLIB NETOPACS VERSION 5.1 OR ABOVE.
Overview
The setup of the ZOpacs involves the following steps:
- Shutdown the NetOpacs
- Install the ZOpacs5.1 client application
- Restart the Amlib NetOpacs WebConsole
Before you begin the installation
Please carefully read the entire installation guide prior to commencing the actual ZOpacs installation. If you have any questions please contact OCLC Support.
Serial Numbers Required for Installation of Amlib Modules
The ZOpacs 5.1 installation requires a serial number. If you did not receive a serial key for the modules that your library has purchased you should contact OCLC (UK) Limited before commencing the upgrade.
Frequently Asked Questions
Question: Do I need to have a completed backup of my system before proceeding?
- Yes. OCLC (UK) Limited recommends that the library verify that it has an up-to-date backup of its database (for example: from the previous night) before installing any updates. You should also make sure that your tape backup includes a backup of your NetOpacs folder (for example: C:\NetOpacs) and all NetOpacs templates.
Question: Does NetOpacs need to be shut down?
- Libraries using the NetOpacs module should ensure that this program is shutdown prior to upgrading
Question: Can OCLC (UK) Limited install the upgrade for me?
- Yes. OCLC (UK) Limited can arrange for the onsite installation of this upgrade for a small fee
Install ZOpacs
Note: This process is only for libraries that have purchased this optional module.
Amlib ZOpacs are installed in the same folder as the Amlib NetOpacs (for example: C:\NetOpacs), so it is important that you already have the latest version of Amlib NetOpacs BEFORE proceeding.
Depending on the library configuration the Amlib ZOpacs module will either be installed alongside the Amlib NetOpacs on the library database server (generally most school libraries) OR will be installed alongside the Amlib NetOpacs on a separate web server (generally public and all other libraries).
Step 1: Logout of Amlib and Shutdown the NetOpacs
- Ensure all users are logged out of the Amlib client
- It is important that before installing the ZOpacs software that the NetOpacs WebConsole is shutdown (including all NetOpacs processes). Alternatively, if you may be running your NetOpacs as a Service or using a Service Manager to run your NetOpacs (for example: FireDaemon) then you should stop your NetOpac processes in the Manager.
To shut down your NetOpacs (via the WebConsole):
- On your NetOpacs server, right-click on the NetOpacs WebConsole “traffic lights” in your Windows system tray at the bottom-right of the screen and select Exit:

- The “traffic lights” and all NetOpacs icons on the Windows taskbar will disappear once NetOpacs has successfully shutdown
To shut down your NetOpacs (when running as a service):
If your server has the Amlib Web Monitor icon (icon is a PC with “cog”) in your Windows “tray it means that NetOpacs has been installed as a service.
1. On your NetOpacs server, stop the NetOpacs service either by a right-clicking on the Amlib Web Monitor and choosing Stop, or via the Windows Services screen:

To shut down your NetOpacs (when running via a Service Manager – for example: FireDaemon):
If your web server has neither the “traffic light” nor “cog icon” in the system tray, the NetOpacs may be running as a FireDaemon service.
- On your NetOpacs server, go to Start > All Programs > FireDaemon OEM > FireDaemon Service Manager – the FireDaemon OEM Service Manager screen will display:

- Highlight the Amlib NetOpacs service and click the Stop button

Note: The Webserver (Windows 2000/2003 Server running NetOpacs) should be restarted WITHOUT loading NetOpacs - you will need to check whether NetOpacs WebConsole is in the Windows NT “Startup” group (if it is, you may need to temporarily remove it from the Startup group, or temporarily disable automatic startup if running as a service).
Step 2: Install the ZOpacs 5.1 Software
Caution: Please ensure that you have full read/write access to the \NetOpacs folder on your server (for example: C:\NetOpacs) and that you are logged in with Administrative Privileges.
- The ZOpacs 5.1 installer is available on the content portal. See Downloads and software updates. Contact OCLC Support for assistance.
- Download the ZOpacsSetup.exe and save it on your NetOpacs server
Caution: If applying a patch for your ZOpacs, you should download the required patch and then run the ZOpacsXXXPatch.exe with naming that corresponds to the patch you want to install.
-
Double-click the ZOpacsSetup.exe to launch the installation Wizard – the Setup – Amlib ZOpacs screen will open displaying the Welcome message:

- Click the Next button – the Serial screen will display, prompting you for valid Serial Number:

- Enter the Serial Key supplied by OCLC (UK) Limited (case sensitive!) then
- Click the Next button – the Installation Location window will be displayed
- Setup will search for the existing folder where the Amlib 5.x NetOpacs are currently installed (if it is unable to find the existing folder a default folder will display)

- If the folder displayed IS NOT correct then click the Browse button to manually locate the location of the existing \NetOpacs folder
- Click the Next button – the Select Components window will display:

- Choose which components should be installed:
- Select Modules To Install:
- Amlib ZOpacs Module and Program Files
- Select Web Server Tasks:
- Create ZOpacs Virtual Directory in IIS (zopacs)
- Select Modules To Install:
- Select ALL options and click the Next button – the Ready to Install window will display with a summary of the installation tasks to be performed:

- Click the Install button – the Installing window will display:

- Click the Finish button when complete

- The setup Wizard will close
Installation of the Amlib 5.1 ZOpacs update is now complete.
Note: Libraries that have configured their web server with multiple NetOpacs installation folders on the one server (for example: they have NetOpacs installed in c:\Netopacs and c:\Netopacs2) will need to repeat the setup steps 3 – 13 for each additional NetOpacs folder, remembering to change the name of the Installation Location at step 6.
Step 3: Check ZOpacs Settings in Amlib Client
- Launch the Amlib client
- Go to Main > Catalogue > Catalogue – the Catalog screen will display
- From the menu, select Application > CatZOptions – the Z39.50 Options screen will display:

- Click the ZOpacs tab

- It is important that the setting: A session expires after XXX minutes is changed from the default of 15 to a value of 60 or higher (do not leave as 15)
- The following settings should be only be modified in consultation with Amlib Support:
- Alternative Path to Z39.50 Client
- Path to the HTML Templates – typically the ZOpacs templates sit in the C:\Netopacs\ZOpacsHtml folder (this is the default installation location – the drive location may vary depending on where your NetOpacs are installed)
- Style to use when displaying the web pages (0-00) – see Technical Notes for more information
- Exit the Amlib client for these settings to take effect
Step 4: Finalise WebConsole Settings
After installation the Amlib NetOpacs WebConsole – also shared with Amlib ZOpacs – requires some additional configuration settings via the WebConsole interface.
- From the Start menu, select All Programs > Amlib NetOpacs Module > NetOpacs WebConsole – the WebConsole will display:

Please Note: If you can’t access the NetOpacs folder from the Start menu, go to the Run box, type the full path to webcon.exe and append the configure switch – for example:- C:\Netopacs\webcon.exe /configure
Alternatively:- Double-click on the NetOpacs WebConsole icon on the server desktop – the Amlib WebConsole application will start (traffic lights will appear in the system tray)
- Right-click on the Amlib WebConsole in the system tray and select Properties – the WebConsole will display
- C:\Netopacs\webcon.exe /configure
- From the Service: field drop-down (not the Service in the menu), select Amlib ZOpacs


- From the menu, select Service > Configure… – the Service – Configure screen will display:

- Ensure the settings are as follows:
- Application: ZOpacs.exe
- Display Name: Amlib ZOpacs Login
- Application Instances: 1 (can be changed to a higher level when in production)
- Service Instances: 1 (can be changed later if you configure NetOpacs as a service)
- Virtual Directory: zopacs
- Script Name: webquery.dll
- Now select the WebQuery tab

- Ensure the settings are as follows:
- Error Template: C:\Netopacs\Error.htm (click Browse and navigate to the Error.htm file in the NetOpacs folder if your NetOpacs are not installed within C:\Netopacs)
- TimeOut (sec): 60 (can be higher – timeout setting in seconds)
- If more than one Web Application is loaded use: we recommend selecting All applications evenly
- Click the OK button – a prompt with the following message will display: The changes you have made will not take effect until 'Amlib WebConsole' is restarted. Do you want to restart 'Amlib WebConsole'?

- Click the Yes button
Please Note: We recommend that the NetOpacs initially be configured as an application for at least one week, as it is easier to troubleshoot interactively than when it is configured as a service. As a result, you will need to ensure that your server is logged in to run the NetOpacs module – if you log out the NetOpacs application will be stopped (if security is important you can lock the console when the server is unattended).
Access Amlib ZOpacs Modules using your Browser
To access the Amlib ZOpacs Main Menu using a browser use the address of the web server with /zopacs/webquery.dll.
For example:
- http://localhost/zopacs/WebQuery.dll?

Or if the default document of webquery.dll has been defined in the previous section you will only need to enter: http://localhost/zopacs.
Technical notes
unlike the Amlib NetOpacs module, the Amlib ZOpacs HTML pages do not need to be compiled from the database BUT are accessed from the C:\Netopacs\ZOpacsHtml folder by default.
Amlib.ini
After installation the Amlib.ini file in the NetOpacs folder on the NetOpacs server will need to be edited to include the correct ZOpacs configuration settings:
[ZOPACS]
VirtualDir=/ZOpacs
ScriptName=webquery.dll
Database=AMLIB
Trusted=N
UserName=NETOPACS
Password=NETOPACS
The important entries are:
- Database – Specifies the Amlib database containing all the parameters for the Z39.50 client. The database name will usually have a LIB suffix (for example: AMLIB or TELIB)
- Trusted – Determines whether NT Authentication should be used to connect to a SQL Server database. If this entry is set to Y then the UserName and Password entries are ignored and NT Authentication is used for connecting to the Database. If this entry is set to N then Database Authentication is used and the UserName and Password entries are used for connecting to the Database.
- UserName & Password – Specified the login name and password for connecting to the database. These entries are only used if the Trusted entry is set to ‘N’. The default is either NETOPACS/NETOPACS or SYSADM/SYSADM
- The remaining settings (duplicated from your [NetOpacs] settings) may be removed
CSS
-
- Please ensure that the CSS for your ZOpacs pages is copied into the corresponding location in the NetOpacs/Amlibweb folder on the NetOpacs server
HTML Templates
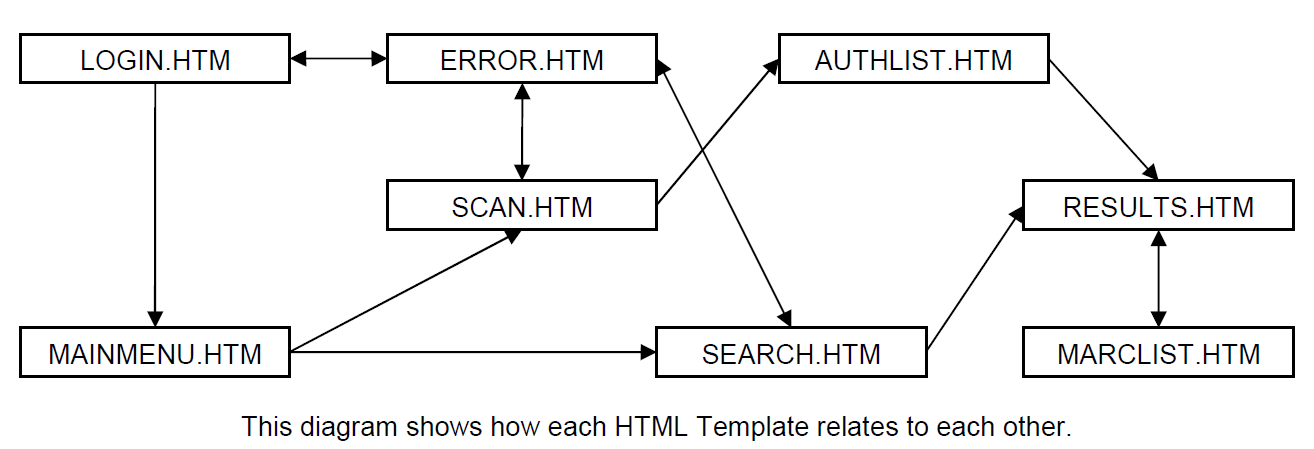
General Overview
There are eight HTML files required by ZOpacs:
- AuthList.htm – displays a list of authorities found as part of a scan search
- Error.htm – general purpose screen used for displaying errors
- Login.htm – username and password screen used for authenticating ZOpacs client users
- MainMenu.htm – main menu screen which contains links to bibliographic and scan search screens
- MarcList.htm – displays the marc and holdings data for a specific record
- Results.htm – displays a list of search results including each requested server and the records found for each server
- Scan.htm – browse search screen which allows the user to choose from a list of servers that support scan searches and choose search attributes
- Search.htm – bibliographic search screen which allows the user to choose from a list of servers and search attributes
The location of the HTML Templates is determined by the Path to the HTML Templates option in the Z39.50 Options screen (see Step 3 above). All eight templates must reside in the same directory OR a subdirectory of the HTML Templates path where the subdirectory name ranges from 00 through to 99. Having the templates in a numbered subdirectory allows you to have up to 100 different designs for on ZOpacs client.

In the example above there exists a ZOpacsHtml folder which contains four subfolders: 00, 01, 02 & 03. If each of these four subfolders contains the eight HTML template files, then it allows the user a choice of four different web designs from within the ZOpacs module. The default design can be specified by changing the Style to be used when displaying web pages (0-99) option in the Z39.50 Options screen (see Step 3 above).
Login.htm
The login screen only appears if the Users are required to login (Y/N) option on the Z39.50 Options screen is set to Y. If a user is required to login then they must type a valid username and password before they can gain access to the ZOpacs search screens.
All login screens require two text fields: USERNAME and PASSWORD. The HTML may look similar to the following:
<input type="text" name="USERNAME">
<input type="text" name="PASSWORD">
Any field that does not have a valid name will not be used as part of the login process.
MainMenu.htm
The main menu screen provides the user with a list of search options. Most main menu screens allow the user to choose either a bibliographic or scan search.
To allow a user access to a bibliographic search there must be a hyperlink to Search.htm somewhere within the MainMenu.htm page.
- For example: <a href="Search.htm">Bibliographic Search</a>
To allow a user access to a scan search there must be a hyperlink to Scan.htm somewhere within the MainMenu.htm page.
- For example: <a href="Scan.htm">Scan Search</a>
Search.htm
The bibliographic search template allows the user to perform searches against a number of Z39.50 servers. The servers and the search attributes displayed depend upon which user is logged.
There are four different types of entry fields:
- The list of servers from which the user should choose (for example: State Library of WA, State Library of Victoria) – there can only be one list of servers and it must either be a single or multi-select list box and have the name of SERVERS
- For example: <select name="SERVERS" size="5" multiple>
- The list of attributes to search for (for example: Title, Author) – there can be up to five attribute lists and they must all be single select list boxes and have the name of ATTRIBUTE
- For example: <select name="ATTRIBUTE">
- The term to search for (for example: Smith, Wilbur) – there can be up to five terms and they must be all input boxes of type TEXT and have the name of TERM
- For example: <input type="text" name="TERM">
- The operators used for combining searches (for example: AND, OR, AND NOT) – there can be up to four attribute lists and they must all be single select list boxes and have the name of OPERATOR
- For example: <select name="OPERATOR">
Other
You will notice that there are four different styles in the ZOpacs directory. Unlike NetOpacs, all the styles are loaded into memory on the first database connection allowing users to access different styles with only one ZOpacs module loaded. There is an option in the Z39.50 Options screen which allows you to specify the default styles: Style to be used when displaying web pages (0-99). You can however bypass the default styles by specifying a specific URL.
-
- For Authentication = Y:
- http://localhost/ZOpacs/webquery.dll?0001 = login screen for Style 0
- http://localhost/ZOpacs/webquery.dll?0101 = login screen for Style 1
- For Authentication = N:
- http://localhost/ZOpacs/webquery.dll?0002 = main menu for Style 0
- http://localhost/ZOpacs/webquery.dll?0102 = main menu for Style 1
- For Authentication = Y:
Note: The last four digits of the URL control this functionality: the first two (for example: 00) control the Style and the second two control the authentication (01 = Y and 02 = N). So if the last digits are 0102, then the URL will be for Style 1, No authentication.
The Amlib ZOpacs system parameters can be changed on the Z39.50 Options screen (see Step 3 above).