Audit reports
Audits and audit reports
The audit reports list stockitems/authorities/borrowers that have been deleted, inserted (added) or updated (modified/changed) within a specified time period.
In addition to the audits, there are a number of Statistics Reports Audits that look at Operator logons and alterations, as well as searches performed in each module.
Supervisor settings: Setting up audits
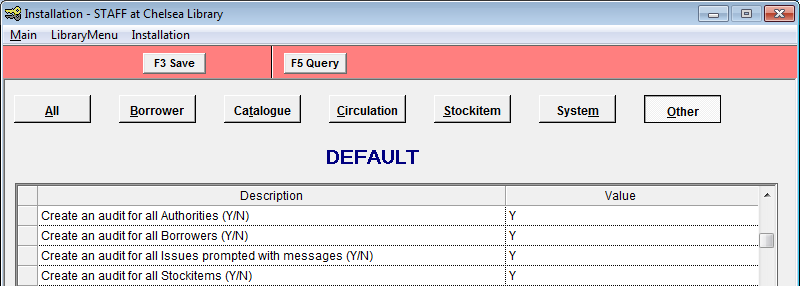
The Audit must be switched on first, before the data can be collected. To check this:
- Launch the Amlib client.
- Go to Main > Supervisor > Installation > Other tab.
- There are several types of audit:
- Create an audit for Authorities (Y/N)
- Create an audit for all Borrowers (Y/N)
- Create an audit for all issues prompted with messages (Y/N)
- Create an audit for all Stockitems (Y/N)
- If you would like to keep audit details, ensure that these are set to Y (particularly the last).
- Make sure you also check your settings by individual Location:
- Select Installation > Choose Location.
- Select location and click OK.
- Select the Other tab.
Note: Any record(s) that were deleted, inserted, or updated prior to the audit being switched on will not be recorded.
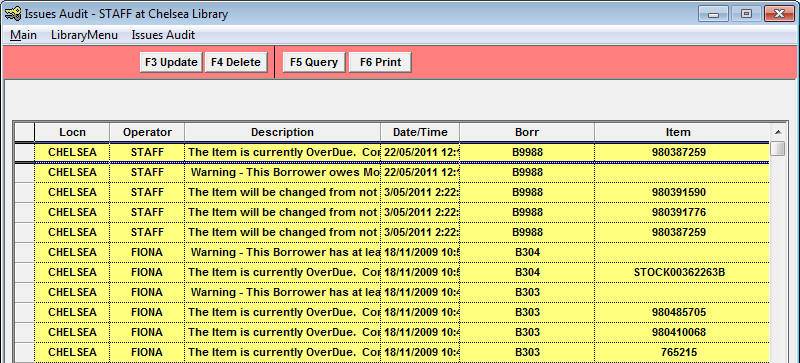
Issues audit
Issues Audit records all messages that are displayed in issues. If you do not use this particular function, make sure the audit is switched off (see Supervisor Settings above):
- Create an audit for all issues prompted with messages (Y/N) = N
As the logs fill up quickly and must be regularly maintained (old entries deleted daily or weekly).
To access the Issues Audit:
- Open the Supervisor module.
- Select LibraryMenu > IssuesAudit. The Issue Audit table will display.
- Click the F6 Print button to print up the list.
To delete entries from the table:
- Open the Supervisor module.
- Select LibraryMenu > IssuesAudit. The Issue Audit screen will display.
- Highlight the entries in the list to be deleted.
- Click the F4 Delete button. This will mark the entries for deletion.
- Click the F3 Update button to delete the marked entries.
Load the template
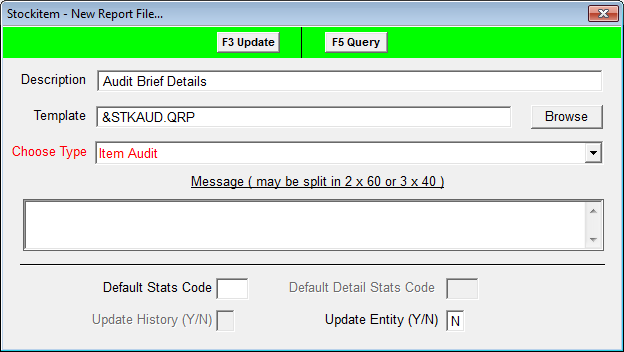
Some audit report templates may need to be loaded before they can then be used in a report. You can also use this method to double-check the Choose Type of an already loaded template.
- Go to Main > Reports > RepAddNew. The Report Files window will display.
- Select the appropriate Report Entity: either Authority, Borrower, Statistics or Stockitem. In the example below: Report Entity = Stockitem.
- Click the F1 New button – The New Report File screen will display.
- Enter a Description (e.g., Audit Full Details).
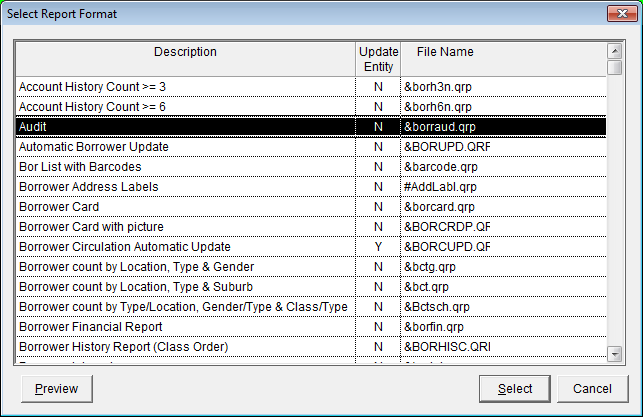
- Click the Browse button to view the Amlib/Reports folder on your Amlib server and locate the template to be loaded. Be sure to change the Files of type: drop-down to System Report Templates (*.QRP).
- Select the template to be loaded and click the Open button.
- Change the Choose Type to select an Audit type:
- Authority: Authority Audits
- Borrower: Audit Report
- Stockitem: Item Audit
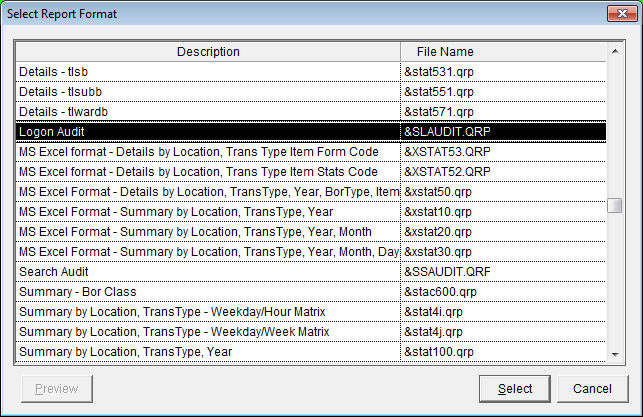
- Statistics: Access Audit, Logon Audit, or Search Audit
- You can leave Default Stats Code blank.
- Update Entity (Y/N) = N.
- Click on the F3 Update button.
- Close out of the Report Files screen.
The template is now loaded and available for use in a Report.
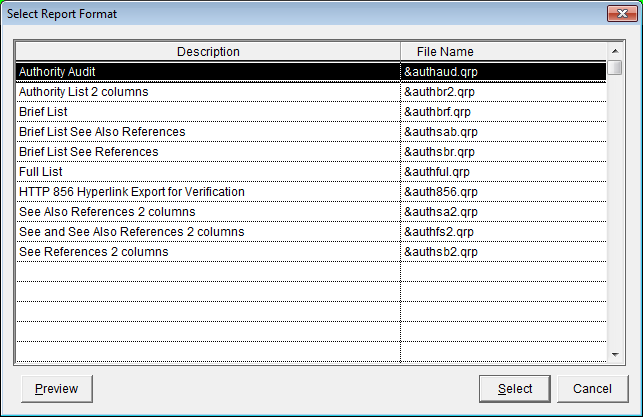
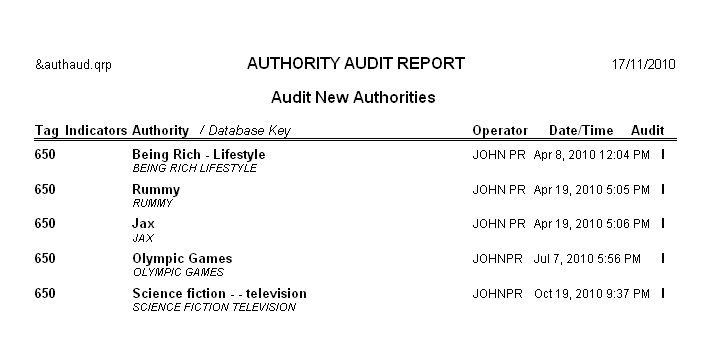
Authority audit reports
Reports can be set up in Main > Reports > RepAuthority. There is only one type of audit report available:
- Audit report: &AUTHAUD.QRP
- Go to Main > Reports > RepAuthority. The Authority Reports screen will display.
- Click the F1 New button.
- Select the &AUTHAUD.QRP template.
- Enter a Report Description (e.g., Audit New Authorities).
- Click the F3 Save button.

- Highlight the Audit report and click the F7 Where button. The Authority Reports – Where screen will display.
- Enter your Where parameters. There are three audit types:
- D: Deleted
- I: Inserted
- U: Updated
The Where parameters will depend on what you are after. Typically you would set the Date and Audit Type (I/U/D). You may also include tag numbers or a span of numbers (e.g., > 600 or < 700).
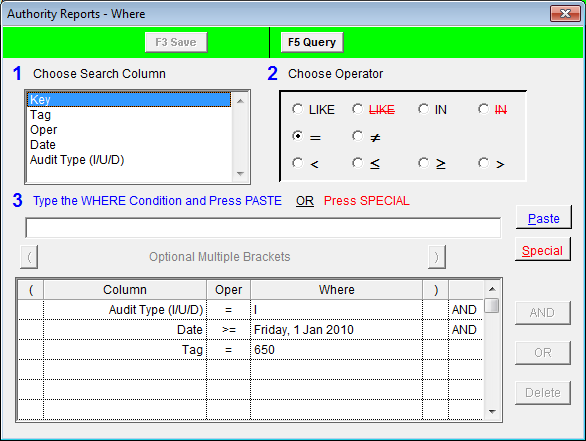
- Click the F3 Save button when complete.
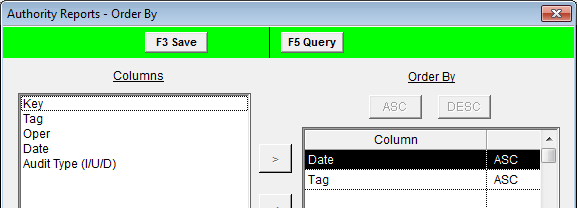
- (Optional) Click the F9 Order button. You can then set the order for the report to print in. You can sort by Date and Tag (or vice versa if you’re looking for a particular tag). Click the F3 Save button when complete.
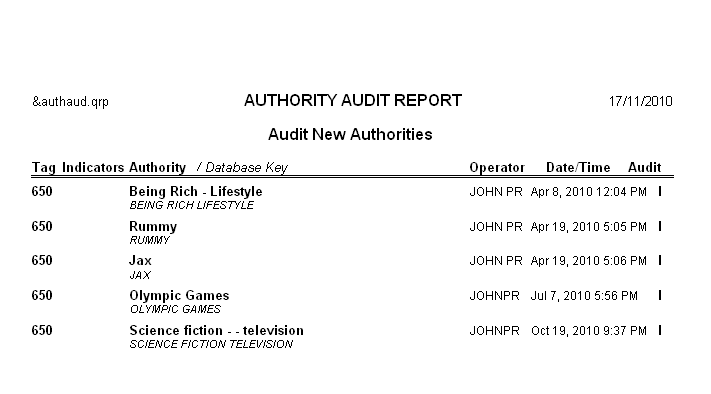
- Click the F8 View button to view the report.
- Select the print icon to print the report.
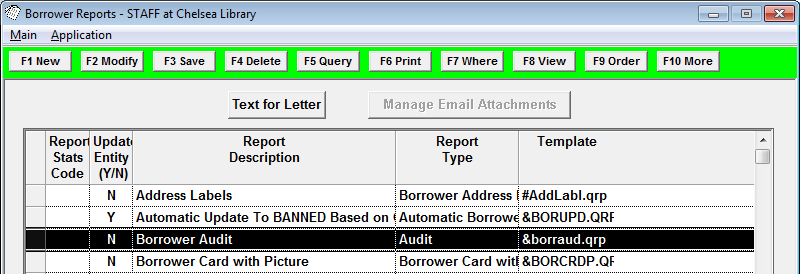
Borrower audit reports
Reports can be set up in Main > Reports > RepBorrower. There is only one type of audit report available:
- Audit: &BORRAUD.QRP
- Go to Main > Reports > RepBorrower. The Borrower Reports screen will display.
- Click the F1 New button.
- Select the &BORRAUD.QRP template.
- Enter a Report Description (e.g., Borrower Audit).
- Click the F3 Save button.
- Highlight the Audit report and click the F7 Where button. The Borrower Reports – Where screen will display.
- Enter your Where parameters. There are three audit types:
- D: Deleted
- I: Inserted
- U: Updated
The Where parameters will depend on what you are after. Typically you would set the Audit Date and Audit Type (I/U/D). You may also want to limit by Location, Borrower Type, etc.
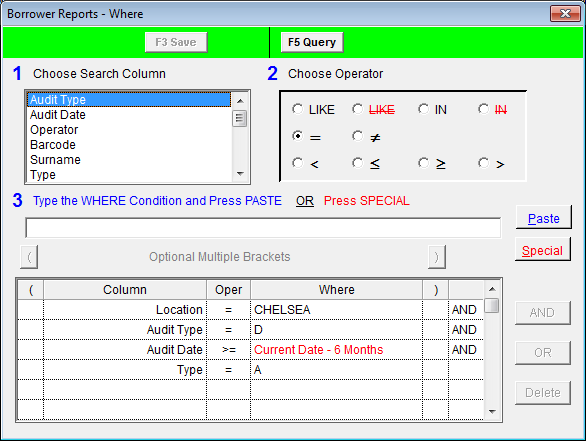
- Click the F3 Save button when complete.
- (Optional) Click the F9 Order button. You can then set the order for the report to print in. You can sort by Audit Date and Barcode (or vice versa if you’re looking for a particular patron). Click the F3 Save button when complete.
- Click the F8 View button to view the report.
- Select the print icon to print the report.
Statistics audit reports
Reports can be set up in Main > Reports > RepStatistics. There are three types of audit reports available:
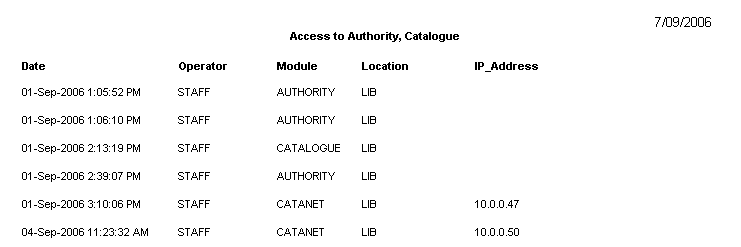
- Access Audit: &SAAUDIT.QRP - This report displays access to the Authorities and Catalogue modules by Operator showing alterations made.
- Logon Audit: &SLAUDIT.QRP - This report displays the date and time Operators logged onto the Authorities and Catalogue modules.
- Search Audit: &SAUDIT.QRP - This report displays Search terms used with the Authorities and Catalogue modules and the type of search done.

Create a Statistics audit report
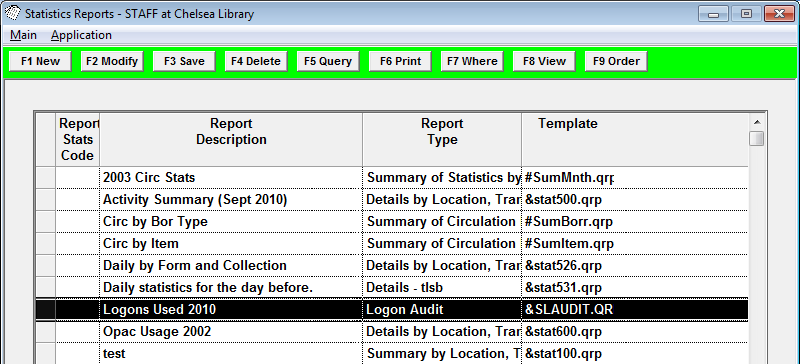
- Go to Main > Reports > RepStatistics. The Statistics Reports screen will display.
- Click the F1 New button.
- Select an audit template (Access, Logon or Search).
- Enter a Report Description (e.g., Logons Used 2010).
- Click the F3 Save button.
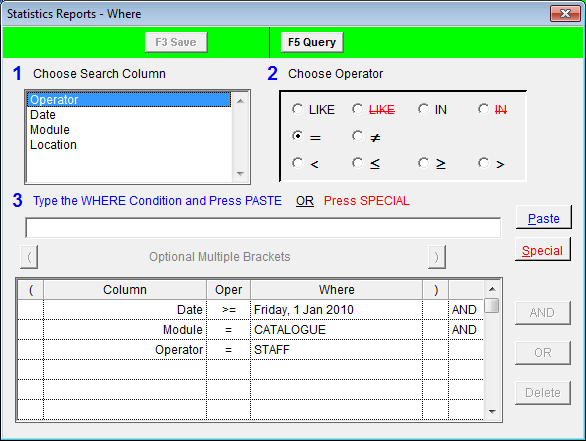
- Highlight the Audit report and click F7 Where. The Statistics Reports – Where screen will display..
- Enter your Where parameters. There are two module types:
- AUTHORITY
- CATALOGUE
The Where parameters will depend on what you are after. Typically you would set the Date and Module parameters, and perhaps Location (Operator Logon Location).
- Click the F3 Save button when complete.
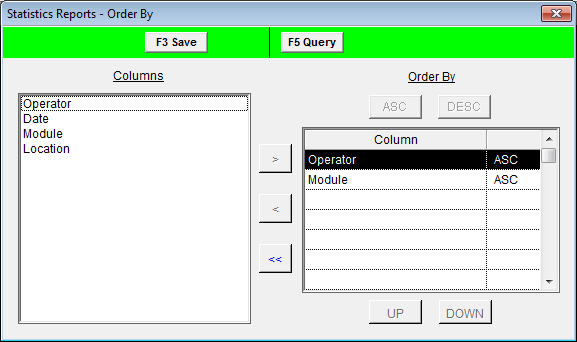
- (Optional) Click the F9 Order button. You can then set the order for the report to print in. You can sort by Operator and Module (or vice versa if you’re looking for a particular item). Click the F3 Save button when complete.
- Click the F8 View button to view the report.
- Select the print icon to print the report.
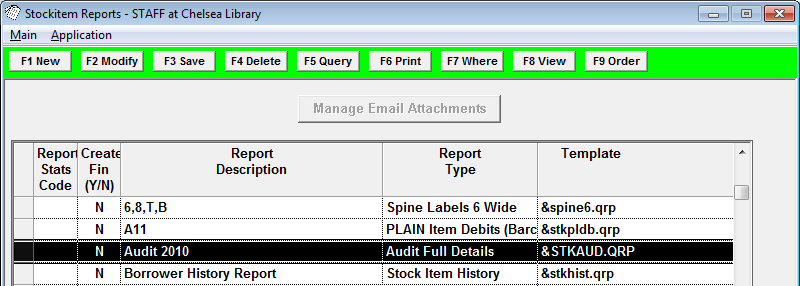
Stockitem audit reports
Reports can be set up in Main > Reports > RepStockitem. There are three types of audit reports available:
- Audit Brief Details: &SADBR.QRP - This report displays a small amount of information for each item.

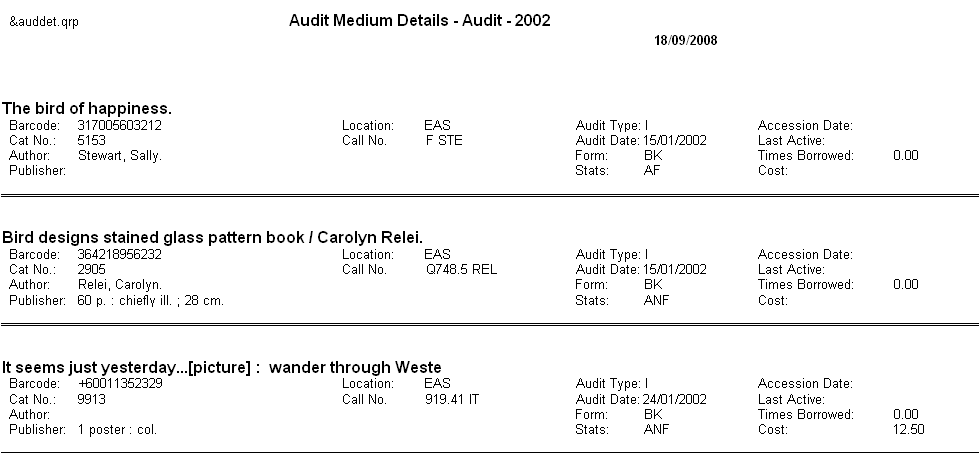
- Audit Medium Details: &SADDET.QRP - This report includes some additional fields: location, publisher, form and stats codes.
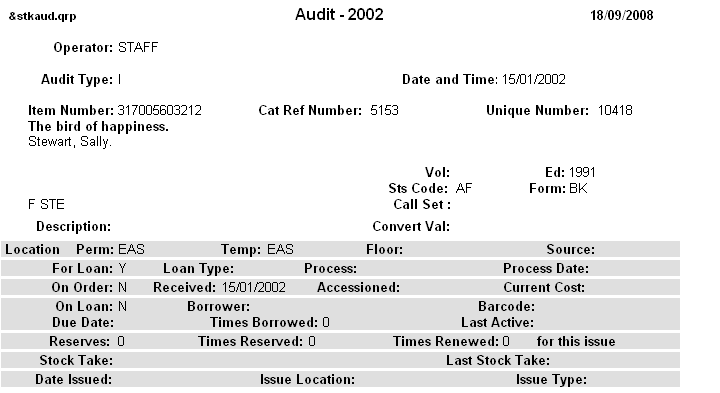
- Audit Full Details: &STKAUD.QRP - This report displays many additional fields for each item.
Create a Stockitem audit report
- Go to Main > Reports > RepStockitem. The Stockitem Reports screen will display.
- Click the F1 New button.
- Select an audit template (brief, medium or full details).

- Enter a Report Description (e.g., Audit 2010).
- Click the F3 Save button.
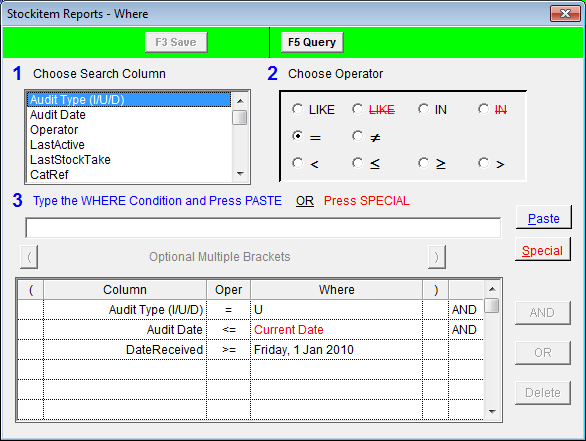
- Highlight the Audit report and click the F7 Where button. The Stockitem Reports – Where pane will open.
- Enter your Where parameters. There are three audit types:
- D: Deleted
- I: Inserted
- U: Updated
The Where parameters will depend on what you are after. Typically you would set the Audit Date and Audit Type (I/U/D) parameters, and perhaps PermLoc (Permanent Location).
- Select the F3 Save button when complete.
- (Optional) Click the F9 Order button – you can then set the order for the report to print in. You can sort by Audit Date and Title (or vice versa if you’re looking for a particular item). Click the F3 Save button when complete.
- Click the F8 View button to view the report.
- Select the print icon to print the report.