Holding Codes & Shelving Location Messages
To access this screen, sign in to the OCLC Service Configuration, open the WorldCat Discovery left navigation, and select Holding Codes & Shelving Location Messages.
When OCLC retrieves local holdings records (LHRs) for an item, we will display the "Location" of the item in the Availability section of your WorldCat Discovery.
If you would like to display a user-friendly location name instead of a Holding Code from the LHR, you can customize the display on this screen. This feature is available to:
- WMS libraries
- WorldCat Discovery libraries that have purchased the Availability option
- WorldCat Discovery libraries that have LHRs in WorldCat
Holding Codes Translation Table
Create rows in the holding codes translation table
Before you can use the Holding Codes Translation Table, you may have to configure the following settings, if you:
- Are using LHRs for location names and call numbers only:
- On the left navigation, click Local and Enhanced Content.
- Under Local Holdings Records, click Enable display of LHR Location and Call Number (without availability).
- Have the Availability option and are receiving a message on the Holding Codes Translation Table screen that says, "You are currently not using LHRs...":
- On the left navigation, click OPAC Statuses, Locations and Circulation Policies.
- Above the table at the bottom of the screen, click the check box next to First display LHR with option to search local OPAC for availability.
- Repeat for all formats (tabs above the table) you want to show the location for.
To create rows in the Holding Codes Translation Table:
- At the top of the table, click Add.
- In the newly added row, click on the table cells and fill out the fields that apply to your library:
- Default Symbol: Indicates if this Holding symbol has been set as the default for the institution.
- To change the Default symbol, use the Actions column and select Set as default symbol or Remove as default symbol.
- Holding Symbol: Enter your OCLC holding symbol in all caps.
- Holding Code:
- If you have an existing holding library code: Enter the four letter holding code in all caps.
- If you do not know your holding library code: Send an email to profiling@oclc.org with the your first and last name, email address, phone number and your library's name and OCLC symbol.
- If you need a new holding library code: Send an email to profiling@oclc.org. Include the information in the bullet point above as well as the new four-character symbol and the name/description.
Caution: New Holding Codes are not active until configured by OCLC. Do not add the new holding code to the translation table until the activation is confirmed by profiling@oclc.org.
- If you are setting up Integration between WorldShare ILL and Circulation, please see Set up integration.
- Branch Registry ID: In order to receive a Branch Registry ID, you must enter your branch information on the Create a New Institution screen in the WorldCat Registry module. At the end of this process, your newly created branch will be assigned its own Registry ID.
- Display Name: Enter the name as you would like it to appear in WorldCat Discovery and/or WMS.
- Shelving Scheme: From the list, select the type of shelving scheme used by your library.
- Shelving Location: Select the Add Shelving Location button.
- Use the + or - options to add or remove additional shelving locations.
- The shelving locations will appear as a list in the field. Use the view more or view less buttons to expand or collapse the list.
- Default Symbol: Indicates if this Holding symbol has been set as the default for the institution.
- Click Save.
Edit or delete rows in the holding codes translation table

Edit rows
From the Actions column in the desired row:
- Select Edit.
- The following fields are editable
- Holding Symbol
- Holding Code
- Branch Registry ID
- Display Name
- Shelving Scheme
- Shelving Location
- Each location is displayed in its own text box when editing.
- Refer to Delete a shelving location and Add or update a shelving location for more information.
- Click the checkmark symbol (
 ) to retain the changes. To discard them, select the X symbol (
 ).
). - Click Save.
Delete rows
Caution: Do not delete a shelving location until you are certain it is not on any records in your collection. To verify that a shelving location is not on any records in your collection, search the shelving location in WorldCat Discovery using the Shelving Location Search index (b8:) (e.g., b8:Anesthesia Nursing).
From the Actions column in the desired row:
- Select Delete.
- Click Save.
Update shelving locations in the holding codes translation table
Delete a shelving location
Caution: Do not delete a shelving location until you are certain it is not on any records in your collection. To verify that a shelving location is not on any records in your collection, search the shelving location in WorldCat Discovery using the Shelving Location Search index (b8:) (e.g., b8:Anathesia Nursing).
See Change location for information about changing the shelving location for multiple items.
Note: It is recommended that existing data is copied and pasted to another application prior to editing to ensure you have the original data. Edits cannot be undone once they are saved.
- Navigate to WorldCat Discovery > Holding Codes & Shelving Location Messages.
- Expand the Holdings Codes Translation Table accordion.
- From the desired row, select Edit from the Actions column.
- Remove the shelving location(s) you want to delete from the Shelving location field.
- Click the checkmark symbol () to retain the changes. To discard them, select the X symbol ().
- Click Save. The location(s) you deleted will no longer appear in WorldShare Circulation.
Add or update a shelving location
Note: It is recommended that the existing shelving location data is copied and pasted to another application prior to editing to ensure you have the original data. Edits cannot be undone once they are saved.
- Navigate to WorldCat Discovery > Holding Codes & Shelving Location Messages.
- Expand the Holdings Codes Translation Table accordion.
- From the desired row, select Edit from the Actions column.
- Update the location(s) you want to update or add new locations in the Shelving Location field.
Caution: Changing the name or case of a shelving location will result in the system recognizing this location as different from the previous one and will disconnect the records from the previous shelving location. If you need to update a shelving location name, follow the instructions to Change the location for multiple LHRs. - Click the checkmark symbol () to retain the changes. To discard them, select the X symbol ().
- Click Save. The location(s) you updated will appear in WorldShare Circulation.
Verify that the appropriate loan policy exists for the new or updated shelving location. See Loan policy for more information. If necessary, edit the loan policy map so that loaned items on the new shelving location will be picked up by the appropriate loan policy. See Loan Policy Map for more information.
Shelving location messages (optional)
Create shelving location messages
Library staff can create messages specific to shelving locations for their library users. The shelving location messages can help users make more informed decisions when placing hold requests.
Custom shelving location messages can be configured to display on the “Availability Table” and the “Place Hold Request Page” as well as on the “Place Hold Confirmation Page.”
Custom messages support hyperlinks in HTML to allow users to link to specific resources. Examples:
- <a href=https://www.example.com/f/archivesrequest>Request an appointment</a>.
- <a href="mailto:abc@example.com">Email us</a> to request an appointment in advance of your visit.
Note: In order to display correctly, at least one alphanumeric character or punctuation mark must be placed outside the HTML tags.
To create shelving location messages:
- Click the Shelving Location Messages (Optional) tab to expand the page and display the Create Message button.
- Click Add another message to display the create message fields.
- In the Enter Custom Message box, enter message text (1000 character limit).
- Link the message with a specific shelving location.
- Select a holding code from the Select Holding Code drop-down menu. A list of associated shelves will display in the Select Shelving Location(s) display box.
- Select one or more shelving location from the Select Shelving Location(s) drop-down menu.
- Select the Place hold workflow step(s) when the message will display:
- Availability table & Place Hold form - display the message on the availability tray and the place hold request page.
- Place hold confirmation - display the message on the place hold confirmation screen.
- (Optional) Click Add another holding code to add additional holding codes and shelving locations to the shelving location message.
Each shelving location message must have a unique combination of Holding Code, Shelving Location and Place hold workflow option.
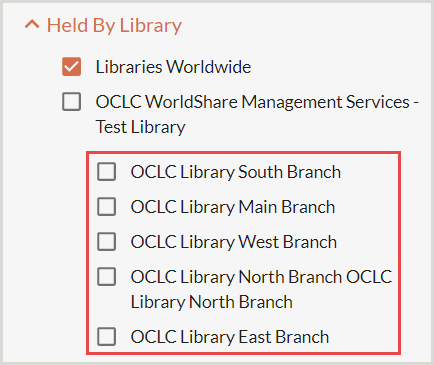
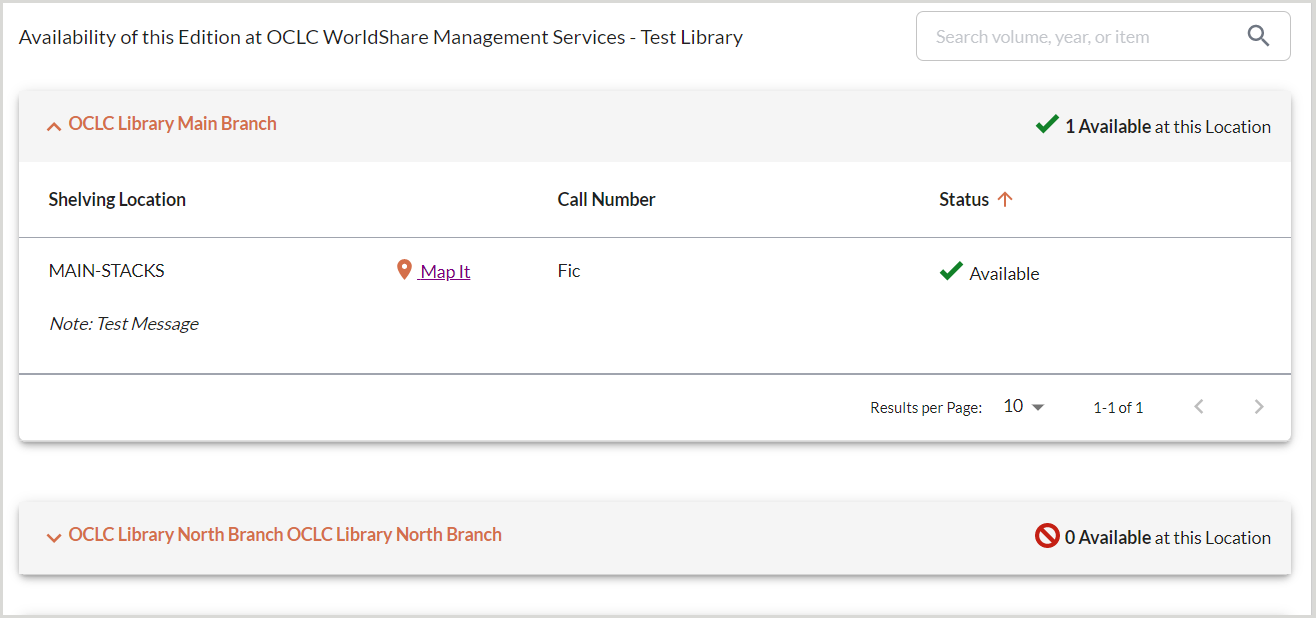
Change the branch display order
For institutions that have configured branches for their Level 1 holdings, the order of display of the branches on the item detail page and the branch scope filter can be controlled.
The branches must be added to the Holding Codes Translation Table. To alter the order of their appearance on the item detail screen and the branch scope filter, contact OCLC Support.
- Item detail screen- Image
- Branch scope filter- Image