Third-party Integration Workflow
Integration workflow
Tipasa integration with third-party ILS provides you with a method to streamline the interlibrary loan-circulation process and workflow. Librarians and staff who process ILL loans will no longer have to update their ILS manually to create temporary items and patron holds, charge patron ILL fees (for WMS or Alma), check out items that your library is lending, or check-in items at the end of the loan period. Third-party integration is available for:
- Alma
- Horizon
- Millennium
- Sierra
- Symphony
You must set up the integration before following the procedures outlined below. For details on how to set up the integration, see Set up third-party integration.
Note: The integration workflow applies to loan requests, which require circulation of a physical item. Copy requests are handled through Tipasa, with no need to "check out" an electronic, non-returnable item. If enabled, Patron fees can still be assessed for Copy requests.
Integration workflow overview
Staff actions take place across both Tipasa and the third-party system. System refers to the automatic integration steps done by the system.
Borrowing workflow
1. Patron requests ILL item
The workflow begins when the patron submits an ILL request using the Patron Request Form.
Caution: The Patron Request Form must contain the Patron ID field so patrons are required to enter their patron identifier when submitting a request.
By default, the Interlibrary Loan Identifier (illId) from the patron’s Tipasa record will auto-populate on the request form when the patron logs in to place a request in Tipasa. If your patrons do not have an Interlibrary Loan Identifier in their Tipasa patron records, please contact OCLC Support for assistance.
The Patron ID from the request form is the connection between the ILL Request and the ILS, so it needs to be a value that can be used to look up the patron in the third-party ILS. Library staff can also initiate requests for the patron within Tipasa by providing the patron's ILS identifier in the Patron ID field of the ILL Request.
2. ILL staff review request and send to lenders (Tipasa)
Once the request is received in Tipasa, library staff need to review the request and send it to lenders.
To review and send the request:
- Click the Interlibrary Loan tab.
- On the left navigation, click Borrowing Requests > New for Review.
- Click the Request ID or Title to view the request.
- Verify the patrons' ILS identifier is saved in the Patron ID field.
- Review the request and select the lenders.
- Click Send Request to send the request.
- A confirmation message will appear if the request was sent.
- Click the Request ID in the confirmation message to return to the request.
Considerations
- The ILL request will be directed to the New for Review queue or match an automation (if set up). With automation, information in the request is matched against the automation. If the request matches the automation, it is processed based on the Automation Request Manager settings. See Automated Request Manager. Some libraries may automatically send out patron-initiated ILL requests to select lenders.
- Depending on your ILL staff workflow, the ILL request in New for Review may be reviewed (marked as reviewed) prior to being sent. In other words, you may have staff responsible for reviewing and selecting lenders, while a final review and submission is done by another staff member. If your library reviews requests prior to submission, you may want to consider adding patron name and barcode verification to this step.
3. ILL staff receive item from lender (Tipasa)
Once you receive the item from the lender, you need to confirm or enter the item's barcode in the ILL Request in Tipasa and mark the request as received. The system will use the barcode to create the temporary item, which can be seen in step 4.
To confirm the barcode and mark the item as received:
- Click the Interlibrary Loan tab.
- On the left navigation, click Borrowing Requests > In Transit.
- In the request for the item, enter the temporary barcode in the designated section.
- If you have determined to use the supplier's shipped item barcode as configured in the Circulation Integration module of the Service Configuration, this value will automatically populate here. The supplier's shipped item barcode will also appear in the Supplier's Item Barcode field in the request.
- If you have determined to use the request ID as configured in the Circulation Integration module of the Service Configuration, this value will automatically populate here.
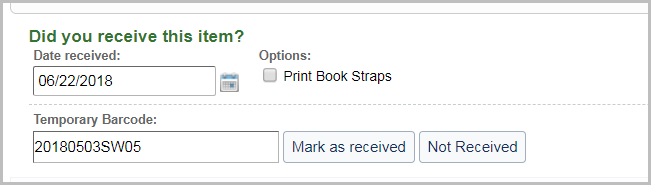
Note: The supplier's shipped item barcode can be replaced in the Temporary Barcode field. You may wish to use the Tipasa Request ID as the item's barcode to more easily research the ILL request after it has been closed by the lending library.
- Click Mark as received.
- If you have configured to create a circulation item record on received in the Circulation Integration module of the Service Configuration, a temporary item will be created with the barcode entered in the Temporary Barcode field.
In the Circulation History, an update shows the temporary item is pending creation. The time to complete the record may vary, but it is generally within seconds. - Click Refresh to reload the Request History.
- Upon completion, the Request History status will say "Temporary item record [barcode] successfully created.".
- After completing these steps, ILL staff should print a book strap, place it on the physical item, and send the physical item to Circulation staff.
Patrons can track the process of the ILL request by checking their My Account. The On Route status is displayed to the patron as "This item is being sent to [patron's pickup location]."
Considerations
If you have configured to charge patron on shipped (Alma or WMS only) in the Circulation Integration module of the Service Configuration, fees will be assessed to the patron's account when the item is shipped from the lender.
To configure Fees for ILL items, please see Patron Fees.
If you have enabled Circulation Integration, do not batch receive loan requests. Each request should be received separately so that an item barcode can be specified for use in the third-party system.
4. Temporary item is created and hold placed (System)
If you have configured this setting in the Circulation Integration module of the Service Configuration, after you mark a request as received, the system creates a temporary item and places an item-level hold on the item for the patron.
In Alma, you can confirm that the system created the temporary item by doing a Physical items – Barcode search.
5. Circulation staff check in the item (Third-party)
Note: If you are using Alma Hold Pickup notifications, Circulation staff receive the physical item from the ILL department and scan in the item to trigger a pick-up notification or Hold Receipt when the item arrives at the patron's pickup location.
If you are using Tipasa Loan available for pickup notifications, that notification will go out when the item is marked as received in Tipasa (or after the amount of delay you have configured for this notification in Service Configuration).
Review the ILS documentation for the check in workflow:
For more information about configuring Tipasa Loan available for pickup notifications (including time delays), see Edit and send notifications.
6. Circulation staff check out the item to patron (Third-party)
When the patron arrives to pick up the item, Circulation staff check out the item to the patron.
Review the ILS documentation for the check out workflow:
7. Renewal request approved (System)
If you have activated the Update due date upon lender approval of renewal request in the Circulation integration section of the OCLC Service Configuration, the due date of the temporary item is updated in the circulation system when a renewal request has been approved by the lending library.
8. Patron returns item and staff check in item (Third-party/Tipasa)
Time passes while the patron has the item on loan. When the patron returns the item, Circulation staff or ILL staff check in the item.
To check in the item:
If you have enabled the Check in item on check in functionality in the Circulation Integration module of the OCLC Service Configuration, the item is automatically checked-in when the request is marked as returned in Tipasa.
- Tipasa staff mark the request as Returned.
- The Circulation History in Tipasa will show the Temporary item checked in to the circulation system.
- The item in Circulation will be deleted.
Circulation staff:
Review ILS documentation for the check in workflow:
Tipasa staff:
Once the item is returned to the ILL department, ILL staff mark the item as returned and ship the item back to the lender.
To mark the item as received and return it to the lender:
- Click the Interlibrary Loan tab.
- On the left navigation, click Print Queue > Return Labels.
- Confirm that the item is listed.
- On the left navigation, click Borrowing Requests > Received/In Use and open the item's request.
- Click Return Item.
- A confirmation message will appear and the item status is updated to Returned.
- On the left navigation, click Print Queue > Return Labels. Process the print queue.
- Print the label.
Affix the label to the package with the item and ship to the lender. Once the lender receives the returned item, they will mark it Checked In/Complete and the ILL request is closed.
Lending workflow
1. ILL Staff respond to Borrowing Request
- On the left navigation, click Lending Requests > Can you Supply? and review the Loan requests.
- Once the requested item is retrieved, in the Request Details section, enter the barcode into the Item Barcode field.
- Enter the desired Due Date.
- Provide additional required fields.
- Respond Yes. The status will update to Shipped / In Transit.
- Optional. Print Shipping Labels and Book Straps/Stickers.
- If configured in the Circulation Integration module, the item is checked out of your third-party Circulation environment when shipped to the borrowing library.
- The Circulation History in Tipasa will indicate that the Item checked out of circulation system.
- The item is moved to the ILL temporary location in your circulation system as configured when setting up integration.
- The Due Date is set by the request's due date in Tipasa and not by Circulation policy configurations.
2. Receive the item from the borrowing institution
When the item is returned:
- On the left navigation, under Lending Requests, click Returned > Returned/In Transit.
- On the Returned/In Transit screen, click the request ID or Title to display the request.
- In the request, review and confirm the information in the Request Details accordion.
- To complete the request, click Checked-in/Complete.
- A confirmation message appears and the request is complete.
Note: If the item is marked Not Returned, it appears in the left navigation under Returned > Returned but Missing and ages out of the system after 180 days. - If configured in the Circulation Integration module, when the item is Checked in/Complete in Tipasa, it is restored to its permanent location and appears available in your third-party Circulation environment.
If the item is checked in to your Circulation environment prior to Tipasa:
- Staff will be prompted to act on the item in Resource Sharing.
- Tipasa staff will need to mark the request as Checked-in/Complete.
-
Note: Checking in first in Alma will not cause problems with the integration.