Proven Senders
The Proven Senders feature allows borrowing libraries to designate individual lenders as proven senders. Proven senders are lenders who provide good quality documents (e.g., good scans, fast turnaround time). When the lenders you designate as proven senders respond to a copy request with an Article Exchange document, the request is automatically received for the borrower. Proven Senders can be combined with automations in order for patrons to receive copies as soon as the lenders scan and send them. See Automated Request Manager for more information.
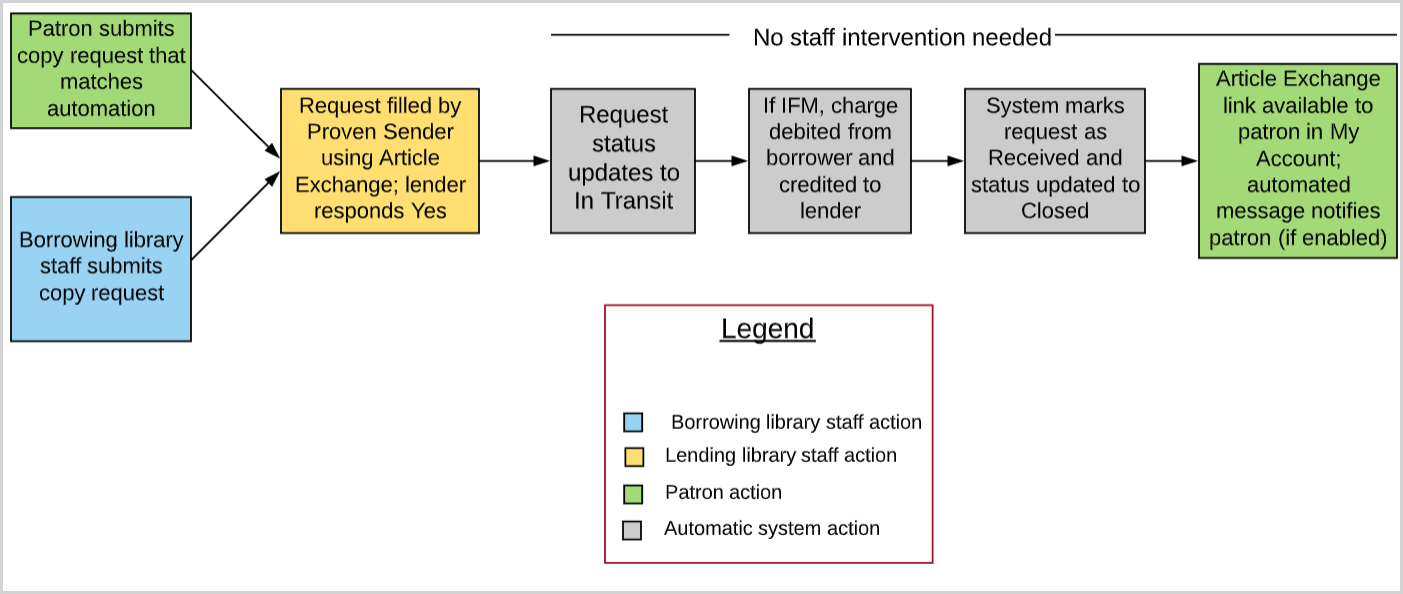
How proven senders works
The following image provides an overview of the proven senders workflow:
Notes for borrowing libraries
In order for the Proven Senders feature to be applied, the following must be true:
- The request must be a Copy request.
- The lender string must include one of the lenders designated as a proven sender.
- The request must be linked to a patron, so the filled request appears to the patron via a link in My Account. If you have turned on patron approval, the patron linked to the request must be approved. See Patron management for more information.
- If your library uses IFM, confirm the values set for IFM and Max Cost in the request before submitting it to lenders. Proven senders works for IFM and non-IFM requests.
After a request is fulfilled
Once all criteria have been met, the system marks the request as Received for the borrowing library. Then, the request is quickly updated to Closed and the following occurs:
- The patron will receive an SMS and/or email with the Article Exchange link if an automated notification for Article available in Article Exchange is enabled. See Notifications for more information.
- The Article Exchange link will be available to the patron in My Account.
Since the filled request is Closed by the system, it will not appear in any queues. The borrower can find it by searching Closed requests, and the Article Exchange link will display in the request for the borrower to preview or manually email if needed. Additionally, the Supplier History section of the Request History accordion shows that the request was filled by a proven sender.
Set up proven senders
You must first turn on Proven Senders in the Advanced Workflows section of the OCLC Service Configuration before requests from any of the lenders you designate as proven senders will be automatically Received. Turning on Proven Senders does not affect any requests that are already in the In Transit queue.
Configure proven senders
To turn on proven senders:
- In Service Configuration, on the left navigation, click WorldShare ILL > Advanced Workflows.
- Under Proven Senders, select the On check box.
- Select who should be included as a proven sender. Options include:
- Include ALL Lenders
- Include only this Custom Holdings Group
- Exclude only this Custom Holdings Group (All other lenders are proven senders)
- If applicable, select the Custom Holdings Group to include or exclude.
If you decide to turn off proven senders, the custom holdings group you select here will be maintained for future use. - Click Save.
- Copy requests fulfilled by proven senders will begin to be automatically received.
Create a custom holdings group for proven senders
Any existing Custom Holdings Group may be specified If you choose to specify a Custom Holdings Group to include or exclude, follow the steps below to create a custom holdings group. Any existing Custom Holdings Groups may be used as well. Refer to Custom Holdings Groups for more information.
To create a custom holdings group:
- Sign in to Service Configuration.
- On the left navigation, click WorldShare ILL > Custom Holdings Groups.
- On the Configure Custom Holdings Groups screen, select Create New Custom Holdings Group.
- In the Custom Holdings Group Name field, enter a name for the custom holdings group.
- Optional. Enter a description of the group.
- Click Add/Edit symbol(s).
- In the Add/Edit OCLC symbols window, add the symbols of the proven senders in the box provided. Separate multiple symbols with a space.
- Click Update Symbols.
- Click Save.
Make changes to proven senders
You can edit or turn off the setting at any time. You may also edit any specified custom holdings group. Considerations when changing the Proven Senders settings:
- If Proven Senders is turned on, adding symbols to a custom holdings group specified as proven senders means that copy requests fulfilled by the lenders of those symbols via Article Exchange will be automatically received. Conversely, if you remove symbols from the custom holdings group, effective immediately, copy requests fulfilled by those lenders via Article Exchange will not be received automatically.
- If Proven Senders is turned off, the functionality immediately turns off. Once the Advanced Workflows screen in Service Configuration is saved, requests fulfilled by the lenders designated as proven senders will not be automatically received.