Check in items
Check in screen
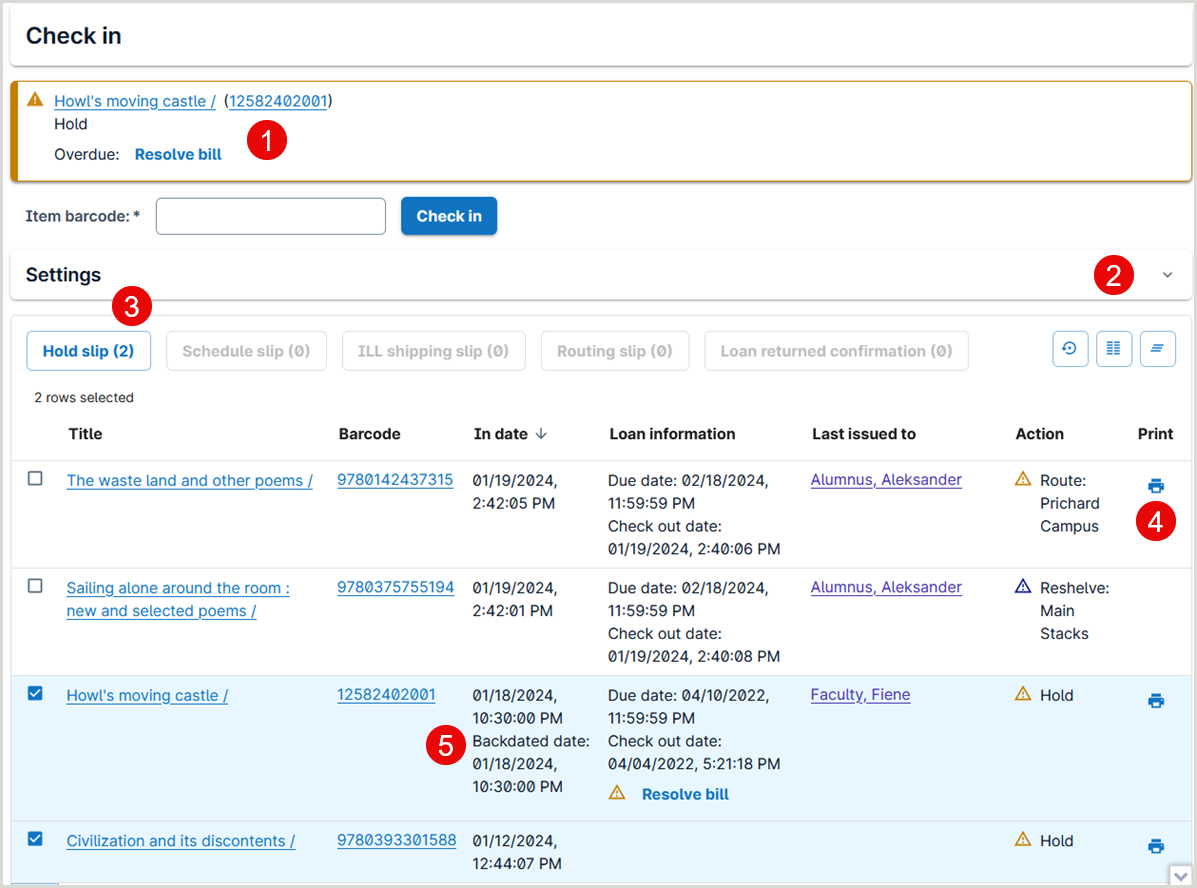
The check-in screen allows you to check in items and control printing preferences, view instructions for processing items, and more. Options to make it easier to process materials include:
- View alerts and other messages about items that you have checked in.
- Choose to close the Settings accordion to gain more screen space for your work.
- Select items in the data grid (table) and use the bulk processing buttons to print or email one or more receipts.
- Print individual receipts for holds, schedules, and routing by clicking the print option for each applicable row in the data grid (table).
- View the date and time that an item was checked in along with any backdated date and time used during processing.
Check in settings
The options in the Settings accordion allow you to customize your check-in options.
Note: Your selected Settings will be retained for your current session only; when you log off or clear your browser cache, the system will no longer remember your choices.
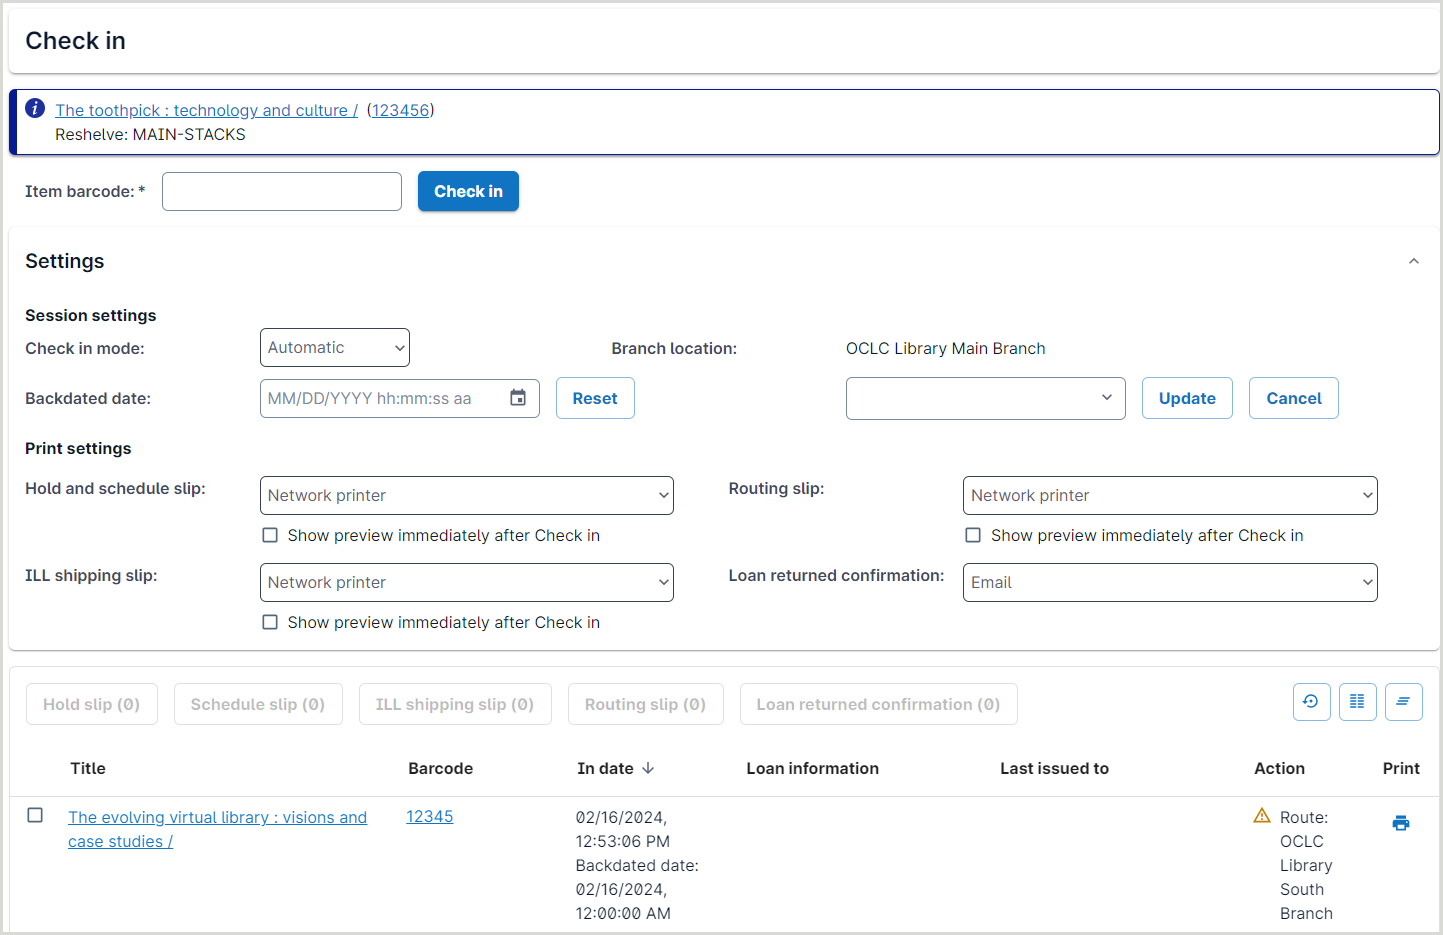
Session settings
Use the Session settings section to choose the appropriate processing mode, your current service location within your branch, and a backdated date for processing materials that were on loan where appropriate.
Note: Your selected Session settings will be retained for your current session only; when you log off or clear your browser cache, the system will no longer remember your choices.
Settings include:
Check in mode
Select the appropriate processing mode. Options include:
- Automatic (default): Use for normal transactions. Auto mode performs all of the normal actions associated with check-in (removes the item from the patron record, triggers a hold, sends the item to a shelving or pickup location, etc.).
- Non loan return: Use to check in items that were used, but not checked out (items from the reference collection, items that are on reserve, or items found in a reading room). This mode updates the item’s Soft Issued Count on the item Statistics screen.
- Inventory: Use when conducting an inventory (for example, you are performing a shelf-read and scanning barcodes of items that are present). This mode updates the item’s Inventoried Count and Last Inventoried date on the item Statistics screen. Refer to Inventory for more information.
- Delete hold: Use to delete a hold on an item that is on the pickup shelf, but has not yet expired. This mode checks the item in and cancels the hold for the patron that had been notified that the item was ready for pickup.
Branch location
Select the current service location within your branch. Optionally update an item's last seen statistics to specify a location inside a branch while checking the item into the system. The system will continue to fulfil holds and item schedules if the item is checked in at the pickup branch.
- Use the Edit Location button to select the appropriate branch from the resulting drop-down list. Select Update to update the location.
- If your library has more than one pickup location per branch, consider checking in items at the specified pickup location to ensure that the Clear Hold Shelf report can list items at each location. The Clear Hold Shelf report provides each item's last-seen location.
- Note: Checking in an item from any other interface will set the item's last-seen statistics at the branch level only. Any previously recorded branch location or free text value will be removed. This includes check-ins and pulling items using Digby, RFID-enabled book returns, and sorting machines.
- Any user with a Circulation or Student Worker role can set a Branch Location from the Check In screen. By default, the current Branch will display. To specify a more exact location for the check in, use the Edit location button to open the editing options.
Backdated date
Select a backdated date for processing materials where appropriate. Select Edit date to alter the date information for the check in.
- Backdating the check in date of items will remove any accruing fines a patron incurred after that date. Reasons for backdating may include a facility emergency, weather related closing, or a staff in-service day.
- Note: To avoid the need to backdate the check in date, enter regular and special hours in the WorldCat Registry. See Open Hours for more information.
- To backdate for processing items:
- Click the Edit date button.
- Select the desired date.
- Optional. Select the timeframe for the new check in time.
- Click OK.
-
Print settings
Control how receipts are generated with the Print Settings section. Choose different options for each type of receipt. For example, select network printing for hold and scheduling receipts while sending routing slips to a point-of-sale (POS) printer and using email for loan returned confirmations (previously called the Check In Receipt).
Note: Your selected Print settings will be retained for your next session, regardless of which machine or browser you used.
- If using point-of-sale (POS) printers, you may need to select your POS printer each time you change workstations or install or rename a printer.
Select to use a Network printer or Do Not Print for the below slips:
- Hold and schedule slip
- Routing slip
- ILL shipping slip
Determine to email, print, or not print the Loan returned confirmation.
When using a network printer, choose if the system should display the print preview modal (dialog box) immediately after you check in the item. If you would prefer to print paperwork when you are done checking in multiple items, you can deselect the Show preview immediately after Check in option to avoid being disrupted as you scan items. Regardless of your selection for the Show preview option, you may print receipts for items that you have already scanned by using the new options in the data grid (table) of processed items to print individual receipts or to batch print receipts.
- Receipts use the email address provided in the patron's record.
- If there is no email address in the patron record, the Email field will be empty. In order to send the patron an email receipt, you must add their email address to their patron record and then resend the receipt.
- If the patron wants the email to be sent to a different email address, you can edit the email address on the Email Preview window.
- Changing the email address on the Email Preview window does not change the email address in the patron record.
For more information on receipts, see Circulation Receipts.
Standard check in
- On the left panel click Check In.
- The default Check in Mode should be at Auto.
- Optional. Set the Branch Location to a specific pickup location. See Set the Branch Location at check in.
- Select a Receipt Option.
- Scan or enter the barcode into the Item Barcode field. If using a scanner it typically reads and processes the check in with each scan. If typing in the barcode you will need to press Enter or click the Check In button.
- Scan or type additional items.
Each item appears in the Check In list, including the name of the patron each item was on loan to.
Note: The Action column tells you what you need to do with the item next.
The Hold or routing slip prints, if the printing option is chosen and the item needs to be held or routed. The Email Preview window will appear if the email option is selected.
(Optional). Click Clear to clear the list of returned items from the Check In screen.
Configure columns
Note: Preferences are retained per your user account.
You can choose the columns that appear on the Check In screen.
- On the right side of the screen, click the Show columns button
 .
. - In the Show Columns window, check or uncheck the columns you want to show or hide.
- Th
- Copy Number information will only display for LHR items that were created or updated after 18 September 2022.
- Close the Show Columns window by clicking anywhere outside it.
Watch a video
Check in
Run time: 4:46
In this video, you will learn how to check in materials, including printing or emailing a check in receipt, and processing items that fulfill a hold or need to be routed to another branch.