Creating a .har file for support
This guide provides a description of how to produce a .har file in order to supply diagnostic information to OCLC Support.
Important
All of the data exchanged between your browser and the server will be present in the .har file. This will include any Personally Identifiable Information (PII) that you create, retrieve, update or use for some application features (such as circulation). It is important, therefore, that if the file generated does include this data it is supplied to OCLC Support in a suitably protected fashion and that OCLC Support are made aware that it does contain PII.
Getting started
In your browser, once logged in to the application, launch the developer tools. This is normally done with the F12 key.
In the developer tools window, click on the "Network" tab.
Once there, ensure that:
- (IE 11) "Clear entries on navigate" is not highlighted or
- (Chrome or Edge Chromium) "Preserve log" is checked or
- (Firefox) "Persist Logs" is checked
and that your browser is recording the activity. The Developer Tools toolbar should then look like:
| IE 11 | Chrome / Edge Chromium | FireFox |
|---|---|---|
|
Screenshot showing the correct options selected on the IE 11 developer tools toolbar. This shows only "stop" (red square) highlighted.
Screenshot to avoid - showing the "Clear entries on navigate" option highlighted. This highlight should not be shown. |
Screenshot showing the Chrome developer tools toolbar buttons with only "stop" (red circle) highlighted and "Preserve log" checked". |
Screenshot showing the Firefox developer tools toolbar buttons with only "Pause/Resume recording network log" (red square) highlighted and the extra menu activated with "Persist Logs" ticked. |


General operation
Once the information is being recorded, continue to use the application as normal - being careful to avoid PII if possible.
If the problem being investigated takes some time to reproduce, it may be useful to clear down the log information every now and then in order to avoid the resulting .har file becoming too large.
This can be done by clicking on the button highlighted below:
| IE 11 | Chrome / Edge Chromium | firefox |
|---|---|---|
|
Screenshot showing the IE 11 developer tools toolbar buttons, highlighting the location of the "Clear session" button |
Screenshot showing the Chrome developer tools toolbar buttons, highlighting the location of the "Clear" button |
Screenshot showing the Firefox developer tools toolbar buttons, highlighting the location of the "Clear" button |


When the issue occurs
As soon as the issue occurs for which you are recording this information, go to the developer tools window and save the .har file.
This can be done by clicking on the option highlighted below:
| IE 11 | Chrome / Edge Chromium | Firefox |
|---|---|---|
|
Screenshot showing the IE 11 developer tools toolbar buttons, highlighting the location of the "Export as HAR" button |
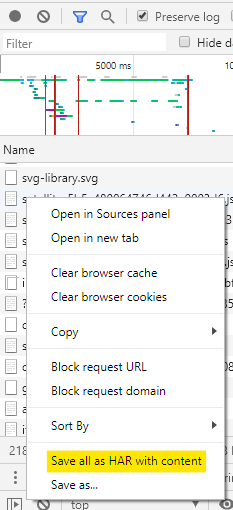
Right click on any of the entries in the log and select the option "Save all as HAR with content":
Screenshot showing the menu that is presented by the Chrome developer tools when a network activity is "right clicked". This highlights the menu option "Save all as HAR with content". |
Screenshot showing the Firefox developer tools toolbar buttons, highlighting the location of the "Save All As HAR" menu option. |


Your browser will then ask you to save the file to disk.
Once saved, if including PII was unavoidable, please ask OCLC Support for the best way to supply the file.
Please remember to quote the support call number when sending the file by email.