Delete Borrower- Double entry financials in 5.3 and 5.4
Delete borrower financial records
This report allows the deletion of paid Borrower Financial Transactions. Care should be taken when deleting Financial records as once the entry has been deleted it cannot be retrieved.
Note: To find out if you are running Double Line Accounting navigate to Main > Supervisor > Installation and select the System button. Locate the setting “Use double entry accounting” and note the current setting. If set to Y you are using Double Entry accounting and if set to N you are using Single Entry accounting. Important: Do not ever change this setting without checking with Amlib support as to the implications.
It should be noted that only Financials will be deleted if the Borrower:
- Has a Status other than a Debt Collection status
- Has transactions which are paid and balanced prior to the cutoff date
- Owes $0.00
It is possible to choose a Template that can be opened later in excel and kept for statistics and auditing purposes
The report is run twice in Update mode. It is suggested that the Report used (&xbofinp.qrp) and sent to a file which can be opened later in excel:
First run: sets the financials to be deleted and flags these with a Reference Number to use in the second run. The Report:
- Must be of the Report Type of Borrower (Purge) Financials
- Must have the Update Column set to Y
- Must be sent via the F6 Print button and the Report Scheduler
- Must have a Cutoff Date in the F10 More parameters
- Can use a File or Where parameters – Note: the Date is in the More button parameters NOT the Where parameters
Second run: Same as the First run except that also included is the Reference Number in the 1st column of the More [F10] parameters to include the to ensure deletion of those flagged to be deleted in the first run
- Must be of the Report Type of Borrower (Purge) Financials
- Must have the Update Column set to Y
- Must be sent via the F6 Print button and the Report Scheduler
- Must have a Reference No taken from the first run and entered into the F10 More Button
- Use the same Cutoff Date in the F10 More parameters as the First run
- Use the same File or Where parameters as the first run– Note: the Date is in the More button parameters NOT the Where parameters
Note: The number of transactions that are automatically retained is NOT determined by the following Supervisor/Installation/Circulation setting: Keep the last ### history records (unlike deleting Single entry financials where this setting is taken into account)
Create a Financial Deletion Report
First Run – this is run in Update Mode to get a Reference Number
- Launch the Amlib client
- Go to Main > Reports > RepBorrower – the Borrower Reports screen will display
- Click the F1 New button – the Select Report Format screen will display
- Highlight the Borrower Financial report template (Purge) you would like to use (for example - &xbofinp.qrp or see the list above). See Appendix 1 for Templates suitable and how to make &xbofinp.qrp available if not in the selection. Note: Must be of a Report type of Borrower (Purge) Financial
- Click the OK button
- Type in a Description – for example: Delete Financials before July 2005
- Ensure the Update Entity (Y/N) column is set to Y
- Click the F3 Save button

- Highlight the report and click the F7 Where button – the Borrower Reports – Where screen will display:
- Enter the required parameters or use a file of borrowers:
- It is possible to enter parameters to limit your selection by Financial Types or Borrower Types – for example: Financial Type = LATEFINE. It is also possible to choose one Barcode – if you wish to delete the transactions so you can delete the Borrower e.g. BorBarcode = CL125B5487382D.
- To delete ALL Financials up to the Cutoff date that are paid and balanced

- Or alternatively have a Saved Borrower File of Financials to be targeted
- Click the F3 Save button when complete
- Click the F10 More Button. On the first run all that is required is to select the Cutoff Date for deletion. This should be entered in a date format of dd/mm/yyyy, for example 01/07/2006 (for the 1st July 2006)

- Click the F9 Order button (if using the &xbofinp.qrp the order is greyed out as the order is fixed by Borrower Barcode (BorBarNo) and Financial Transaction System Number (Trans No) – the Borrower Reports – Order By screen will display
- Select BorBarNo from the Columns list and arrow it across into the Order By list
- Select Trans No from the Columns list and arrow it across into the Order By list
- Click the F3 Save button when complete

- Click the F6 Print button – the Print screen will display
- Change the To setting to File (this will enable the report to be saved as file, rather than printed)

- Click the OK button – the Report – Save As screen will display
- Enter the File name (for example: Fin Deletions 120101) and browse to the destination location. If you are later going to transfer to excel, use a Txt File type

- Click the Save button
Schedule Report
Start the Scheduler
- From the Reports menu, select Application > RepStartSchedule

- The Report Scheduler screen will then display
- Select your printing options: Ensure Save to File is ticked (you can tick all three if you intend on printing up multiple reports using multiple formats during a session)
- Also decide If a report is scheduled by another user do you still want to print it? = Yes/No

- Then click the OK button
- After clicking OK, if you go back into the Application menu you will see that RepStartSchedule is now greyed out with a tick next to it – this indicates that the Scheduler is now running

Please Note: If you need to restart the scheduler at any point, you will need to log out of all Report screens (Ctrl + L) and start at the beginning of these instructions.
Check Print Progress
- You can check the progress of your reports at any time by going into Main > Reports > RepPrintProgress – the Print Progress screen will display
- If your library uses the scheduler for a lot of reports, you can select a frequency type from the Filter drop-down menu at the top:

- You can also click through the three tab options at the top to see the ones that are Waiting, Running, or have already been Printed

- Your report will show up in “Printed” when it is complete
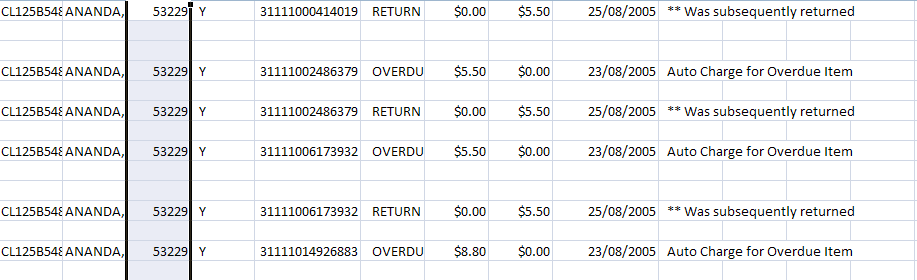
- Take note of the Reference No in the 1st Run report. In the example below the Reference no is 53299. This will be used in second run to actually delete the Financials

Find the Reference Number: (&XBOFINP.QRP)
Brought up later in excel – See Appendix 1 on how to load the text file into excel Find the Reference No to use for the second Run.
Second Run – Repeat the Steps from the First run except add the Reference No into the F10 More button parameters
- Go to Main > Reports > RepBorrower – the Borrower Reports screen will display
- Highlight the same report that was used for the First Run
- Ensure the Update Entity column is still set to Y
- Keep the Where parameters and Order options the same as the first run
- Click the F10 More Button. Keep the Cutoff Date the same as the First run. Add the Reference Number to the Column in Line 1 Field 1. Press F3 Save

- Click the F6 Print button – the Print screen will display
- Change the To setting to File (this will enable the report to be saved as file, rather than printed). If you intend to use the same file on the Final Run tick Overwrite Saved Files

- Click the OK button – the Report – Save As screen will display
- Enter the File name (for example: Borrower Financial Deletions 2012) and browse to the destination location. If you are later going to transfer to excel, use a Txt File type.
- Click the Save button. If you want to keep the same File name and you receive a message about overwriting the file, choose Yes if the first file is not required.
Schedule Report
Start the Scheduler
- From the Reports menu, select Application > RepStartSchedule
- The Report Scheduler screen will then display
- Select your printing options: Ensure Save to File is ticked (you can tick all three if you intend on printing up multiple reports using multiple formats during a session)
- Also decide If a report is scheduled by another user do you still want to print it? = Yes/No
- Then click the OK button
- After clicking OK, if you go back into the Application menu you will see that RepStartSchedule is now greyed out with a tick next to it – this indicates that the Scheduler is now running
Please Note: If you need to restart the scheduler at any point, you will need to log out of all Report screens (Ctrl + L) and start at the beginning of these instructions.
Check Print Progress
- You can check the progress of your reports at any time by going into Main > Reports > RepPrintProgress – the Print Progress screen will display
- If your library uses the scheduler for a lot of reports, you can select a frequency type from the Filter drop-down menu at the top:
- You can also click through the three tab options at the top to see the ones that are Waiting, Running, or have already been Printed
- Your report will show up in “Printed” when it is complete
- The Financials will now be purged. Ensure the Reference No is removed from the F10 More button in Field 1 Column 1 so it is clear for the next run
Templates Templates
The following report templates can be used in the Reports module to delete Borrower Financials if Update Entity is set to Y, the Reports are set as a Report Type of Borrower (Purge) Financial and the report is run via the report Scheduler. The F7 Where statement is used to determine which records will be deleted (though the date element is taken from the More button not the Where statement).
- &XBOFINP.QRP – Delimited with a semi colon to allow sending to a File in Text Format and then saved in Excel for Audits and Reports. can list (or delete paid). Borrower Financial Transactions records – lists the borrower/s and line-by-line details of their transactions. Designed to be sent to a File
- &BORFIN.QRP – Borrower Financial Transactions: can list (or delete paid) Borrower Financial Transactions records – lists the borrower/s and line-by-line details of their transactions
- &BORFINO.QRP – Borrower Owing (Summary): can list (or delete paid) Borrower Financial Transactions records – lists the borrower/s and a summary of the amounts paid/owing/remaining
- &BORFINP.QRP – Borrower Financial Transactions (Purge): can list (or delete paid) Borrower Financial Transactions records – lists details of the individual transactions (can be used to mark and delete double-entry transactions)
- &BFINSU.QRP – Borrower Financial Transactions (Summary): can delete paid Borrower Financial Transactions records – produces a count of the transactions deleted by type. This may not give enough details to satisfy an audit
- &XBOFINP.QRP - Borrower Financial Transactions (Purge): Has delimiters of semi colon so can be sent as a list to excel (or delete paid) Borrower Financial Transactions records – lists details of the individual transactions (can be used to mark and delete double-entry transactions) -
These reports can be either printed or sent to file for record purposes.
Load the Template (if required)
- Launch the Amlib client
- Go to Main > Reports > RepAddNew – the Report Files screen will display
- Select Report Entity = RepBorrower
- Click the F1 New button – the Borrower – New Report File screen will display:

- Enter the following details:
- Description – for example: Borrower Financial Purge to Excel
- Template = &xborfinp.qrp (or alternatively &BORFIN.QRP, &BORFINO.QRP, &BORFINP.QRP or &BFINSU.QRP)
- Choose Type = Borrower (purge) Financial
- Update Entity (Y/N) = Y
- Click the F3 Update button when complete
- Select F3 Save on the Report Files Window for the Borrower Entity
- The template is loaded and can now be used in a report.
Note: You should locate these templates via Template name rather than Description, as these are multi-function templates and the Description may refer to the alternate functionality.
Example: &xbofinp.qrp – after being accessed and formatted in Excel

Example of Listing: (&BORFINP.QRP)

1. Your report will show up in “Printed” when it is complete
Example of Summary: (&BFINSU.QRP)

Sending a Text File to Excel
A number of report templates have been specifically set up to be exported and used in MS Excel. For example &xbofinp.qrp to keep an audit of deleted financial records
Create the Report
There are several Excel report templates available which can be used to save to a file.
In this example, we are going to use the &XSTKCSV.QRP template in the Reports > RepStockitem module:
- Go to Main > Reports > RepStockitem – the Stockitem Reports screen will open
- Click the F1 New button and select the &XSTKCSV.QRP template
- Type in an appropriate Description and click the F3 Save button
- Enter an appropriate F7 Where search – for example: Title LIKE Harry Potter
- F9 Order the Report – for example: Title | ASC
- Select Application > RepStartSchedule – ensure that Save to File is ticked and click on the OK button

- Click the F6 Print button – change the To: option to File and click the OK button

- A Report – Save As dialogue box will open:
- To save it for a Word document, leave the Save as type: as Rich Text Format (RTF)
- To be able to open it in Excel, change the Save as type: to Text Document

- You can check the progress of your report in Reports > RepPrintProgress
- If you’ve saved the report to open in Excel (Text Document) then you will need to follow these steps so it is displayed correctly:
- Open Microsoft Excel
- Use File > Open to open the text file you’ve saved – ensure that the Files of type: = All Files (*.*)
- The Text Import Wizard will open

- Excel will recognise your file as Delimited, so click the Next button
- Delimiters: select Semicolon (;) in the Other box (it is possible to use both if you don’t know which one the report is using but this may cause cell contents to be misaligned – so check carefully!)
- Click the Next button and then the Finish button

- Your data will be transferred into the Excel sheet and you can now use the formatting tools to customise it:
Creating a Summary Financial Report and Clearing the Financials
Warning: this gives no details of the deleted transactions which may not be approved by auditors
- Go to Main > Reports > RepBorrower – the Borrower Reports screen will display
- Highlight the Report that was run earlier to get the listing
- Click the F2 Modify button – the Select Report Format screen will display
- Highlight the Borrower Summary Financial report template– &BFINSU.QRP (Borrower Financial Transactions Summary)
- Click the OK button
- Ensure the Update Entity (Y/N) column is set to Y
- Click the F3 Save button
- Click the F6 Print button – the Print screen will display
- Change the To setting to File (this will enable the report to be saved as file, rather than printed)
- Click the OK button – the Report – Save As screen will display
- Enter the File name (for example: Borrower Financial Deletions 2011) and browse to the destination location

- Click the Save button
Checking the Supervisor Settings
These reports will perform differently depending on the Supervisor parameter:
- Main > Supervisor > Installation > System tab: Use Double entry Accounting
These instructions are for double-entry accounting (=Y).

Note: The number of transactions that are automatically retained is NOT determined by the following setting:
- Main > Supervisor > Installation > Circulation tab: Keep the last ### history records
It is purely set by the Date in the F10 More parameters of the report and also checks the to ensure that the Borrower does NOT have a Status of Debt Collection, amount owing is $0.00 which become marked for deletion with a Reference Number
Save the Template
- It is possible to customise any of the above templates to add/delete fields.
- Save the customised template into the Amlib/Reports folder on the Amlib server. This will make the template available for use for all users. Alternatively, you may save it into a local folder on your PC – but please be aware, that the template (once loaded) will only be available for use on that PC.
- Ensure that the template is saved with a name that clearly identifies it as a Purge Financial template – for example: Xborfinp.QRP
Load the Template
- Launch the Amlib client
- Go to Main > Reports > RepAddNew
- The Report Files window will open – ensure that the Report Entity matches that in the table above
- Click the F1 New button
- Type in a Description – for example: Borrower Purge Customised
- Browse to the Amlib/Reports folder on your Amlib Server and locate the template to be loaded (if the template has been loaded onto your PC – then navigate to the local folder)
- Click the Open button
- Select the appropriate Choose Type – Borrower (purge) Financial
- You can leave Default Stats Code blank
- Update Entity (Y/N) = Y
- Click the F3 Update button
- Close out of the Report Files window

The template is now loaded and available for use in a Report.