Overdue letter reports
Overview
It is possible to create and run overdue letters via the Amlib system.
Most overdue letter reports require the loading of a customised overdue letter template (based on the &ODLET.QRP template). The following guide takes you through the entire process for loading the customised template*, creating a new report and running the report.
Overdue Report templates
- &ODLET.QRP – Standard overdue letter
- &ODUNIVC.QRP – Very overdue report with invoice
- &ODLET1C.QRP – Overdue letter arranged by Borrower classes
- &ODLET1G.QRP – Overdue letters arranged by Borrower groups
- &ODLSTC.QRP – Overdue List by Class with no page break in between classes
- &ODLSTG.QRP – Overdue List by Group with no page break in between groups
- &ODLSTOC.QRP – Overdue List by Class with a page break between the classes
- &ODLSTOG.QRP – Overdue List by Group with page break in between groups
- &ODSLPC.QRP – Overdue slip with cost by Class
- &ODSLPG.QRP – Overdue slip with cost by Group
- &ODSTAFF.QRP – Overdue slips for staff
Save the template
- Save the customised template into the Amlib/Reports folder on the Amlib server. This will make the template available for use for all users. Alternatively, you may save it into a local folder on your PC – but please be aware, that the template (once loaded) will only be available for use on that PC.
- Ensure that the template is saved with a name that clearly identifies it as a customised overdue letter template – for example: AAODLET.QRP
Load the template
- Launch the Amlib client.
- Go to Main > Reports > RepAddNew. The Report Files window will display.
- From the Report Entity dropdown, select Circulation.
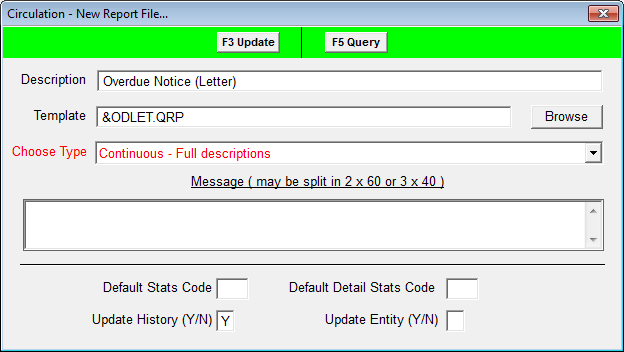
- Click the F1 New button. The Circulation - New Report File screen will display.
- Enter a Description – for example: Overdue Letter.
- Browse to the Amlib/Reports folder on your Amlib server and locate the template to be loaded (if the template has been loaded onto your PC – then navigate to the local folder).
- Click the Open button.
- Choose Type = Continuous – Full descriptions.
- You can leave Default Stats Code and Default Detail Stats Code blank.
- Update History (Y/N) = Y.
- Update Entity (Y/N) = N.
- Click the F3 Update button.
- Close out of the Report Files window.
The template is now loaded and available for use in a Report.
Create the report
- Go to Main > Reports > RepCirculation. The Circulation Reports screen will display.
- Click the F1 New button. The Select Report Format screen will display:
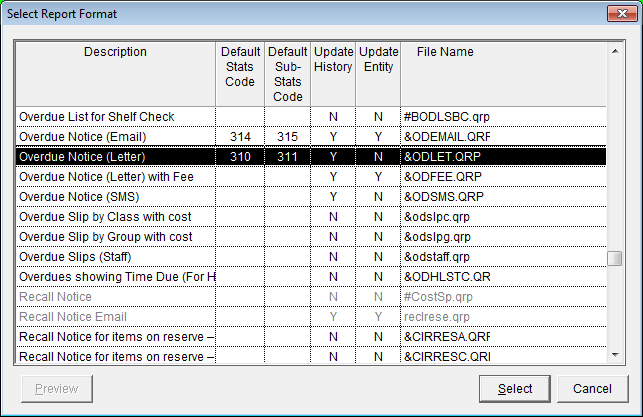
- Highlight Overdue Letter (wording may differ – it will be using the &ODLET.QRP or customised print template) and click the Select button.

- Enter a Report Description – for example: 1st Overdue Notice (Letter).
- If you would like the borrower record to retain a record of any notice sent, then ensure that Create Hist (Y/N) = Y.
- If there are replacement costs involved, ensure that the Create Acct (Y/N) = Y.
- Click the F3 Save button.

Where statement
- Highlight the report in the list and click on the F7 Where button – the Circulation Reports – Where screen will display:
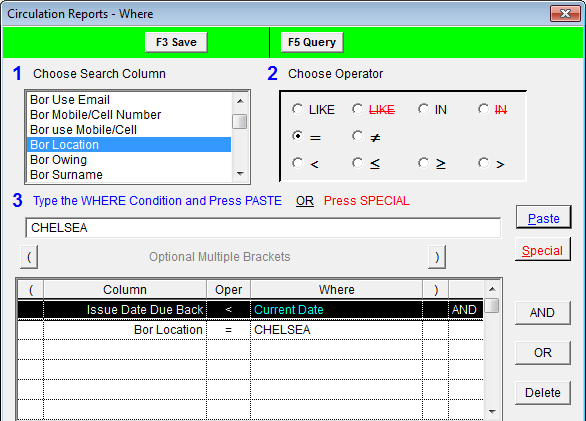
- The Where statement must include the following settings:
- Issue Date Back < Current Date (via Special button) – this can be altered to suit your particular needs.
- Additionally, you may wish to limit by Borrower Location, Type, Group, and Class.
- Click on the F3 Save button when complete.
Order
- Select the report from the list and click on the F9 Order button – the Circulation Reports – Order By screen will display:
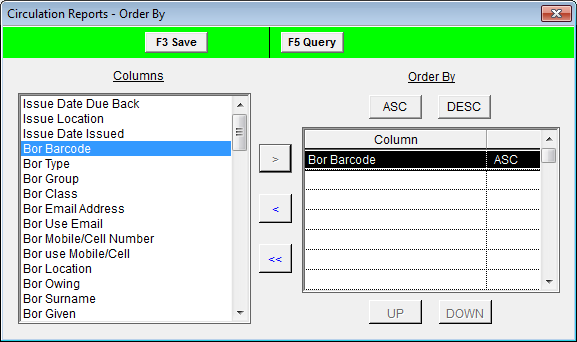
- Use the arrow keys to select fields to Order By – for example: Bor Barcode.
- Click on the F3 Save button when complete.
View report
When your report is set up with the template, Where statement, and order, you can then preview the report as follows:
- Highlight the report and click the F8 View button – the Select File for View prompt will display:
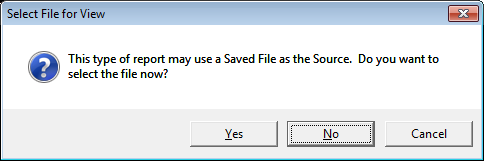
- This type of report may use a Saved File as the Source (rather than the entire database). If you would like this report to use just a Saved File, click the Yes button, otherwise click the No button (generally users select the No button)
- The report will display in the Report – View screen:
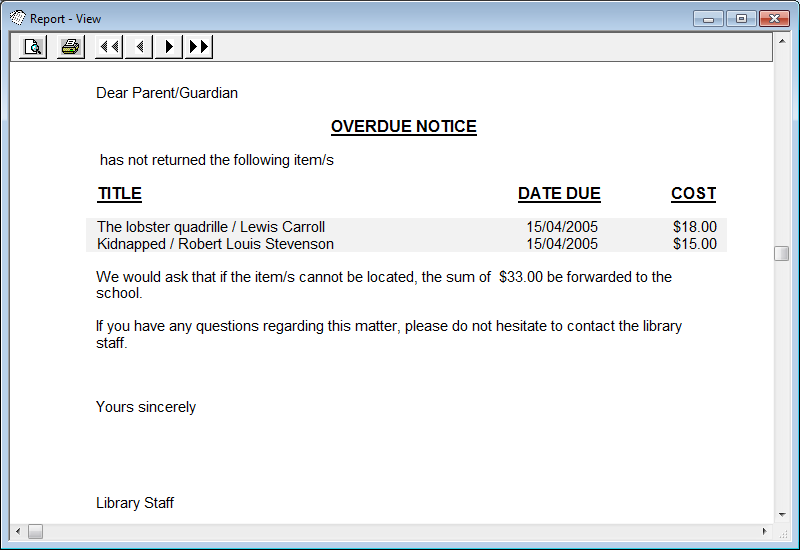
- If you wish to print a hardcopy, click on the print icon.
Print report (via Scheduler)
If you only want to print a report then the quickest method is to use F8 View and print from the Report – View window (see above).
Using the Scheduler (via the F6 Print button) has several benefits over running reports via the F8 View button: It allows you to schedule regularly run reports so that staff do not have to do it manually each time, and it allows for further functions as part of the report such as updating Borrower/Stockitem history, updating the Reservation Status and adding report information to your statistics. Email and SMS reports MUST be run via the Scheduler.
This guide will take you through setting up a report to use RepStartSchedule.
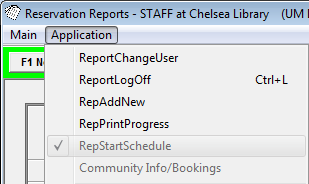
Start the Scheduler
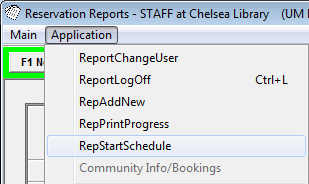
- From the Report screen, select Application > RepStartSchedule.
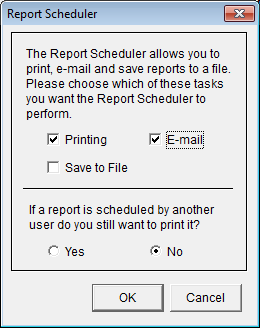
- The Report Scheduler screen will then display.
- Select your printing options: Ensure Printing, E-mail, and/or Save to File are ticked (you can tick all three if you intend on printing up multiple reports using multiple formats during a session).
- Also decide If a report is scheduled by another user do you still want to print it? = Yes/No.
- Click the OK button.
- After clicking OK, if you go back into the Application menu you will see that RepStartSchedule is now greyed out with a tick next to it – this indicates that the Scheduler is now running.
Note: If you need to restart the scheduler at any point, you will need to log out of all Report screens (Ctrl + L) and start at the beginning of these instructions.
Schedule the report
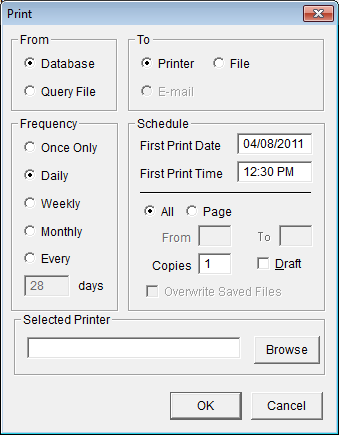
- With your report highlighted, select the F6 Print button. The Print dialogue box will open.
- Select from the following options:
- From:
- Database (to search the entire database)
- To:
- Printer (to generate print reports)
- E-mail (to generate email reports)
- File (to save a report as a file)
- Frequency:
- Once Only (if this is the only time you’re going to print this report
- Daily (if you plan to send it every day)
- Weekly (if this is a once a week item)
- Monthly (if this is to be printed every calendar month)
- Every ___ days (if you want to set a specific schedule
- Schedule:
- First Print Date (the day you want this report to begin its schedule)
- First Print Time (specifies the exact minutes the report will run)
- Selected Printer:
- You can specify any active printer on the network to print to – including virtual printer drivers such as a third party software that allows you to print to PDF (For example: CutePDF Writer)
- You can specify any active printer on the network to print to – including virtual printer drivers such as a third party software that allows you to print to PDF (For example: CutePDF Writer)
- From:
- Once you have selected all of your settings, click the OK button.
Check print progress
- You can check the progress of your reports at any time by going into Main > Reports > RepPrintProgress.
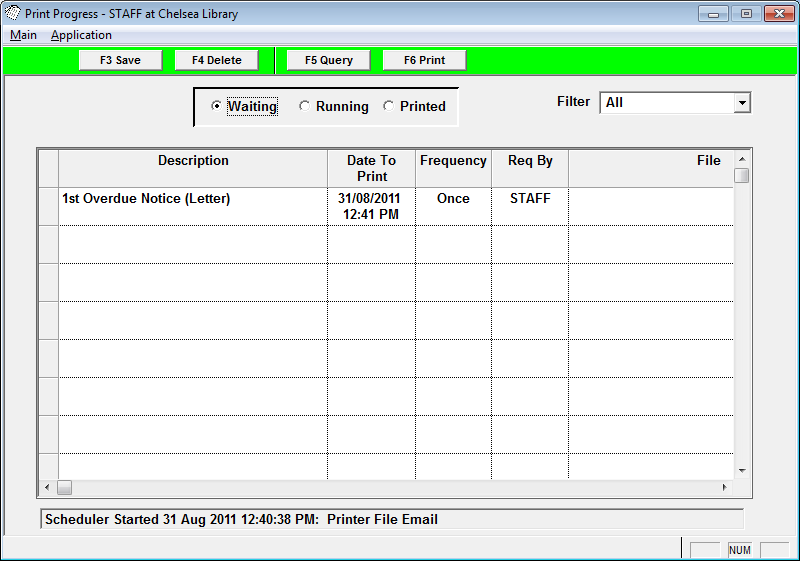
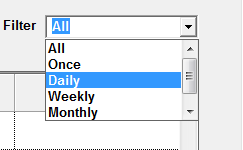
- If your library uses the scheduler for a lot of reports, you can select a frequency type from the Filter drop-down menu at the top.
- You can also click through the three tab options at the top to see the ones that are Waiting, Running, or have already been Printed.
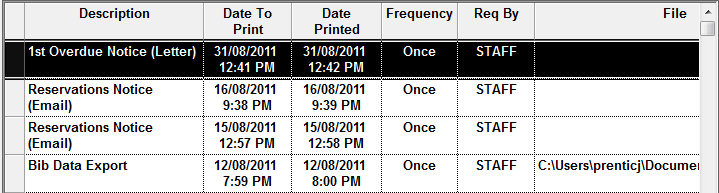
- Your report will show up in “Printed” when it is complete.
Additional items
When scheduling reports, you must remember:
- The scheduler must be started prior to the time that reports are scheduled to run – you may have a procedure to start the scheduler first thing in the morning. Schedule your reports a bit later (e.g. if you start at 8:30am, then schedule the first report for 9:30am) so that if there are any unforeseen delays, the print schedule will still go as normal.
- Schedule reports with time to spare. Allow time for Amlib to be started and the scheduler to be started. Allow time between scheduled reports in case you need time to refill the printer, or something else happens.
- Check and stock the printer before the reports are due to run. Scheduling reports that print to file or send e-mails are somewhat easier to manage, so you may want to try the scheduling with these first. If you are scheduling printed reports, ensure that the printer is full of paper, not low on toner and if possible have someone near the printer when the reports are due to run, so they can fix any paper jams quickly.
- Check the ‘Waiting’ queue. Old reports that have not run can jam up the print queue and stop your scheduled reports from running. It is good practice when starting the scheduler for the day to check RepPrintProgress and delete out any old print jobs from the “Waiting” queue.
- Check and maintain your “Printed” queue. A large amount of print jobs in your printed queue can stop your reports from running. While there is ample space in this area to store information on past print jobs, the space in not unlimited. If the print jobs are not deleted on a regular basis (perhaps quarterly or every few months) this area will eventually become too full to allow the reports to run. It is fine to keep some print jobs in the “Printed” area of RepPrintProgress. Perhaps keep the last few days or few weeks and delete the rest. How many reports and how often you print will determine how far back you can keep this information.
- If scheduled reports do not run for some reason (there is a paper jam or the scheduler is not started, etc.) they will sit in the “Waiting” queue in RepPrintProgress and stop other reports from printing. If there is a delay, check the “Waiting” queue. If the reports due to run have a date/time next to them that has already passed, these will need to be deleted and then manually printed via the ‘print’ button.
- Check before your re-run reports. If there was a delay or paper jam and you have to run a report for a second time, check your settings before running it. If the report creates accounts for very overdue items, running it a second time will generate a second charge – it is best to run manually via F8 View and then print from the view screen. Do the same if you are adding history to records or recording statistics. Reservations will require a different procedure as they will already have their status changed to “Printed”.