Set up Email and Troubleshooting
Overview
There are various activities within Amlib that require email functionality – chief amongst these being the ability to run reports that generate emails to clients.
Whilst the set-up within Amlib is relatively simple, it can be somewhat complicated by the fact that it is sometimes necessary to unblock various ports and firewalls.
The first part of this guide goes through the setup process and the second examines various troubleshooting tips.
Set up
Supervisor parameters
To begin, some settings need to be set in the Supervisor module (this need only be done once):
- Launch the Amlib client.
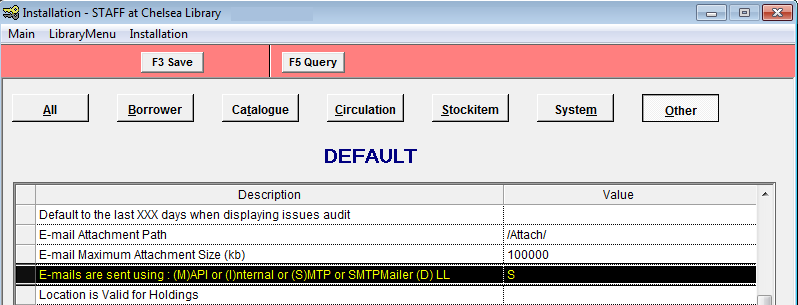
- Go to Main > Supervisor > Installation. The Default Installation screen will open.
- Select the Other tab.
- Scroll down and set E-mails are sent using the following method: (M)API or (I)nternal or (S)MTP or SMPTMailer(D) LL to S, I , M or D.
Generally (S) SMTP is recommended, especially as it is simple and it has advantages over the others. It also means that the email client does not need to be open on the PC running the notices and allows greater flexibility with regard to setting up “from” and BCC/CC parameters.
Then the following parameters should also be set (a full table is included below):- SMTP Blind Carbon Copy e-mail address: you can specify the BCC address to send a copy of all notices (so that you can verify that they have been sent).
- SMTP sender e-mail address: the email address to display on the notice sent to the borrower (For example: enquiries@amlib.com.au, it can be the same as the BCC address).
- SMTP Server name: the address of the SMTP mail server being used. This might be a server address or an IP address.
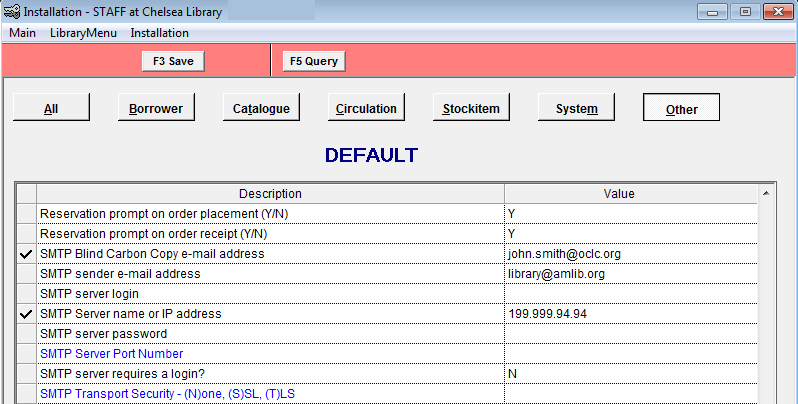
- Click the F3 Save button.
- Once complete, you must exit and reopen the Amlib client to allow the settings to take effect.
The complete set of parameters to consider:
| description | explanation | example |
|---|---|---|
| E-mails are sent using : (M)API or (I)nternal OR (S)MTP or SMTPMailer (D) LL |
Generally (S) SMTP is recommended, especially if the organisation is not using a Microsoft Exchange Server. It also means that the email client does not need to be open on the PC running the notices AND can display the “from” name from one of the parameters below rather than the email address from the email client. | Set to S, I or M (S is the default one for internal mail – does not use Transport Security) OR If using a SMTPMailer service such as Gmial.com or Outlook.com set this to D |
| SMTP Blind Copy e-mail address | Optional: If using the SMTP for emails. Enter only if copies of the email are to sent to a chosen email address – for example: Testing purposes | library@amlib.com |
| SMTP sender e-mail address | Optional: If using the SMTP for emails, enter the Address you wish to indicate as the sender | enquiries@amlib.com.au |
| SMTP server login | Optional: From your Systems Administrator if required – required by systems using encryption | For Gmail this is: smpt.gmail.com If not using a SMTPMailer service leave blank |
| SMTP Server name or IP address | If using the SMTP for emails, enter the Server Name or IP Address of the Server installed with the e-mail communication protocol, responsible for receiving and forwarding email messages | ServerName – for example: server.amlib.com.au or your IP address such as 199..199.94.94 ( this needs to be set for all email setups) |
| SMTP server password | Optional: From your systems administrator if required – required by systems using encryption | You will need to set this if using a SMTPMailer service otherwise leave blank |
| SMTP Server Port Number | Only needs to be set for those using SMTP Transport Security or if you have selected D above | (S)SL = port 465 or if using (T)LS = Port 587 |
| SMTP server requires a login? | If Y, supply a SMTP server logon and password If N, leave SMTP server logon and password blank |
Y/N – this will be Y if you have selected D above and use a SMTPMailer service otherwise set this to N |
| SMTP Transport Security - (N)one, (S)SL, (T)LS | The use of the Transport Layer Security (TLS) protocol over SMTP offers certificate-based authentication and helps provide security-enhanced data transfers by using encryption – this is required by SMTPMailer services. | If you have selected D above set this to either T(LS) or S(SL) for an encrypted connection |
The above tasks create Sender and BCC for all emails generated by the system. However, it is possible to set up separate SMTP parameters (Sender and CC) for individual locations, modules and reports.
Set up individual email systems by location
- In any Installation screen module, select Installation > Choose Location and choose a Location.
- Repeats steps 2-5 above. If you would like to use the Default settings, then the relevant fields for each location should be left blank.
- Once complete, you must exit and reopen the Amlib client to allow the settings to take effect.
Set up individual email locations, modules, and reports
We recommend leaving the email set-up for particular locations until after initial testing has been completed. Once the initial testing has been done, then:
- In any Supervisor module, select Library Menu > LocRepSMTP. The SMTP Parameters by Location table will open.
- Select the F1 New or F2 Insert button.
- Using the drop-down boxes available in each column, select the Location, Report Screen, and Report Type.
- Then type in the individual Sender’s Email and Carbon Copy Email addresses.
- Click the F3 Save button when complete.
- Once complete, you must exit and reopen the Amlib client to allow the settings to take effect.
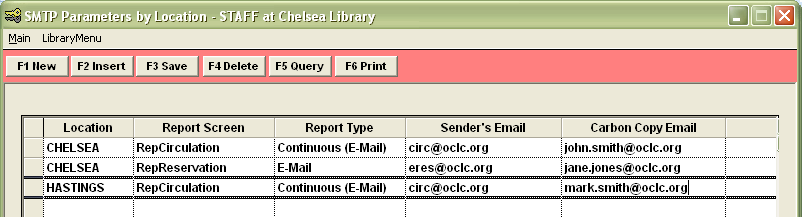
Note: It is not possible to alter a pre-existing entry in the SMTP Parameters by Location table – entries must be deleted (using F4 Delete) and then re-entered.
Borrower settings
For borrowers to receive their overdue notices via email, the borrower record will need to have the following:
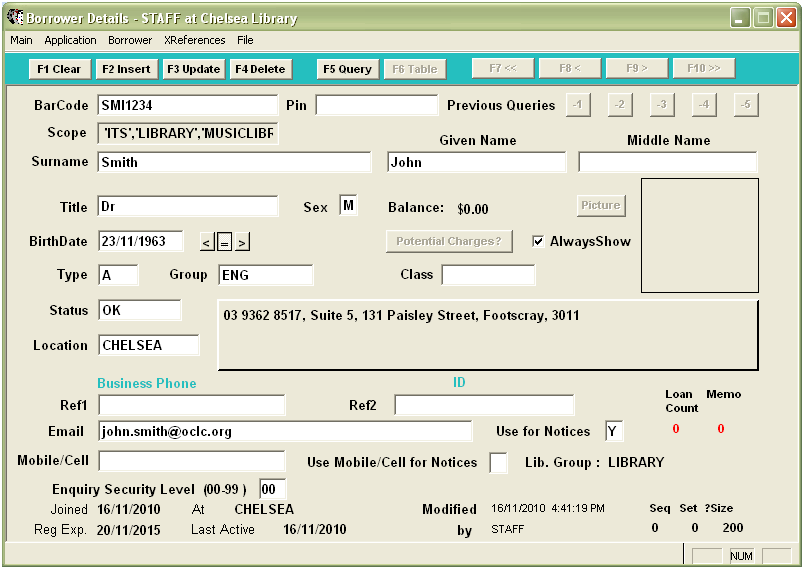
- Email address – for example: john.smith@oclc.org
- Use for Notices = Y (for Yes)

Report settings
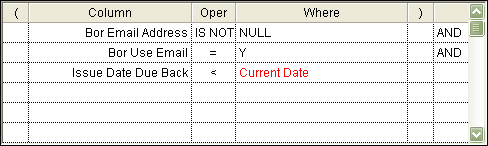
When creating an Overdue or Reservation email report, the following two settings must be included in the F7 Where parameters:
- Borrower Email Address NOT NULL (Paste without a value in 3 to get a null value)
- Bor Use Email = Y
Troubleshooting
Amlib
Once the email has been setup in Amlib, you will sometimes find that you are unable to email out of the system. This can be due to a variety of reasons, including Amlib configuration, blocked email, firewalls, blocked ports, email client server settings, etc. The following section will help you with troubleshooting the main reasons.
Supervisor settings
The Supervisor settings applied above should be rechecked with your IT Support team:
- Ensure that the SMTP Server name or IP address have been correctly entered.
- Ensure that no SMTP server login and SMTP server password is required.
- Is the SMTP server requires a login? field correctly set?
- Have you checked to make sure that each Location has not accidently been configured with a different email setup? – See: Setup individual email systems by location above. If you want the Default settings to be in effect for all locations, then the relevant fields for each location should be left blank.
- Run the Amlib Test Email Utility – See: Appendix A: Amlib test email utility.
Borrower settings
For borrowers to receive their overdue notices via email, the borrower record will need to have the following:
- Email address
- Use for Notices = Y (for Yes)

Run reports
Emails generated by the Amlib system need to sent using the Reports Scheduler (via F6 Print). Things to check include:
- Does the F7 Where statement check for NULL email values?
- Did you choose an email-capable report template? – for example: the Overdue Email Notices use the &ODEMAIL.QRP template
- Was the report template Choose Type set for email – for example: the &ODEMAIL template has a Choose Type = Continuous – Email
- Did you start Report Scheduler beforehand?
- Was the E-mail option selected on the Report Scheduler pane when you started the Scheduler?
- Did you “print” the report via F6 Print?
- When printing the report (via F6 Print), was the To = Email option selected on the Print screen?
Email address validation rules
When email reports are being sent a certain amount of validation is going on. Email addresses are rejected if illegal characters are found.
If the email address is invalid and if the barcode of the patron can be found by the process, the Borrower ID is written to a saved Borrower File, which can be checked later.
If the barcode of the patron cannot be found, no file can be created but an error message is written to the amdberror.log in the Amlib folder.
If the SMTP protocol is being used then any errors encountered will be logged. Neither MAPI nor the internal method support error reporting in an accessible way.
- Must be at least 5 characters long. Shortest theoretical address is a@b.c
- Must contain an “@”
- Must have one or more characters before the “@”
- Must contain a “.”
- No more than 4 characters after the last “.”
- No “_” after the “@”
- Only one “@”
- No invalid chars – the following ranges are invalid:
- Less than ASCII 48 (except 45 and 46)
- ASCII 57 to 65 (except 64)
- ASCII 90 to ASCII 97 (except 95)
- ASCII > 122
Note: 45 = "-", 46 = ".", 64 = "@" and 95 = "_"
The formatting of the email is checked against these rules, but the address may it still be invalid.
Error messages
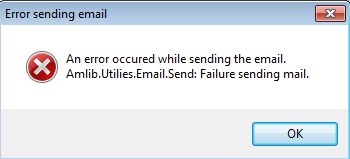
If emailing out of Amlib proves unsuccessful, then it is a good idea to examine the Amlib error log (amdberror.log). Any unsuccessful email should generate an entry in the error log.
- The amdberror.log file can be located in the /Amlib folder on your Amlib server
- Open up the file in Notepad – look for any entry headed REPORTS (as most email functions use the Reports module)
- If there is a Socket Connect failure, then this is usually indicative that either the server details have been entered incorrectly or the outgoing email is being blocked in some way – the latter will require troubleshooting of the security surrounding your Amlib system (Amlib has been correctly set-up but the outgoing emails are being blocked).
- Users should run the Amlib test email facility to check the validity of their email server settings

It is also possible for other types of error messages to be generated when an email report is scheduled to run.
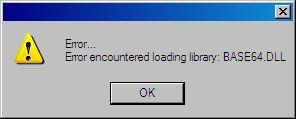
- If a BASE64.DLL error occurs during “printing” of emails, then this indicates a missing Amlib Base64.DLL file in the /Amlib folder on the Amlib server. Contact Amlib Support for more information.
Blocked emails
Once the email has been setup in Amlib, you will sometimes find that you are unable to email out of the system. This is often due to the fact that the emails from Amlib are being relayed via your email client. Unauthenticated mass emails of this type can often be perceived as junk mail or spam and blocked.
Note: It is important to remember that emails sent out of the Amlib client are being generated by the Reports module on a specific machine. Emails out of Amlib are generally the result of a report being scheduled, so that when it runs it then generates an email notice rather than a print out. Whilst some scheduled reports are set up (by users) to run on the Amlib server, most are set up and scheduled from a client machine. Therefore, any efforts to address issues with regard to blocked emails must be directed toward the machine on which the report is scheduled to run.
Port settings/Firewalls
A firewall prevents computers on a network from communicating directly with external computer systems. A firewall typically consists of a computer that acts as a barrier through which all information passing between the networks and the external systems must travel. The firewall software analyses information passing between the two and rejects it if it does not conform to pre-configured rules.
It does this through the use of ports. Ports are basically logical connections (or sockets) between two computing devices (for example: a PC and a printer) or network devices used for sharing data. Port numbers range from 1 to 65535 and some port numbers are assigned to specific tasks, such as port 25 for transferring SMTP data.
Port 21 is for FTP, port 25 is for SMTP, port 80 is for HTTP, port 110 is for POP3, port 23 is for Telnet, etc. There are many ports that, if left open, can be considered a high security risk. Many viruses spread to different computers because of open ports.
Amlib uses port 25 for SMTP emailing out of the client:
- Contact your IT support team to ensure that the TCP/IP port 25 (if using SMTP) is open for the PC running the Amlib Reports module (Reports.exe)
- Users of Windows Server 2003, Windows Server 2003 R2, Windows Server 2003 with SP1, Windows Server 2003 with SP2 may like to consult the following site:
Anti-virus settings
If you are having trouble with email reports not being sent, it is possible that your anti-virus agent is blocking access to your email server on port 25 (SMTP) as it believes the email is a mass mail. Therefore you will have to add Report.exe (the Amlib Reports module application) to the anti-virus “safe list”.
In addition to the Amlib server, individual anti-virus agents on a client machine (for example: McAfee OAS) can block outgoing Amlib emails as “spam”.
The following anti-viral agents have information regarding changes to the settings to allow Amlib to email out of the system:
Email client server settings
A common source of blocked emails is the actual email client itself.
When the email report is run, the client PC connects to your SMTP email server (for example Exchange 2003) and the email server sends the email (relays it). SMTP mail servers need to be set up to allow email messages from the client machine to be relayed (as the email being sent is not authenticated and perceived to be junk mail). This is usually done by adding an exception to allow relay rule. You will need to add each client PC (using its IP address) that run the Reports module to the exceptions list.
More information about SMTP relay blocks: http://support.microsoft.com/kb/290842
Microsoft Exchange Server 2003 settings
Appendix D: Microsoft Exchange Server 2003 Settings: Setting Relay Restrictions
Set up anonymous relaying for non-authenticated applications (including Amlib)
Microsoft Exchange Server 2007 settings
Configure the Exchange Server 2007 HUB Transport Role to Receive Internet Mail
Enable 3rd party software to send emails. It is possible to setup a Receive Connector rule on the Exchange 2007 hub transport server, where the new IP address of the machines that are running 3rd party software are manually added into the field ”receive email from remote servers that have these IP addresses:” and for permissions have Anonymous and Exchange servers selected. This rule then allows software to send emails as required (where the from address is not gathered by Active Directory automatically).
iinet email settings
Appendices
Appendix A: Amlib test email utility
A new Amlib Test Email Utility is now available to help users quickly test the validity of their email server settings. The Utility allows users to enter their email server details and then send a test message.
Note: This Amlib Test Email Utility should be installed and run locally on the client PC(s) using the Amlib client, rather than the Amlib server itself.
Install Amlib test utility
- The Amlib Test Email Utility is available from the OCLC Support website, under Amlib > Downloads and Software Updates > Utilities.
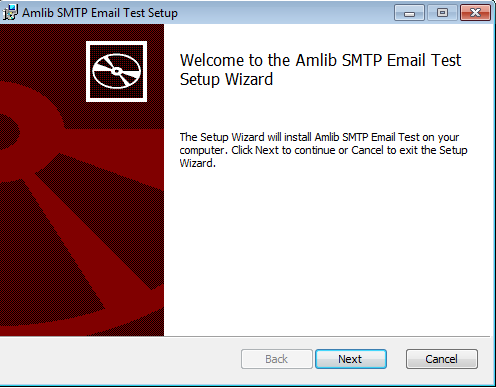
- Download the Amlib Email Test Utility (SMTPEmailTest.msi).
- Run the SMTPEmailTest.msi.
- Click Next.
- Select a Directory to Install the Amlib Test Utility - leave the default setting.
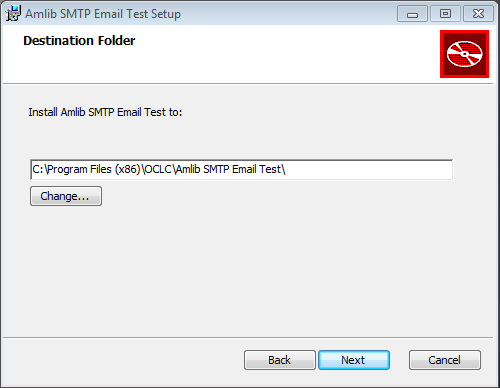
- Click Next.
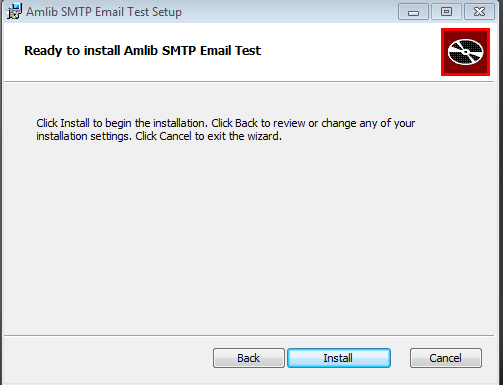
- Click Install.
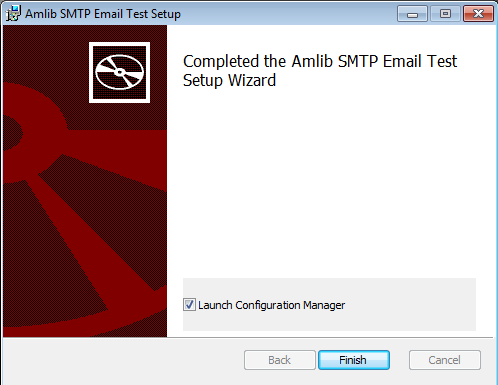
- Select Finish and ensure the Launch Configuration Manager option is ticked.
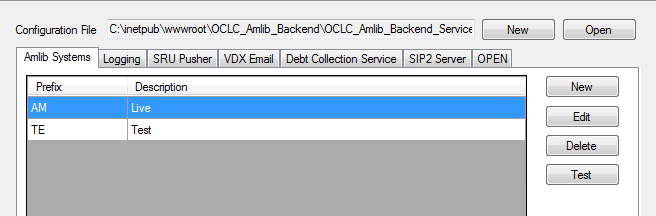
- The AM and TE databases will display as default.
Note: This configuration automatically has the AM [Live] and TE [Test] databases defined [but not set].
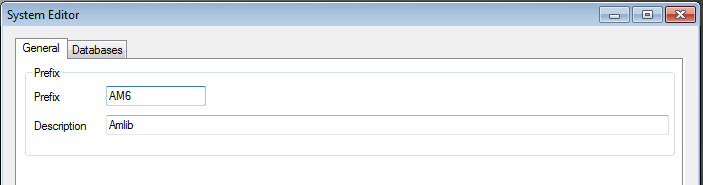
- In the Amlib Systems tab, highlight the Live or Test database connector and select the Edit button. The System Editor will open.
- If your database prefix is not ‘AM’, add a new connector by selecting the New button. On the General tab, enter the Prefix and a Description, otherwise continue with step 6.
- On the Databases tab, enter the following details:
- Choose the details for the RDBMS and OleDbProvider from the drop-down boxes.

- Enter the details for the Lib database.

- Server – Enter the name of the Server running your Amlib databases.
- Instance – Enter an Instance.
(only if required – otherwise leave as Default, an example would be SQLEXPRESS) - Port – Enter a Port number (if required – otherwise leave as 0 [for unused]).
- User – Enter the Username for the database connection.
- Password – Enter the Password for the database connection – the username and password should be the same as that the login for your other Amlib databases. SYSADM/SYSADM is the default login for most Amlib database setups.
- Select the Copy to all button to copy the details to the other database fields.

- Choose the details for the RDBMS and OleDbProvider from the drop-down boxes.
- Click the OK button. The System Editor window will close.
Testing
Once complete, the connection can be tested:
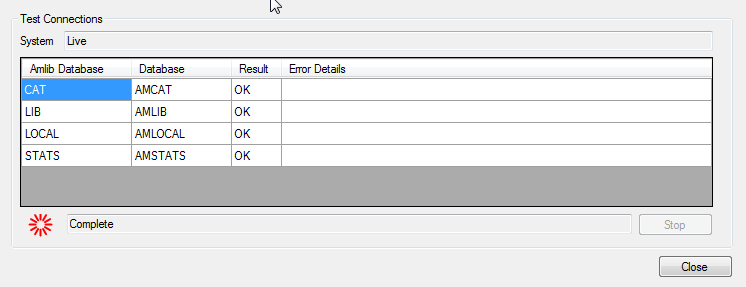
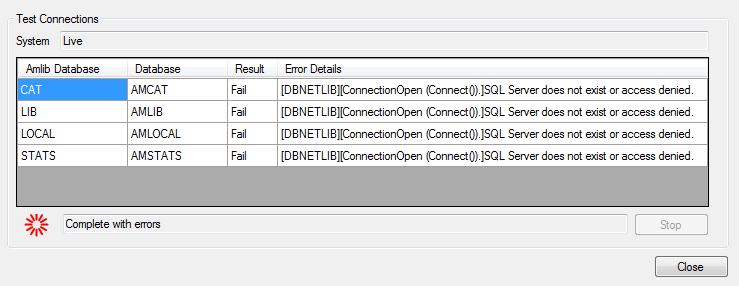
- Highlight the relevant database – for example: AM – and Select the Test button
- The Test Connections window will display with the result – if errors occur, the reason will display in the Error Details column:
- Test successful – all Results = OK:
- Test unsuccessful – all Results = Fail with Error Details shown, Use the error details to guide you and go back and check your configuration:
- Test successful – all Results = OK:
- Click the Close button to close the Test Connections screen.
- Select Exit.
Start Amlib test utility
- Open a Windows Explorer Window and browse to \Program Files (x86)\OCLC\Amlib SMTP Email Test.
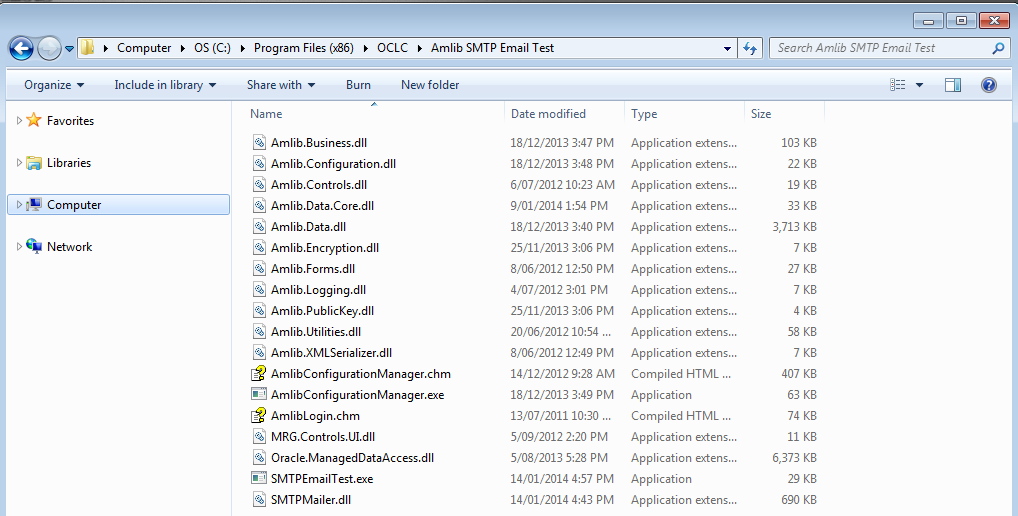
- Double-click SMTPEmailTest.exe. The SMTPEmailTest Utility window will display:

In the SMTP Server Details section:
- Click the Login button.
- Enter a valid User Name and Password (not case-sensitive).
- Select a Database. This should be the same database you use for Amlib.
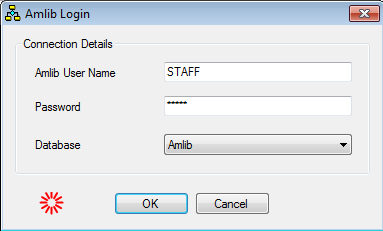
- Click the OK button. The Please select a location window will display:
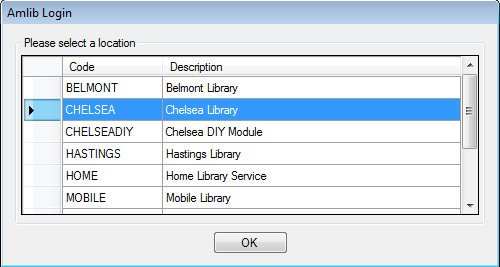
- Chose a login location and click the OK button (by default, the Location setup for your Username in the Amlib Installation setting will be highlighted).
- All the SMTP Email server setting are now extracted from the Amlib database (if they have been defined in the Amlib Installation setting:
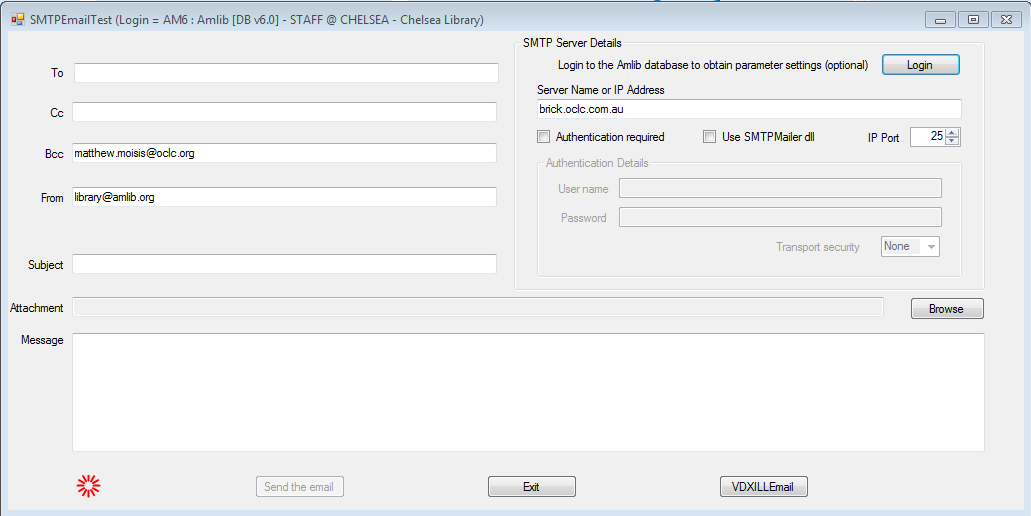
Enter the following message details:- To: Type an email address into the field to which a test email is to be sent.

- Cc: Type a carbon copy email address (optional).

- Bcc: Type a blind carbon copy email address (optional).

- From: This email address is extracted from the Amlib database therefore does not need to be altered.

- Type a Subject: into the field provided.

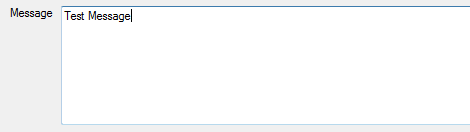
- Type a Message: in the box provided.
- To: Type an email address into the field to which a test email is to be sent.
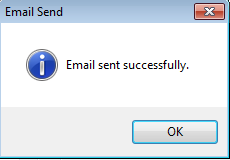
- Once all details are completed, click on the Send Email Test! Button.
- If all the details are valid, and the SMTP port (25) is not being blocked the you should see the following message:
- If the email server details are incorrect or the port is blocked, the following message will appear:
Appendix B: McAfee Anti-Virus settings
If you are having trouble with email reports not being sent, and you are using McAfee anti-virus, then it is most likely that the anti-virus agent is blocking access to your email server on port 25 (SMTP). Therefore you will have to add the Amlib Reports module to the anti-virus “safe list”.
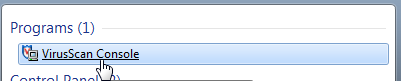
- Click the Windows start button.

- In the Search programs and files search box type Virusscan.

- Select VirusScan Console to start McAfee VirusScan Console.
- Right-click on the Access Protection task in the VirusScan Console, and click on Properties from the pop-up menu – Access Protection Properties pane will appear.
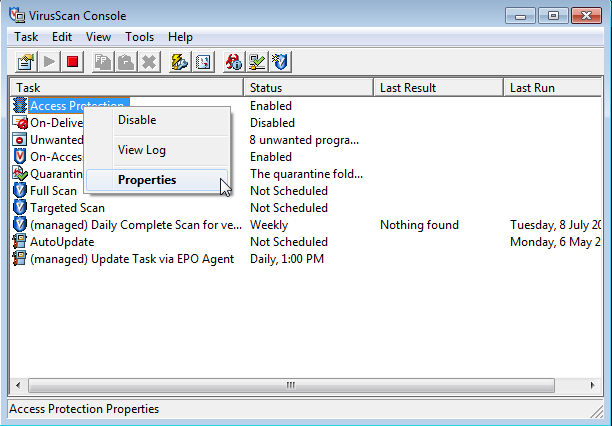
- Select Anti-virus Standard Protection from the Categories table.
- Select Prevent mass mailing worms from sending mail from the Rules column.
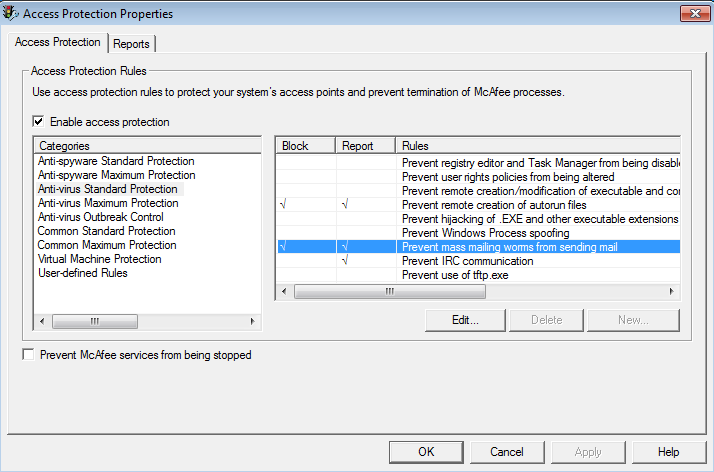
- Click on the Edit… button. The Rule Details pane will appear.
- Add the name of your Amlib Reports module executable file (Report.exe) to the end of the list in the box labeled: Processes to exclude:. Don't forget to comma separate each process, and don't remove anything which is already there.

- Click the OK buttons when complete. This will save your changes and exit McAfee.
Appendix C: Symantec EndPoint Protection (SEP) Settings
- Right-click on the EndPoint shield button (
 )in your system tray, and select Open Symantec EndPoint Protection from the pop-up menu. The Symantec EndPoint Protection pane will appear.
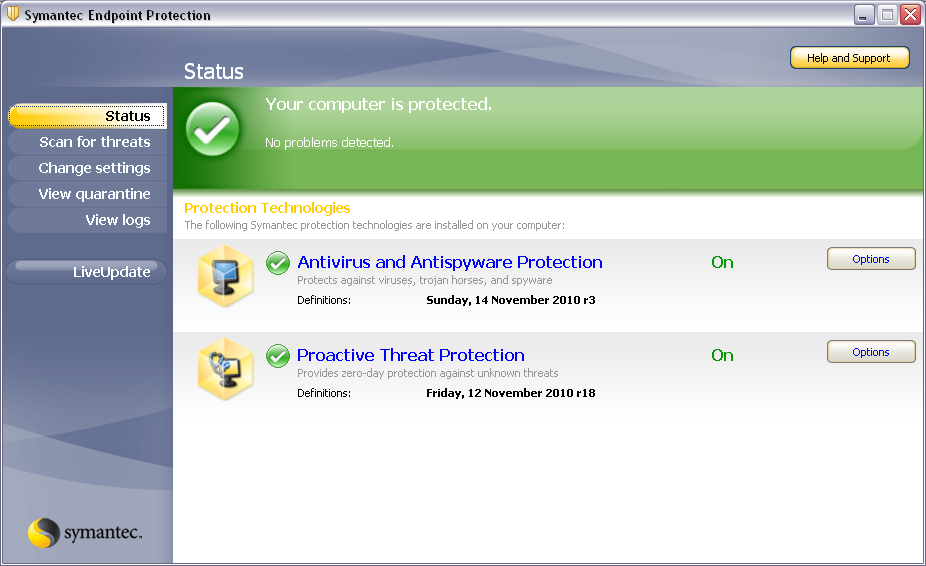
- In the sidebar, click Change settings. The Change Settings pane will appear.
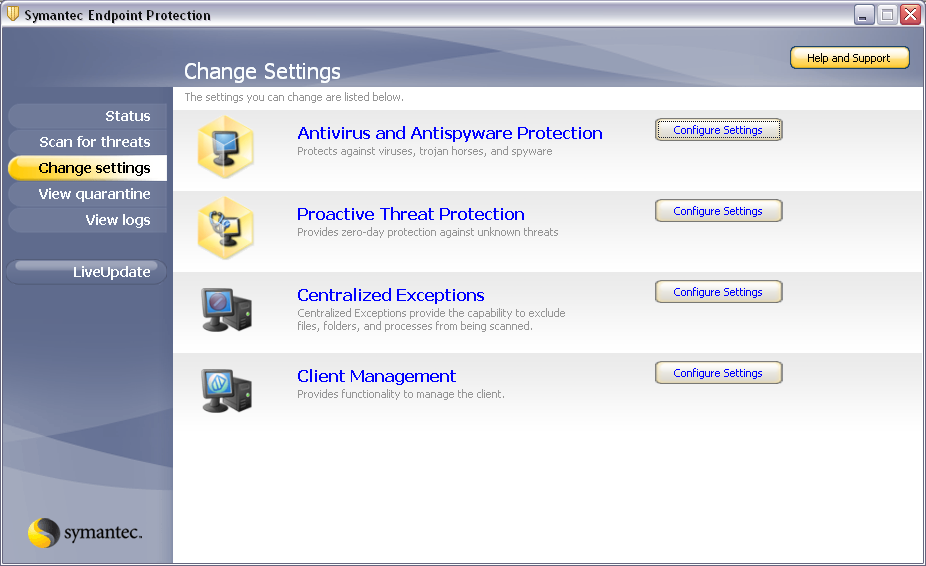
- Next to Centralized Exceptions, click the Configure Settings button. The Centralized Exceptions dialog box will open.
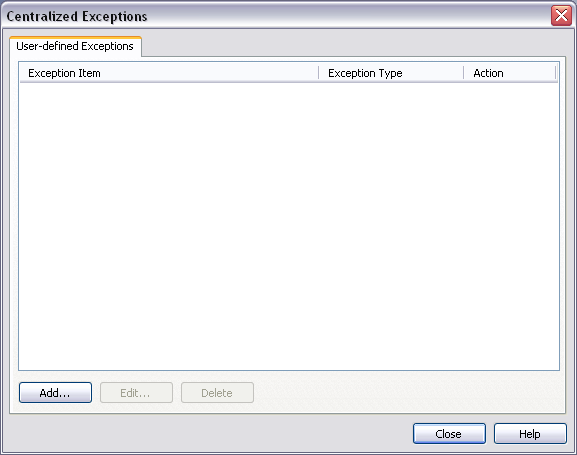
- On the User-defined Exceptions tab, click Add > Security Risk Exceptions > File. The Add File Exception dialog box will open.
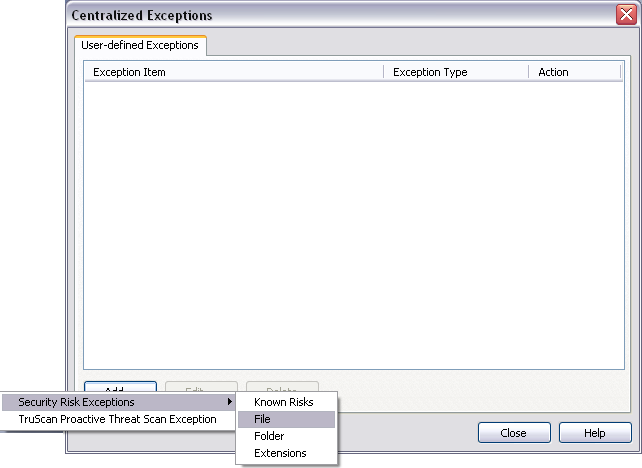
- Type in Report.exe, and then click the Add button.
- Click the OK button
- In the Centralized Exceptions dialog box, click Close button and exit SEP.
Appendix D: Microsoft Exchange Server 2003 Settings: Setting Relay Restrictions
- On the Exchange server, launch the Exchange System Manager.
- In the left-hand index, expand Administrative Groups > First Administrative Group > Servers > ServerName > Protocols > SMTP.
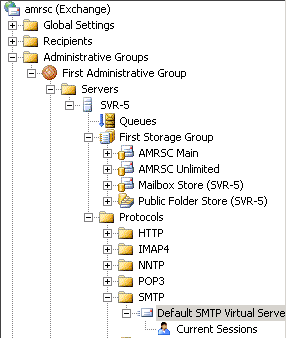
- Right-click on the Default SMTP Virtual Server and select Properties. The Default SMTP Virtual Server Properties pane will open.
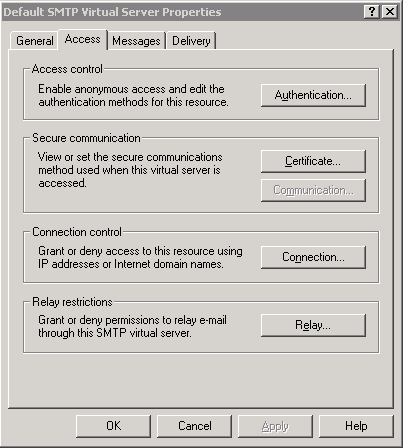
- Click on the Access tab and select the Relay... button (near the bottom). The Relay Restrictions pane will open.
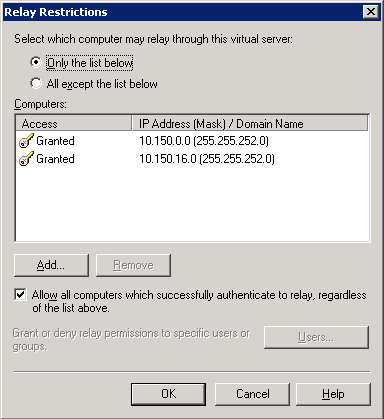
- Add the IP subnet (or single IP addresses) you want to allow relaying for.

- Click OK to save settings.
More information can be found here:
Setting Relay Restrictions:
Appendix E: iinet settings
iinet block outgoing (and incoming) unauthenticated SMTP emails on Port 25 by default to prevent spamming.
It is possible to opt out of port blocking by logging into your iinet toolbox:
- Log into your iinet toolbox.
- From the top menu, select Account Tools > port blocking.
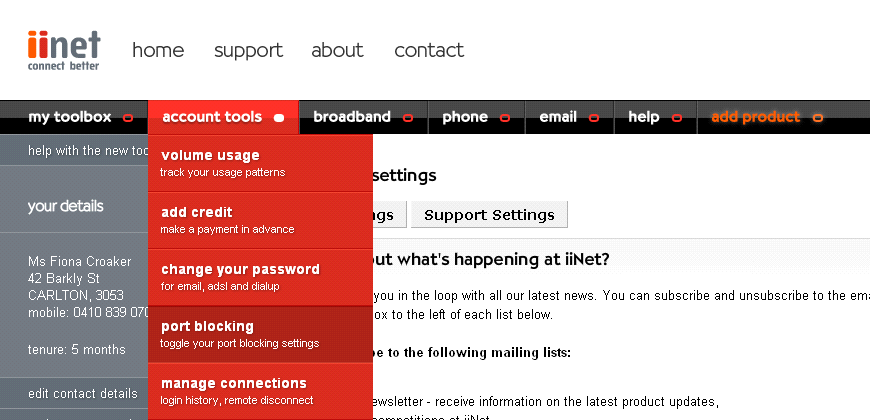
- The toggle port blocking pane will open.
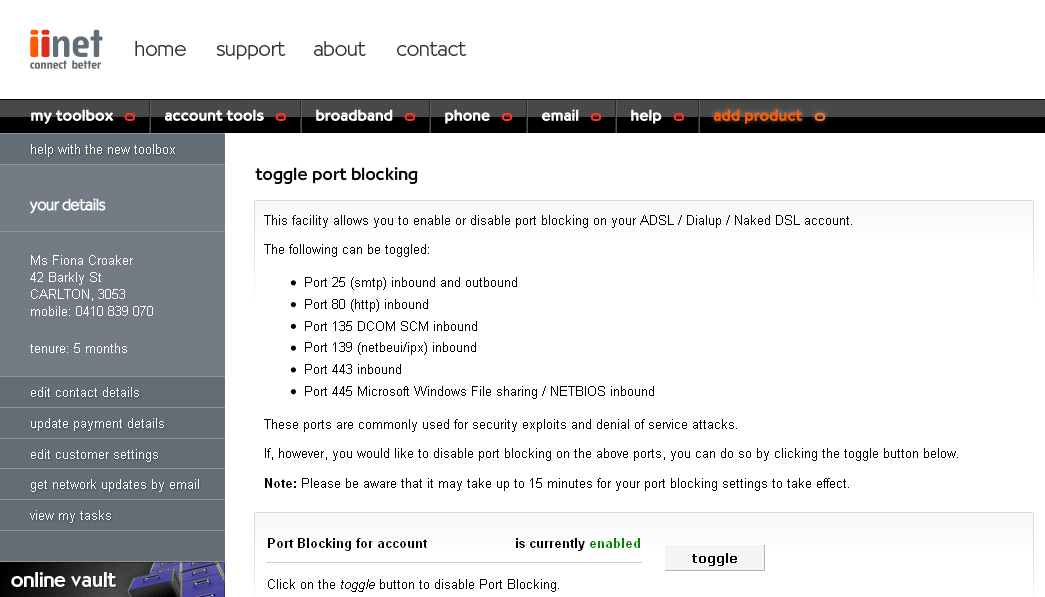
- Check that Port Blocking for account AccountName is currently enabled.
- Click the toggle button.
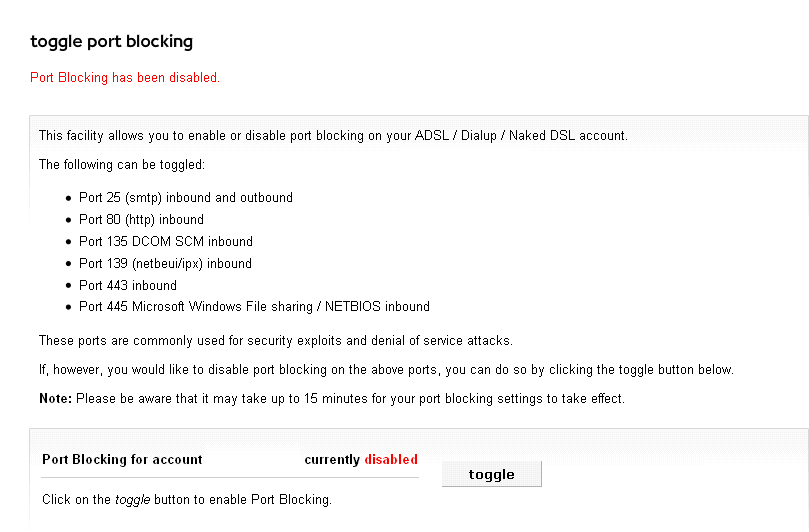
- A message (Port Blocking has been disabled) should appear toward the top of the pane and the Port Blocking for account AccountName is currently should now read disabled.
- You should automatically be disconnected and then reconnected after to change this setting. If you are not, disconnect and then reconnect manually.
- Log out of the iinet.
Your ISP setup may also be causing problems when using iinet, as you need to have an iinet IP address in order to send an email via their email servers. This is done to stop open relay servers (spammers).
For more information, iinet customers should contact their 24 hour call Centre on 13 22 58 or email support@iinet.net.au.
Explain that who you are, and that you have the Amlib LMS and that you need to enable open relaying for SMTP (port 25) to send overdue and reservation emails out of the system. If they require a particular application name, then it is: Reports.exe (the Amlib Reports module).
You can help!
This is an evolving document and we need your help to keep it up to date. If there is something that you would like to see added to the guide or you have further information which may be of benefit to our other users, then please email support-amlib@oclc.org.